Split Container
The RadSplitContainer allows you to use movable bars to divide the displayed area into resizable parts. With the RadDocking's SplitContainers you can build complex layouts like the one shown on Figure 1. Some practical examples of such layouts are Explorer-like and Outlook-like interfaces.
Figure 1: RadDocking with complex layout
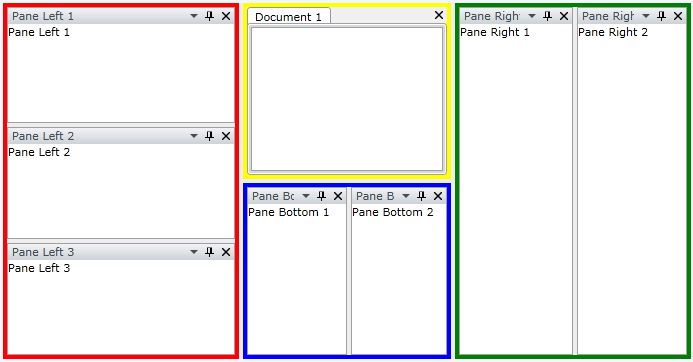
Each split container is painted in a different color.
The class that represents the split container is Telerik.Windows.Controls.RadSplitContainer.
This topic covers the following features of the RadSplitContainer:
Setting the initial FloatingLocation of the RadSplitContainer
Adding PaneGroups/SplitContainers to the RadSplitContainer programmatically
Setting the Orientation Property
When you want to define the orientation (Vertical or Horizontal) in which the panes are ordered inside the container, then you need to set the Orientation property of the RadSplitContainer.
Setting the Orientation property of a RadSplitContainer is similar to setting the Orientation property of a StackPanel.
- Setting the Orientation property to Vertical
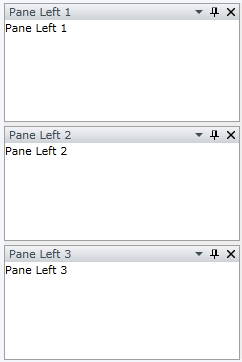
When you want to achieve vertically oriented layout, you need to set the Orientation property to Vertical. See the example below:
Example 1: Setting the container's Orientation to Vertical
<telerik:RadDocking x:Name="radDocking">
    <telerik:RadSplitContainer x:Name="radSplitContainer" Orientation="Vertical">
        <telerik:RadPaneGroup>
            <telerik:RadPane Header="Pane Left 1" Content="Pane Left 1" />
        </telerik:RadPaneGroup>
        <telerik:RadPaneGroup>
            <telerik:RadPane Header="Pane Left 2" Content="Pane Left 2"  />
        </telerik:RadPaneGroup>
        <telerik:RadPaneGroup>
            <telerik:RadPane Header="Pane Left 3" Content="Pane Left 3" />
        </telerik:RadPaneGroup>
    </telerik:RadSplitContainer>
</telerik:RadDocking>
Figure 2: Setting the container's Orientation to Vertical
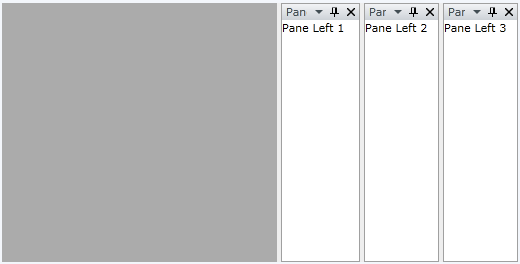
- Setting the Orientation property to Horizontal
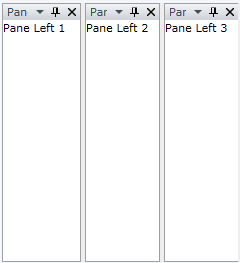
When you want to achieve horizontally oriented layout, you need to set the Orientation property to Horizontal. Consider the previous example. If you set the container's Orientation to Horizontal:
Example 2: Setting the container's Orientation to Horizontal
<telerik:RadDocking x:Name="radDocking1">
    <telerik:RadSplitContainer x:Name="radSplitContainer1" Orientation="Horizontal">
        <telerik:RadPaneGroup>
            <telerik:RadPane Header="Pane Left 1" Content="Pane Left 1" />
        </telerik:RadPaneGroup>
        <telerik:RadPaneGroup>
            <telerik:RadPane Header="Pane Left 2" Content="Pane Left 2"  />
        </telerik:RadPaneGroup>
        <telerik:RadPaneGroup>
            <telerik:RadPane Header="Pane Left 3" Content="Pane Left 3" />
        </telerik:RadPaneGroup>
    </telerik:RadSplitContainer>
</telerik:RadDocking>
Then the result will be:
Figure 3: Setting the container's Orientation to Horizontal
The RadSplitContainer's Orientation can also be set in the code-behind.
Example 3: Setting Orientation to Vertical in code-behind
private void SetOrientationToVertical()
{
    radSplitContainer.Orientation = Orientation.Vertical;
}
Private Sub SetOrientationToVertical()
    radSplitContainer.Orientation = Orientation.Vertical
End Sub
The default Orientation for the RadSplitContainer is Horizontal.
Setting the InitialPosition of the RadSplitContainer
When you want to specify the initial dock position of the RadSplitContainer that is inside a Telerik.Windows.Controls.RadDocking, you need to set the InitialPosition property.
The InitialPosition is a Telerik.Windows.Controls.DockState enumeration, which offers the following values:
- DockedLeft - use this value, when you want the RadSplitContainer to be positioned on the left side of the RadDocking control.
Example 4: InitialPosition DockedLeft
<telerik:RadDocking x:Name="radDocking2">
    <telerik:RadSplitContainer x:Name="radSplitContainer2" InitialPosition="DockedLeft">
        <telerik:RadPaneGroup>
            <telerik:RadPane Header="Pane Left 1" Content="Pane Left 1" />
        </telerik:RadPaneGroup>
        <telerik:RadPaneGroup>
            <telerik:RadPane Header="Pane Left 2" Content="Pane Left 2"  />
        </telerik:RadPaneGroup>
        <telerik:RadPaneGroup>
            <telerik:RadPane Header="Pane Left 3" Content="Pane Left 3" />
        </telerik:RadPaneGroup>
    </telerik:RadSplitContainer>
</telerik:RadDocking>
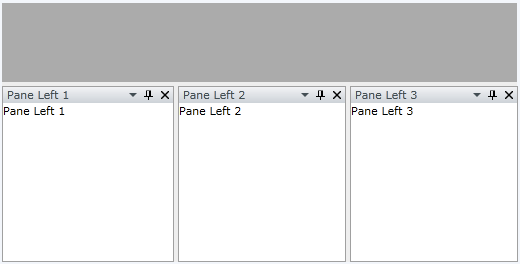
- DockedTop - use this value, when you want the RadSplitContainer to be positioned on the top side of the RadDocking control.
Example 5: InitialPosition DockedTop
<telerik:RadDocking x:Name="radDocking3">
    <telerik:RadSplitContainer x:Name="radSplitContainer3" InitialPosition="DockedTop">
        <telerik:RadPaneGroup>
            <telerik:RadPane Header="Pane Left 1" Content="Pane Left 1" />
        </telerik:RadPaneGroup>
        <telerik:RadPaneGroup>
            <telerik:RadPane Header="Pane Left 2" Content="Pane Left 2"  />
        </telerik:RadPaneGroup>
        <telerik:RadPaneGroup>
            <telerik:RadPane Header="Pane Left 3" Content="Pane Left 3" />
        </telerik:RadPaneGroup>
    </telerik:RadSplitContainer>
</telerik:RadDocking>

- DockedRight - use this value, when you want the RadSplitContainer to be positioned on the right side of the RadDocking control.
Example 5: InitialPosition DockedRight
<telerik:RadDocking x:Name="radDocking4">
    <telerik:RadSplitContainer x:Name="radSplitContainer4" InitialPosition="DockedRight">
        <telerik:RadPaneGroup>
            <telerik:RadPane Header="Pane Left 1" Content="Pane Left 1" />
        </telerik:RadPaneGroup>
        <telerik:RadPaneGroup>
            <telerik:RadPane Header="Pane Left 2" Content="Pane Left 2"  />
        </telerik:RadPaneGroup>
        <telerik:RadPaneGroup>
            <telerik:RadPane Header="Pane Left 3" Content="Pane Left 3" />
        </telerik:RadPaneGroup>
    </telerik:RadSplitContainer>
</telerik:RadDocking>
- DockedBottom - use this value, when you want the RadSplitContainer to be positioned on the bottom side of the RadDocking control.
Example 6: InitialPosition DockedBottom
<telerik:RadDocking x:Name="radDocking5">
    <telerik:RadSplitContainer x:Name="radSplitContainer5" InitialPosition="DockedBottom">
        <telerik:RadPaneGroup>
            <telerik:RadPane Header="Pane Left 1" Content="Pane Left 1" />
        </telerik:RadPaneGroup>
        <telerik:RadPaneGroup>
            <telerik:RadPane Header="Pane Left 2" Content="Pane Left 2"  />
        </telerik:RadPaneGroup>
        <telerik:RadPaneGroup>
            <telerik:RadPane Header="Pane Left 3" Content="Pane Left 3" />
        </telerik:RadPaneGroup>
    </telerik:RadSplitContainer>
</telerik:RadDocking>
- FloatingOnly - use this value when you want the RadSplitContainer to be initially hosted in a floatable Tool Window.
Example 7: InitialPosition FloatingOnly
<telerik:RadDocking x:Name="radDocking6">
    <telerik:RadSplitContainer x:Name="radSplitContainer6" InitialPosition="FloatingOnly">
        <telerik:RadPaneGroup>
            <telerik:RadPane Header="Pane Left 1" Content="Pane Left 1" />
        </telerik:RadPaneGroup>
        <telerik:RadPaneGroup>
            <telerik:RadPane Header="Pane Left 2" Content="Pane Left 2"  />
        </telerik:RadPaneGroup>
        <telerik:RadPaneGroup>
            <telerik:RadPane Header="Pane Left 3" Content="Pane Left 3" />
        </telerik:RadPaneGroup>
    </telerik:RadSplitContainer>
</telerik:RadDocking>
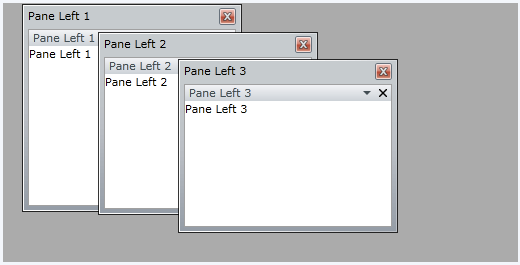
- FloatingDockable - use this value when you want the RadSplitContainer to be initially hosted in a floatable Tool Window.
Example 8: InitialPosition FloatingDockable
<telerik:RadDocking x:Name="radDocking7">
    <telerik:RadSplitContainer x:Name="radSplitContainer7" InitialPosition="FloatingDockable">
        <telerik:RadPaneGroup>
            <telerik:RadPane Header="Pane Left 1" Content="Pane Left 1" />
        </telerik:RadPaneGroup>
        <telerik:RadPaneGroup>
            <telerik:RadPane Header="Pane Left 2" Content="Pane Left 2"  />
        </telerik:RadPaneGroup>
        <telerik:RadPaneGroup>
            <telerik:RadPane Header="Pane Left 3" Content="Pane Left 3" />
        </telerik:RadPaneGroup>
    </telerik:RadSplitContainer>
</telerik:RadDocking>
Note the difference between FloatingOnly and FloatingDockable. The both will make your pane(s) floatable. However, when you set the InitialPosition to be FloatingOnly, then during run-time the user won't be able to dock the pane(s).
The RadSplitContainer's InitialPosition property can also be set in the code-behind.
Example 9: Setting InitialPosition in code-behind
private void SetInitialPositionToLeft()
{
    radSplitContainer.InitialPosition = Telerik.Windows.Controls.Docking.DockState.DockedLeft;
}
Private Sub SetInitialPositionToLeft()
    radSplitContainer.InitialPosition = Telerik.Windows.Controls.Docking.DockState.DockedLeft
End Sub
Place each RadPane (RadPaneGroup) in a separate split container to have the power to initially dock them as desired using the InitialPosition property.
Setting the InitialSize of the RadSplitContainer
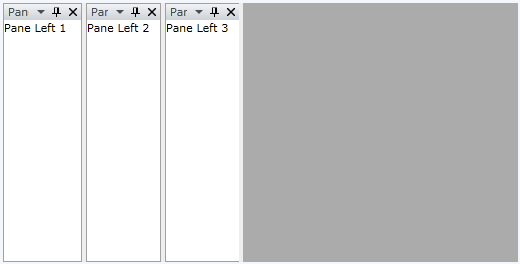
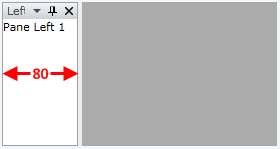
The initial size of the RadSplitContainer is set with the DockingPanel.InitialSize attached property. This propery is of type Size which allows you to set both width and height, but only one of the values will be used, based on the RadDockPanel.Dock setting of the container. When the dock position is Top or Bottom, the Height value of the InitialSize will be used. When the dock position is Left or Right, the Width will be used. The other dimension will autosize, based on the layout.
Example 10: Setting InitialSize
<telerik:RadDocking x:Name="radDocking8">
    <telerik:RadSplitContainer telerik:DockingPanel.InitialSize="80,1">
        <telerik:RadPaneGroup>
            <telerik:RadPane Header="Left Pane" Content="Pane Left 1" />
        </telerik:RadPaneGroup>
    </telerik:RadSplitContainer>
</telerik:RadDocking>
On the snapshot you can see that the pane titled "Left Pane" (docked left by default) has width set to 80, while its height is equal to the height of the container to which it is docked, ignoring the height specified by the DockingPanel.InitialSize property.
Setting the Initial FloatingSize of the RadSplitContainer
Similarly to the initial position, you have the ability to set the initial floating size of the RadSplitContainer.
For this purpose you need to set the RadDocking.FloatingSize attached property like it is shown in the example below:
Example 11: Setting FloatingSize
<telerik:RadDocking x:Name="radDocking9">
    <telerik:RadSplitContainer x:Name="radSplitContainer9" InitialPosition="FloatingDockable"
telerik:RadDocking.FloatingSize="300,300">
        <telerik:RadPaneGroup>
            <telerik:RadPane Header="Pane Left 1" Content="Pane Left 1" />
        </telerik:RadPaneGroup>
        <telerik:RadPaneGroup>
            <telerik:RadPane Header="Pane Left 2" Content="Pane Left 2"  />
        </telerik:RadPaneGroup>
        <telerik:RadPaneGroup>
            <telerik:RadPane Header="Pane Left 3" Content="Pane Left 3" />
        </telerik:RadPaneGroup>
    </telerik:RadSplitContainer>
</telerik:RadDocking>
Note that the InitialPosition must be set either to FloatingOnly or FloatingDockable. Otherwise setting the RadDocking.FloatingSize attached property will not affect the size of the split container.
If you want to resize the RadSplitContainer during run-time, then just use the Resizer.
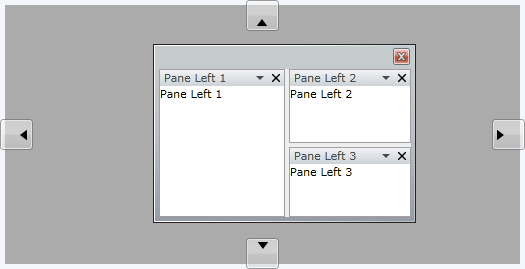
Setting the Initial FloatingLocation of the RadSplitContainer
Similarly to the initial floating size you have the ability to set the initial floating location of the RadSplitContainer.
For this purpose you need to set the RadDocking.FloatingLocation attached property like it is shown in the example below:
Example 12: Setting FloatingLocation
<telerik:RadDocking x:Name="radDocking10">
    <telerik:RadSplitContainer x:Name="radSplitContainer10" InitialPosition="FloatingDockable"
telerik:RadDocking.FloatingLocation="10,10">
        <telerik:RadPaneGroup>
            <telerik:RadPane Header="Pane Left 1" Content="Pane Left 1" />
        </telerik:RadPaneGroup>
        <telerik:RadPaneGroup>
            <telerik:RadPane Header="Pane Left 2" Content="Pane Left 2"  />
        </telerik:RadPaneGroup>
        <telerik:RadPaneGroup>
            <telerik:RadPane Header="Pane Left 3" Content="Pane Left 3" />
        </telerik:RadPaneGroup>
    </telerik:RadSplitContainer>
</telerik:RadDocking>
Note that the InitialPosition must be set either to FloatingOnly or FloatingDockable. Otherwise setting the RadDocking.FloatingLocation attached property will not affect the location of the split container.
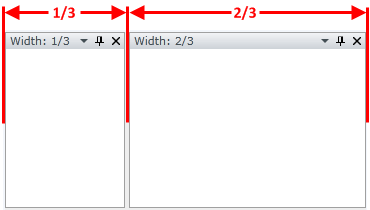
Setting the RelativeSize of the RadSplitContainer
For this purpose you need to set the RelativeSize attached property of the ProportionalStackPanel class. By using this property you can proportionally divide the width or the hight occupied by two or more RadSplitContainers placed in the same RadSplitContainer. For example, if you have two split containtainers, the first one should occupy 1/3 of the available width and the second - the remaining 2/3, you have to set this proportion (1:2) in their widths as it is shown in the code snippet below.
Example 13: Setting RelativeSize
<telerik:RadDocking x:Name="radDocking11">
    <telerik:RadSplitContainer InitialPosition="DockedTop">
        <telerik:RadSplitContainer telerik:ProportionalStackPanel.RelativeSize="200, 200">
            <telerik:RadPaneGroup>
                <telerik:RadPane Header="Width: 1/3"  />
            </telerik:RadPaneGroup>
        </telerik:RadSplitContainer>
        <telerik:RadSplitContainer telerik:ProportionalStackPanel.RelativeSize="400, 200">
            <telerik:RadPaneGroup>
                <telerik:RadPane Header="Width: 2/3" />
            </telerik:RadPaneGroup>
        </telerik:RadSplitContainer>
    </telerik:RadSplitContainer>
</telerik:RadDocking>
The default value is 200, 200.
Adding PaneGroups/SplitContainers to the RadSplitContainer Programmatically
In order to add a pane group or another split container in the code-behind, you need to use the RadSplitContainer's Items collection.
Other Important Properties Exposed by the RadSplitContainer
IsInDocumentHost - read-only boolean property. Returns whether the current RadPaneGroup is placed in DocumentHost.
IsInToolWindow - read-only boolean property. Returns whether the current RadPaneGroup is in Tool Window.
SplitterPosition - read-only property. Returns the current dock position of the RadSplitContainer. If the container is in floatable window, the return value is null.
Styling the RadSplitContainer
To learn how to style the RadSplitContainer in your applications take a look at the Styling the RadSplitContainer topic.