Row behaviors
RadGridView manages user mouse and keyboard input over its rows by GridRowBehavior. Depending on the row type, RadGridView introduces different behaviors, listed on the table below:
| Row behavior | Row type |
|---|---|
| GridDataRowBehavior | GridViewDataRowInfo |
| GridHierarchyRowBehavior | GridViewHierarchyRowInfo |
| GridNewRowBehavior | GridViewNewRowInfo |
| GridGroupRowBehavior | GridViewGroupRowInfo |
| GridFilterRowBehavior | GridViewFilteringRowInfo |
| GridHeaderRowBehavior | GridViewTableHeaderRowInfo |
| GridDetailViewRowBehavior | GridViewDetailsRowInfo |
By implementing a specific custom row behavior, developers can change the default row functionality or supplement the existing one.
Let’s start with constructing a hierarchical RadGridView and populate it with data.
public RowBehaviorsForm()
{
    InitializeComponent();

    //Fill data
    DataTable items = new DataTable("Items");
    items.Columns.Add("Id", typeof(int));
    items.Columns.Add("Title", typeof(string));
    items.Columns.Add("IsActive", typeof(bool));

    DataTable subItems = new DataTable("SubItems");
    subItems.Columns.Add("Id", typeof(int));
    subItems.Columns.Add("Name", typeof(string));
    subItems.Columns.Add("ItemId", typeof(int));

    for (int i = 1; i <= 3; i++)
    {
        items.Rows.Add(i, "Item" + i, i % 2 == 0);

        for (int j = 1000; j <= 1005; j++)
        {
            subItems.Rows.Add(j, "SubItem" + j, i);
        }
    }

    //Set up grid hierarchy
    radGridView1.DataSource = items;
    radGridView1.AutoSizeColumnsMode = GridViewAutoSizeColumnsMode.Fill;

    GridViewTemplate template = new GridViewTemplate();
    template.ReadOnly = true;
    template.AutoSizeColumnsMode = GridViewAutoSizeColumnsMode.Fill;

    GridViewRelation relation = new GridViewRelation(radGridView1.MasterTemplate, template);
    relation.ParentColumnNames.Add("Id");
    relation.ChildColumnNames.Add("ItemId");
    radGridView1.MasterTemplate.Templates.Add(template);
    radGridView1.Relations.Add(relation);
    template.ReadOnly = false;
    template.DataSource = subItems;
}
Sub New()
    InitializeComponent()
    'Fill data
    Dim items As New DataTable("Items")
    items.Columns.Add("Id", GetType(Integer))
    items.Columns.Add("Title", GetType(String))
    items.Columns.Add("IsActive", GetType(Boolean))
    Dim subItems As New DataTable("SubItems")
    subItems.Columns.Add("Id", GetType(Integer))
    subItems.Columns.Add("Name", GetType(String))
    subItems.Columns.Add("ItemId", GetType(Integer))
    For i As Integer = 1 To 3
        items.Rows.Add(i, "Item" & i, i Mod 2 = 0)
        For j As Integer = 1000 To 1005
            subItems.Rows.Add(j, "SubItem" & j, i)
        Next
    Next
    'Set up grid hierarchy
    RadGridView1.DataSource = items
    RadGridView1.AutoSizeColumnsMode = GridViewAutoSizeColumnsMode.Fill
    Dim template As New GridViewTemplate()
    template.[ReadOnly] = True
    template.AutoSizeColumnsMode = GridViewAutoSizeColumnsMode.Fill
    Dim relation As New GridViewRelation(RadGridView1.MasterTemplate, template)
    relation.ParentColumnNames.Add("Id")
    relation.ChildColumnNames.Add("ItemId")
    RadGridView1.MasterTemplate.Templates.Add(template)
    RadGridView1.Relations.Add(relation)
    template.[ReadOnly] = False
    template.DataSource = subItems
End Sub
By default, when the user hits the Delete key over a certain row, the row is deleted. We will extend this functionality by notifying the user when he tries to delete a parent row, which ChildRows collection is not empty. For this purpose, it is necessary to create a custom grid behavior. To do this, create a new class named CustomGridHierarchyRowBehavior. As we are currently using a hierarchical grid, our class should inherit the GridHierarchyRowBehavior. Override the ProcessDeleteKey method in order to display a MessageBox and proceed with the delete operation after confirmation only: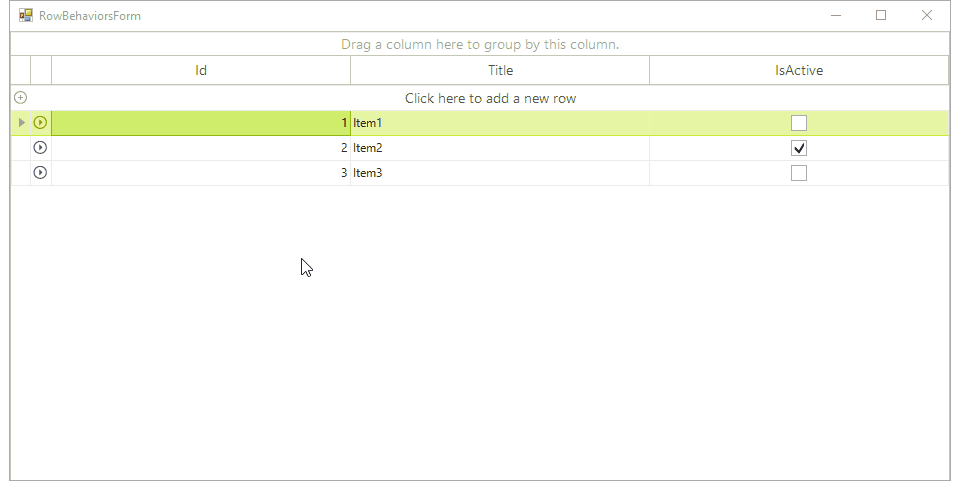
public class CustomGridHierarchyRowBehavior : GridHierarchyRowBehavior
{
    protected override bool ProcessDeleteKey(KeyEventArgs keys)
    {
        if (this.GridControl.CurrentRow.ChildRows.Count > 0)
        {
            DialogResult result = MessageBox.Show("The current row has child rows." +
                                                  "Are you sure you want to delete the selected row?", "Confirmation", MessageBoxButtons.YesNo);
            if (result == DialogResult.No)
            {
                return true;
            }
        }

        return base.ProcessDeleteKey(keys);
    }
}
Public Class CustomGridHierarchyRowBehavior
Inherits GridHierarchyRowBehavior
    Protected Overrides Function ProcessDeleteKey(keys As KeyEventArgs) As Boolean
        If Me.GridControl.CurrentRow.ChildRows.Count > 0 Then
            Dim result As DialogResult = MessageBox.Show("The current row has child rows." & "Are you sure you want to delete the selected row?", "Confirmation", MessageBoxButtons.YesNo)
            If result = DialogResult.No Then
                Return True
            End If
        End If
        Return MyBase.ProcessDeleteKey(keys)
    End Function
End Class
Next we will register this behavior in our grid. Add the following code after populating the grid with data:
//register the custom row  behavior
BaseGridBehavior gridBehavior = radGridView1.GridBehavior as BaseGridBehavior;
gridBehavior.UnregisterBehavior(typeof(GridViewHierarchyRowInfo));
gridBehavior.RegisterBehavior(typeof(GridViewHierarchyRowInfo), new CustomGridHierarchyRowBehavior());
'register the custom row  behavior
Dim gridBehavior As BaseGridBehavior = TryCast(RadGridView1.GridBehavior, BaseGridBehavior)
gridBehavior.UnregisterBehavior(GetType(GridViewHierarchyRowInfo))
gridBehavior.RegisterBehavior(GetType(GridViewHierarchyRowInfo), New CustomGridHierarchyRowBehavior())
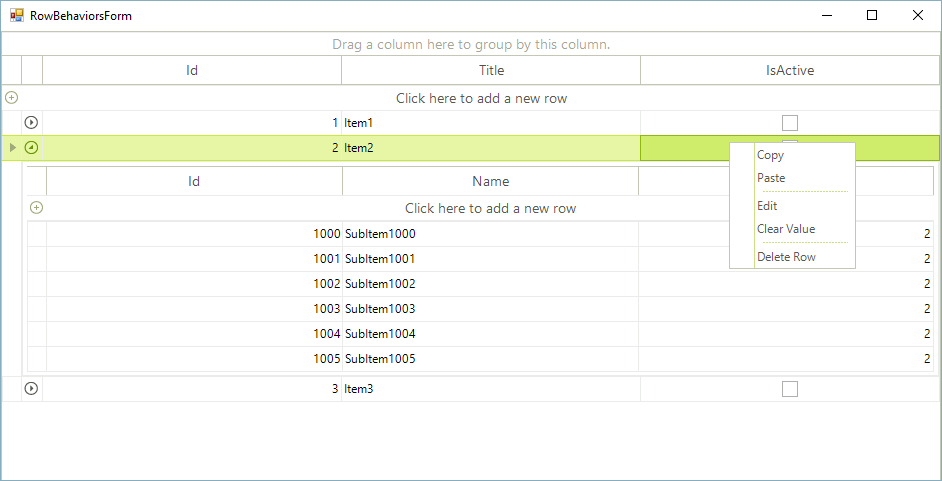
The next modification we are going to introduce is to override the OnMouseDownLeft method and show the context menu for the GridCheckBoxCellElement, associated with the mouse location. First, it is necessary to use the grid navigator to process selection of the cell element, positioned at the mouse location. Afterwards, show the context menu for the specific cell:
protected override bool OnMouseDownLeft(MouseEventArgs e)
{
    GridCellElement cellElement = this.GetCellAtPoint(e.Location);
    if (cellElement != null && cellElement is GridCheckBoxCellElement)
    {
        GridRowElement rowElement = cellElement.RowElement;
        this.Navigator.BeginSelection(this.GetMouseNavigationContext(e));
        this.Navigator.Select(rowElement.RowInfo, cellElement.ColumnInfo);
        this.Navigator.EndSelection();

        if (!cellElement.IsInValidState(true))
        {
            cellElement = this.GetCellAtPoint(e.Location);
        }
        if (cellElement != null)
        {
            GridViewElement.ContextMenuManager.ShowContextMenu(cellElement);
        }
        return true;
    }

    return base.OnMouseDownLeft(e);
}
Protected Overrides Function OnMouseDownLeft(e As MouseEventArgs) As Boolean
    Dim cellElement As GridCellElement = Me.GetCellAtPoint(e.Location)
    If cellElement IsNot Nothing AndAlso TypeOf cellElement Is GridCheckBoxCellElement Then
        Dim rowElement As GridRowElement = cellElement.RowElement
        Me.Navigator.BeginSelection(Me.GetMouseNavigationContext(e))
        Me.Navigator.[Select](rowElement.RowInfo, cellElement.ColumnInfo)
        Me.Navigator.EndSelection()
        If Not cellElement.IsInValidState(True) Then
            cellElement = Me.GetCellAtPoint(e.Location)
        End If
        If cellElement IsNot Nothing Then
            GridViewElement.ContextMenuManager.ShowContextMenu(cellElement)
        End If
        Return True
    End If
    Return MyBase.OnMouseDownLeft(e)
End Function
RadGridView supports rows/cells navigation by default, using the arrow keys. It is possible to customize this behavior as well. In the CustomGridHierarchyRowBehavior class override the ProcessKey method and stop the base grid logic for navigation upwards/downwards if the current row belongs to the MasterTemplate and its “IsActive” cell value is set to false:
public override bool ProcessKey(KeyEventArgs keys)
{
    if (keys.KeyCode == Keys.Up || keys.KeyCode == Keys.Down)
    {
        DataRowView rowView = this.GridControl.CurrentRow.DataBoundItem as DataRowView;
        if (rowView != null && this.GridControl.CurrentRow.ViewTemplate == this.MasterTemplate)
        {
            if ((bool)rowView.Row["IsActive"] == false)
            {
                return true;
            }
        }
    }
    return base.ProcessKey(keys);
}
Public Overrides Function ProcessKey(keys__1 As KeyEventArgs) As Boolean
    If keys__1.KeyCode = Keys.Up OrElse keys__1.KeyCode = Keys.Down Then
        Dim rowView As DataRowView = TryCast(Me.GridControl.CurrentRow.DataBoundItem, DataRowView)
        If rowView IsNot Nothing AndAlso Me.GridControl.CurrentRow.ViewTemplate.Equals(Me.MasterTemplate) Then
            If CBool(rowView.Row("IsActive")) = False Then
                Return True
            End If
        End If
    End If
    Return MyBase.ProcessKey(keys__1)
End Function
Following the demonstrated approach, developers can customize not only the hierarchy rows, but the new row for example, implementing a custom GridNewRowBehavior and registering it for the GridViewNewRowInfo.