Drag and Drop
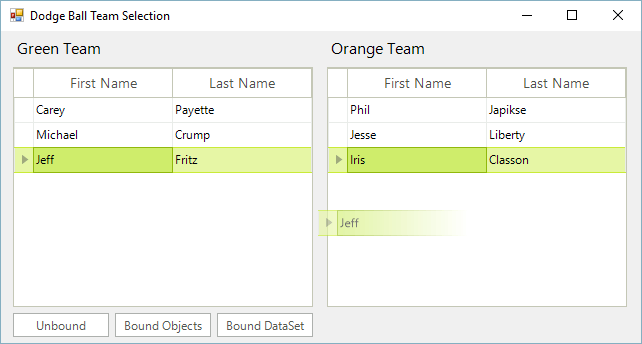
Sometimes applications need to allow users to split items up into separate groupings. One way to handle this scenario is through moving data back and forth between several RadGridView controls. In order to achieve a better user experience, you can implement drag and drop functionality between the grids.

This help article demonstrates how to extend the RadGridView control to enable drag and drop functionality between two grids, whether it be an unbound grid, bound to a binding list of objects, or bound to a DataSet. It supports the ability to drag and drop multiple rows at a time.
A complete solution providing a C# and VB.NET project is available here.
Getting started
To get started:
Open Visual Studio 2012 and create a new Telerik UI for WinForms project.
Add a new class called “DragAndDropRadGrid.cs”.
Modify the class to extend the RadGridView control through inheritance.
public class DragAndDropRadGrid : RadGridView
Public Class DragAndDropRadGrid
    Inherits RadGridView
The drag and drop functionality is made easy using the built-in RadGridViewDragDropService as the plumbing code is already handled, you only need to handle events emanating from this service. Create a default constructor for the DragAndDropRadGrid class. In this constructor we will grab a reference to the RadDragDropService and generate event handler stubs for a few of the service’s events.
public DragAndDropRadGrid()
{
    this.MultiSelect = true;

    //handle drag and drop events for the grid through the DragDrop service
    RadDragDropService svc =
        this.GridViewElement.GetService<RadDragDropService>();
    svc.PreviewDragStart += svc_PreviewDragStart;
    svc.PreviewDragDrop += svc_PreviewDragDrop;
    svc.PreviewDragOver += svc_PreviewDragOver;

    //register the custom row selection behavior
    var gridBehavior = this.GridBehavior as BaseGridBehavior;
    gridBehavior.UnregisterBehavior(typeof(GridViewDataRowInfo));
    gridBehavior.RegisterBehavior(typeof(GridViewDataRowInfo), new RowSelectionGridBehavior());
}

public override string ThemeClassName
{
    get
    {
        return typeof(RadGridView).FullName;
    }
}
Public Sub New()
    Me.MultiSelect = True
    'handle drag and drop events for the grid through the DragDrop service
    Dim svc As RadDragDropService = Me.GridViewElement.GetService(Of RadDragDropService)()
    AddHandler svc.PreviewDragStart, AddressOf svc_PreviewDragStart
    AddHandler svc.PreviewDragDrop, AddressOf svc_PreviewDragDrop
    AddHandler svc.PreviewDragOver, AddressOf svc_PreviewDragOver
    'register the custom row selection behavior
    Dim gridBehavior = TryCast(Me.GridBehavior, BaseGridBehavior)
    gridBehavior.UnregisterBehavior(GetType(GridViewDataRowInfo))
    gridBehavior.RegisterBehavior(GetType(GridViewDataRowInfo), New RowSelectionGridBehavior())
End Sub
Public Overrides Property ThemeClassName As String
    Get
        Return GetType(RadGridView).FullName
    End Get
    Set(value As String)
        MyBase.ThemeClassName = value
    End Set
End Property
Starting the Drag and Drop Service using behaviors
In order to start the drag and drop service when the user clicks on a row with the left mouse button, it is necessary to create a custom grid behavior. To do this, create a new class that inherits the GridDataRowBehavior class. In addition the drag and drop service allows you to disable the auto scrolling while dragging functionality:
//initiates drag and drop service for clicked rows
public class RowSelectionGridBehavior : GridDataRowBehavior
{
    protected override bool OnMouseDownLeft(MouseEventArgs e)
    {
        GridDataRowElement row = this.GetRowAtPoint(e.Location) as GridDataRowElement;
        if (row != null)
        {
            RadGridViewDragDropService svc = this.GridViewElement.GetService<RadGridViewDragDropService>();
            svc.AllowAutoScrollColumnsWhileDragging = false;
            svc.AllowAutoScrollRowsWhileDragging = false;
            svc.Start(row);
        }
        return base.OnMouseDownLeft(e);
    }
}
'initiates drag and drop service for clicked rows
Public Class RowSelectionGridBehavior
    Inherits GridDataRowBehavior
    Protected Overrides Function OnMouseDownLeft(ByVal e As MouseEventArgs) As Boolean
        Dim row As GridDataRowElement = TryCast(Me.GetRowAtPoint(e.Location), GridDataRowElement)
        If Not row Is Nothing Then
            Dim svc As RadGridViewDragDropService = Me.GridViewElement.GetService(Of RadGridViewDragDropService)()
            svc.AllowAutoScrollColumnsWhileDragging = False
            svc.AllowAutoScrollRowsWhileDragging = False
            svc.Start(row)
        End If
        Return MyBase.OnMouseDownLeft(e)
    End Function
End Class
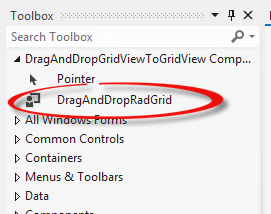
It is important to register this behavior in our grid. Build the solution and our custom grid is now setup and ready to use. You can locate it in the Visual Studio toolbox when in the design view of a form.

Drag and Drop events
The PreviewDragStart event is fired once the Drag and Drop service on the grid is started. In this case, we simply want to tell the drag and drop service if the drag operation can move forward. Implement the PreviewDragStart event handler as follows:
//required to initiate drag and drop when grid is in bound mode
private void svc_PreviewDragStart(object sender, PreviewDragStartEventArgs e)
{
    e.CanStart = true;
}
'required to initiate drag and drop when grid is in bound mode
Private Sub svc_PreviewDragStart(ByVal sender As Object, ByVal e As PreviewDragStartEventArgs)
    e.CanStart = True
End Sub
The next event we will handle is the PreviewDragOver event. This event allows you to control on what targets the row being dragged can be dropped on. In this case, as long as it’s being dropped somewhere on the target grid, we are good with it. Implement the handler as follows:
private void svc_PreviewDragOver(object sender, RadDragOverEventArgs e)
{
    if (e.DragInstance is GridDataRowElement)
    {
        e.CanDrop = e.HitTarget is GridDataRowElement ||
                    e.HitTarget is GridTableElement ||
                    e.HitTarget is GridSummaryRowElement;
    }
}
Private Sub svc_PreviewDragOver(ByVal sender As Object, ByVal e As RadDragOverEventArgs)
    If TypeOf e.DragInstance Is GridDataRowElement Then
        e.CanDrop = TypeOf e.HitTarget Is GridDataRowElement OrElse
                    TypeOf e.HitTarget Is GridTableElement OrElse
                    TypeOf e.HitTarget Is GridSummaryRowElement
    End If
End Sub
The last event we want to handle in our implementation is the PreviewDragDrop event. This event allows you to get a handle on all the aspects of the drag and drop operation, the source (drag) grid, the destination (target) grid, as well as the row being dragged. This is where we will initiate the actual physical move of the row(s) from one grid to the other. Implement the handler as follows:
//gather drag/source grid and target/destination information and initiate the move of selected rows
private void svc_PreviewDragDrop(object sender, RadDropEventArgs e)
{
    var rowElement = e.DragInstance as GridDataRowElement;
    if (rowElement == null)
    {
        return;
    }
    e.Handled = true;

    var dropTarget = e.HitTarget as RadItem;
    var targetGrid = dropTarget.ElementTree.Control as RadGridView;
    if (targetGrid == null)
    {
        return;
    }

    var dragGrid = rowElement.ElementTree.Control as RadGridView;
    if (targetGrid != dragGrid)
    {
        e.Handled = true;
        //append dragged rows to the end of the target grid
        int index = targetGrid.RowCount;

        //Grab every selected row from the source grid, including the current row
        List<GridViewRowInfo> rows =
            dragGrid.SelectedRows.ToList<GridViewRowInfo>();
        if (dragGrid.CurrentRow != null)
        {
            GridViewRowInfo row = dragGrid.CurrentRow;
            if (!rows.Contains(row))
                rows.Add(row);
        }
        this.MoveRows(targetGrid, dragGrid, rows, index);
    }
}
'gather drag/source grid and target/destination information and initiate the move of selected rows
Private Sub svc_PreviewDragDrop(ByVal sender As Object, ByVal e As RadDropEventArgs)
    Dim rowElement = TryCast(e.DragInstance, GridDataRowElement)
    If rowElement Is Nothing Then
        Return
    End If
    e.Handled = True
    Dim dropTarget = TryCast(e.HitTarget, RadItem)
    Dim targetGrid = TryCast(dropTarget.ElementTree.Control, RadGridView)
    If targetGrid Is Nothing Then
        Return
    End If
    Dim dragGrid = TryCast(rowElement.ElementTree.Control, RadGridView)
    If Not targetGrid Is dragGrid Then
        e.Handled = True
        'append dragged rows to the end of the target grid
        Dim index As Integer = targetGrid.RowCount
        'Grab every selected row from the source grid, including the current row
        Dim rows As New List(Of GridViewRowInfo)
        For Each row As GridViewRowInfo In dragGrid.SelectedRows
            rows.Add(row)
        Next
        If Not dragGrid.CurrentRow Is Nothing Then
            Dim row As GridViewRowInfo = dragGrid.CurrentRow
            If (Not rows.Contains(row)) Then
                rows.Add(row)
            End If
        End If
        Me.MoveRows(targetGrid, dragGrid, rows, index)
    End If
End Sub
Moving the data from one source to the other
You will notice at the end of the PreviewDragDrop handler that we need to create a MoveRows function that will handle the actual moving the data from the source to the destination. As mentioned at the beginning of the article, three distinct data scenarios will be handled:
Unbound
Bound to Objects (through a BindingList)
Bound to a DataSet
It is in the MoveRows method where the physical moving of the data happens. Basically what we need in this method is to add the data into the target data source, and remove it from the source data source in order to complete the drag and drop operation under the covers. Implement the MoveRows method as follows:
private void MoveRows(RadGridView targetGrid, RadGridView dragGrid,
    IList<GridViewRowInfo> dragRows, int index)
{
    dragGrid.BeginUpdate();
    targetGrid.BeginUpdate();
    for (int i = dragRows.Count - 1; i >= 0; i--)
    {
        GridViewRowInfo row = dragRows[i];
        if (row is GridViewSummaryRowInfo)
        {
            continue;
        }
        if (targetGrid.DataSource == null)
        {
            //unbound scenario
            GridViewRowInfo newRow = targetGrid.Rows.NewRow();
            foreach (GridViewCellInfo cell in row.Cells)
            {
                if (newRow.Cells[cell.ColumnInfo.Name] != null)
                    newRow.Cells[cell.ColumnInfo.Name].Value = cell.Value;
            }

            targetGrid.Rows.Insert(index, newRow);

            row.IsSelected = false;
            dragGrid.Rows.Remove(row);
        }
        else if (typeof(DataSet).IsAssignableFrom(targetGrid.DataSource.GetType()))
        {
            //bound to a dataset scenario
            var sourceTable = ((DataSet)dragGrid.DataSource).Tables[0];
            var targetTable = ((DataSet)targetGrid.DataSource).Tables[0];

            var newRow = targetTable.NewRow();
            foreach (GridViewCellInfo cell in row.Cells)
            {
                newRow[cell.ColumnInfo.Name] = cell.Value;
            }

            sourceTable.Rows.Remove(((DataRowView)row.DataBoundItem).Row);
            targetTable.Rows.InsertAt(newRow, index);
        }
        else if (typeof(IList).IsAssignableFrom(targetGrid.DataSource.GetType()))
        {
            //bound to a list of objects scenario
            var targetCollection = (IList)targetGrid.DataSource;
            var sourceCollection = (IList)dragGrid.DataSource;
            sourceCollection.Remove(row.DataBoundItem);
            targetCollection.Add(row.DataBoundItem);
        }
        else
        {
            throw new ApplicationException("Unhandled Scenario");
        }
        index++;
    }
    dragGrid.EndUpdate(true);
    targetGrid.EndUpdate(true);
}
Private Sub MoveRows(ByVal targetGrid As RadGridView, ByVal dragGrid As RadGridView, ByVal dragRows As IList(Of GridViewRowInfo), ByVal index As Integer)
    dragGrid.BeginUpdate()
    targetGrid.BeginUpdate()
    For i As Integer = dragRows.Count - 1 To 0 Step -1
        Dim row As GridViewRowInfo = dragRows(i)
        If TypeOf row Is GridViewSummaryRowInfo Then
            Continue For
        End If
        If targetGrid.DataSource Is Nothing Then
            'unbound scenario
            Dim newRow As GridViewRowInfo = targetGrid.Rows.NewRow()
            For Each cell As GridViewCellInfo In row.Cells
                If Not newRow.Cells(cell.ColumnInfo.Name) Is Nothing Then
                    newRow.Cells(cell.ColumnInfo.Name).Value = cell.Value
                End If
            Next cell
            targetGrid.Rows.Insert(index, newRow)
            row.IsSelected = False
            dragGrid.Rows.Remove(row)
        ElseIf GetType(DataSet).IsAssignableFrom(targetGrid.DataSource.GetType()) Then
            'bound to a dataset scenario
            Dim sourceTable = (CType(dragGrid.DataSource, DataSet)).Tables(0)
            Dim targetTable = (CType(targetGrid.DataSource, DataSet)).Tables(0)
            Dim newRow = targetTable.NewRow()
            For Each cell As GridViewCellInfo In row.Cells
                newRow(cell.ColumnInfo.Name) = cell.Value
            Next cell
            sourceTable.Rows.Remove((CType(row.DataBoundItem, DataRowView)).Row)
            targetTable.Rows.InsertAt(newRow, index)
        ElseIf GetType(IList).IsAssignableFrom(targetGrid.DataSource.GetType()) Then
            'bound to a list of objects scenario
            Dim targetCollection = CType(targetGrid.DataSource, IList)
            Dim sourceCollection = CType(dragGrid.DataSource, IList)
            sourceCollection.Remove(row.DataBoundItem)
            targetCollection.Add(row.DataBoundItem)
        Else
            Throw New ApplicationException("Unhandled Scenario")
        End If
        index += 1
    Next i
    dragGrid.EndUpdate(True)
    targetGrid.EndUpdate(True)
End Sub
Using our new control
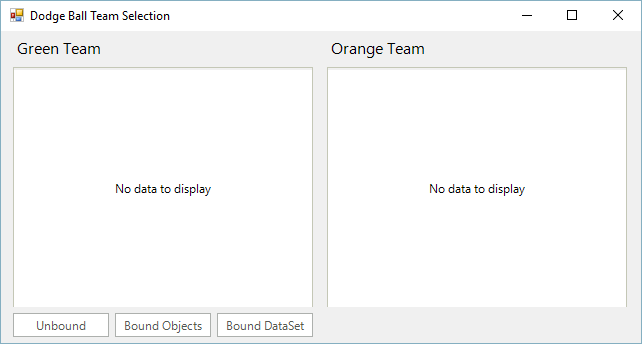
Open the designer for Form1 and layout your form by dragging two instances of our DragAndDropRadGrid control (name them leftGrid and rightGrid respectively). Then drag three RadButton instances and name them btnUnbound, btnBoundObjects, and btnBoundDataSet. Visually layout the form and label your form elements in the designer as follows:

Initialize some settings of the grids in the default constructor of the form as follows, we’ll also add a method to reset the grids:
public DragAndDropRadGridForm1()
{
    InitializeComponent();
    leftGrid.ShowGroupPanel = false;
    rightGrid.ShowGroupPanel = false;
    leftGrid.AllowAddNewRow = false;
    rightGrid.AllowAddNewRow = false;
    leftGrid.AutoSizeColumnsMode = GridViewAutoSizeColumnsMode.Fill;
    rightGrid.AutoSizeColumnsMode = GridViewAutoSizeColumnsMode.Fill;
}
private void ResetGrids()
{
    leftGrid.DataSource = null;
    leftGrid.Rows.Clear();
    leftGrid.Columns.Clear();
    rightGrid.DataSource = null;
    rightGrid.Rows.Clear();
    rightGrid.Columns.Clear();
}
Public Sub New()
    InitializeComponent()
    leftGrid.ShowGroupPanel = False
    rightGrid.ShowGroupPanel = False
    leftGrid.AllowAddNewRow = False
    rightGrid.AllowAddNewRow = False
    leftGrid.AutoSizeColumnsMode = GridViewAutoSizeColumnsMode.Fill
    rightGrid.AutoSizeColumnsMode = GridViewAutoSizeColumnsMode.Fill
End Sub
Private Sub ResetGrids()
    leftGrid.DataSource = Nothing
    leftGrid.Rows.Clear()
    leftGrid.Columns.Clear()
    rightGrid.DataSource = Nothing
    rightGrid.Rows.Clear()
    rightGrid.Columns.Clear()
End Sub
First we will implement the usage of our custom grid in an unbound scenario. To do this, double-click on the Unbound button to implement its click event handler as follows:
private void btnUnbound_Click(object sender, EventArgs e)
{
    ResetGrids();
    PrepareUnboundGrid(leftGrid);
    leftGrid.Rows.Add("Carey", "Payette");
    leftGrid.Rows.Add("Michael", "Crump");
    leftGrid.Rows.Add("Jeff", "Fritz");
    PrepareUnboundGrid(rightGrid);
    rightGrid.Rows.Add("Phil", "Japikse");
    rightGrid.Rows.Add("Jesse", "Liberty");
    rightGrid.Rows.Add("Iris", "Classon");
}
private void PrepareUnboundGrid(RadGridView grid)
{
    //setup columns
    GridViewTextBoxColumn firstName = new GridViewTextBoxColumn("FirstName", "FirstName");
    firstName.HeaderText = "First Name";
    GridViewTextBoxColumn lastName = new GridViewTextBoxColumn("LastName", "LastName");
    lastName.HeaderText = "Last Name";
    grid.Columns.AddRange(firstName, lastName);
}
Private Sub btnUnbound_Click(ByVal sender As Object, ByVal e As EventArgs) Handles btnUnbound.Click
    ResetGrids()
    PrepareUnboundGrid(leftGrid)
    leftGrid.Rows.Add("Carey", "Payette")
    leftGrid.Rows.Add("Michael", "Crump")
    leftGrid.Rows.Add("Jeff", "Fritz")
    PrepareUnboundGrid(rightGrid)
    rightGrid.Rows.Add("Phil", "Japikse")
    rightGrid.Rows.Add("Jesse", "Liberty")
    rightGrid.Rows.Add("Iris", "Classon")
End Sub
Private Sub PrepareUnboundGrid(ByVal grid As RadGridView)
    'setup columns
    Dim firstName As GridViewTextBoxColumn = New GridViewTextBoxColumn("FirstName", "FirstName")
    firstName.HeaderText = "First Name"
    Dim lastName As GridViewTextBoxColumn = New GridViewTextBoxColumn("LastName", "LastName")
    lastName.HeaderText = "Last Name"
    grid.Columns.AddRange(firstName, lastName)
End Sub
Next we will implement the usage of our grid when it is bound to a BindingList. Double-click on the Bound to Objects button, and implement it as follows:
private void btnBoundObjects_Click(object sender, EventArgs e)
{
    ResetGrids();
    BindingList<Player> dataList1 = new BindingList<Player>();
    dataList1.Add(new Player() { FirstName = "Carey", LastName = "Payette" });
    dataList1.Add(new Player() { FirstName = "Michael", LastName = "Crump" });
    dataList1.Add(new Player() { FirstName = "Jeff", LastName = "Fritz" });
    BindingList<Player> dataList2 = new BindingList<Player>();
    dataList2.Add(new Player() { FirstName = "Phil", LastName = "Japikse" });
    dataList2.Add(new Player() { FirstName = "Jesse", LastName = "Liberty" });
    dataList2.Add(new Player() { FirstName = "Iris", LastName = "Classon" });
    leftGrid.DataSource = dataList1;
    rightGrid.DataSource = dataList2;
}
Private Sub btnBoundObjects_Click(ByVal sender As Object, ByVal e As EventArgs) Handles btnBoundObjects.Click
    ResetGrids()
    Dim dataList1 As New BindingList(Of Player)()
    dataList1.Add(New Player() With { _
        .FirstName = "Carey", _
        .LastName = "Payette" _
    })
    dataList1.Add(New Player() With { _
        .FirstName = "Michael", _
        .LastName = "Crump" _
    })
    dataList1.Add(New Player() With { _
        .FirstName = "Jeff", _
        .LastName = "Fritz" _
    })
    Dim dataList2 As New BindingList(Of Player)()
    dataList2.Add(New Player() With { _
        .FirstName = "Phil", _
        .LastName = "Japikse" _
    })
    dataList2.Add(New Player() With { _
        .FirstName = "Jesse", _
        .LastName = "Liberty" _
    })
    dataList2.Add(New Player() With { _
        .FirstName = "Iris", _
        .LastName = "Classon" _
    })
    leftGrid.DataSource = dataList1
    rightGrid.DataSource = dataList2
End Sub
Add a Player class to the Form1.cs source file to support this scenario defined as the following:
public class Player
{
    public string FirstName { get; set; }
    public string LastName { get; set; }
}
Public Class Player
    Public Property FirstName() As String
        Get
            Return m_FirstName
        End Get
        Set(ByVal value As String)
            m_FirstName = value
        End Set
    End Property
    Private m_FirstName As String
    Public Property LastName() As String
        Get
            Return m_LastName
        End Get
        Set(ByVal value As String)
            m_LastName = value
        End Set
    End Property
    Private m_LastName As String
End Class
Lastly we will implement the scenario of when the grids are bound to a DataSet. Implement the click event handler of the Bound to DataSet button as follows:
private void btnBoundDataSet_Click(object sender, EventArgs e)
{
    ResetGrids();
    DataSet ds1 = new DataSet();
    DataTable team1 = new DataTable();
    team1.Columns.Add("First Name", typeof(string));
    team1.Columns.Add("Last Name", typeof(string));
    team1.Rows.Add("Carey", "Payette");
    team1.Rows.Add("Michael", "Crump");
    team1.Rows.Add("Jeff", "Fritz");
    ds1.Tables.Add(team1);
    DataSet ds2 = new DataSet();
    DataTable team2 = new DataTable();
    team2.Columns.Add("First Name", typeof(string));
    team2.Columns.Add("Last Name", typeof(string));
    team2.Rows.Add("Phil", "Japikse");
    team2.Rows.Add("Jesse", "Liberty");
    team2.Rows.Add("Iris", "Classon");
    ds2.Tables.Add(team2);
    leftGrid.DataSource = ds1;
    leftGrid.DataMember = "Table1";
    rightGrid.DataSource = ds2;
    rightGrid.DataMember = "Table1";
}
Private Sub btnBoundDataSet_Click(ByVal sender As Object, ByVal e As EventArgs) Handles btnBoundDataSet.Click
    ResetGrids()
    Dim ds1 As DataSet = New DataSet()
    Dim team1 As DataTable = New DataTable()
    team1.Columns.Add("First Name", GetType(String))
    team1.Columns.Add("Last Name", GetType(String))
    team1.Rows.Add("Carey", "Payette")
    team1.Rows.Add("Michael", "Crump")
    team1.Rows.Add("Jeff", "Fritz")
    ds1.Tables.Add(team1)
    Dim ds2 As DataSet = New DataSet()
    Dim team2 As DataTable = New DataTable()
    team2.Columns.Add("First Name", GetType(String))
    team2.Columns.Add("Last Name", GetType(String))
    team2.Rows.Add("Phil", "Japikse")
    team2.Rows.Add("Jesse", "Liberty")
    team2.Rows.Add("Iris", "Classon")
    ds2.Tables.Add(team2)
    leftGrid.DataSource = ds1
    leftGrid.DataMember = "Table1"
    rightGrid.DataSource = ds2
    rightGrid.DataMember = "Table1"
End Sub
Go ahead and build and run the application. You are now able to use drag and drop functionality in bound and unbound modes. You are also able to select multiple rows using either the shift or control key, and holding the key down while you drag the rows between the grids.