Getting Started with the Chat
This tutorial explains how to set up a basic Telerik UI for ASP.NET Core Chat and highlights the major steps in the configuration of the component.
You will initialize a Chat component and load it with data. Finally, you can run the sample code in Telerik REPL and continue exploring the components.
Prerequisites
To successfully complete the tutorial, you need a project that is already configured to use the Telerik UI for ASP.NET Core components:
You can use the Telerik REPL playground and skip installing the components on your system and configuring a project.
-
You can prepare a Visual Studio project by following either of these guides:
Creating a new pre-configured project for the Telerik UI for ASP.NET Core components from a project template.
Manually configuring an existing project as described in the First Steps on Windows or First Steps on Mac articles.
1. Prepare the CSHTML File
The first step is to add the required directives at the top of the .cshtml document:
-
To use the Telerik UI for ASP.NET Core HtmlHelpers:
@using Kendo.Mvc.UI -
To use the Telerik UI for ASP.NET Core TagHelpers:
@addTagHelper *, Kendo.Mvc
2. Initialize the Chat
Use the Chat HtmlHelper or TagHelper to add the component to the page. The Name() configuration method is mandatory as its value is used for the id and the name attributes of the Chat element.
    @using Kendo.Mvc.UI

    @(Html.Kendo().Chat()
        .Name("chat")
    )
    @addTagHelper *, Kendo.Mvc

    <kendo-chat name="chat">
    </kendo-chat>
3. Configure a Default User
The next step is to configure the User property and set a default avatar and name for the current user.
    @using Kendo.Mvc.UI

    @(Html.Kendo().Chat()
        .Name("chat")
        .User(u => u
            .Name("ChatBot Name")
            .IconUrl("https://demos.telerik.com/aspnet-core/shared/images/site/devcraft-ninja-small.svg")
        )
    )
    @addTagHelper *, Kendo.Mvc

     <kendo-chat name="chat">
        <user name="ChatBot Name" icon-url="https://demos.telerik.com/aspnet-core/shared/images/site/devcraft-ninja-small.svg"/>
    </kendo-chat>
4. Handle a Chat Event
The Chat exposes different client-side events that you can handle and use to customize the component's functions. In this tutorial, you will use the SendMessage event. Attach a handler in the declaration of the Chat and declare the onSendMessage JavaScript function.
    @(Html.Kendo().Chat()
        .Name("chat")
        .User(u => u
            .Name("ChatBot Name")
            .IconUrl("https://demos.telerik.com/aspnet-core/shared/images/site/devcraft-ninja-small.svg")
        )
        .Events(e => e
            .SendMessage("onSendMessage")
        )
    )
    <script>
        function onSendMessage() {
            // Handle the send message event.
        }
    </script>
    <script>
        function onSendMessage() {
            // Handle the send message event.
        }
    </script>

    <kendo-chat name="chat"
        on-send-message="onSendMessage">
        <user name="ChatBot Name" icon-url="https://demos.telerik.com/aspnet-core/shared/images/site/devcraft-ninja-small.svg"/>
    </kendo-chat>
5. (Optional) Reference Existing Chat Instances
To use the client-side API of the Chat and build on top of its initial configuration, you need a reference to the Chat instance. Once you get a valid reference, you can call the respective API methods:
-
Use the
.Name()(idattribute) of the component instance to get a reference.<script> $(document).ready(function() { var chatReference = $("#chat").data("kendoChat"); // chatReference is a reference to the existing Chat instance of the helper. }) </script> -
Use the Chat client-side API to control the behavior of the control. In this example, you will set up a
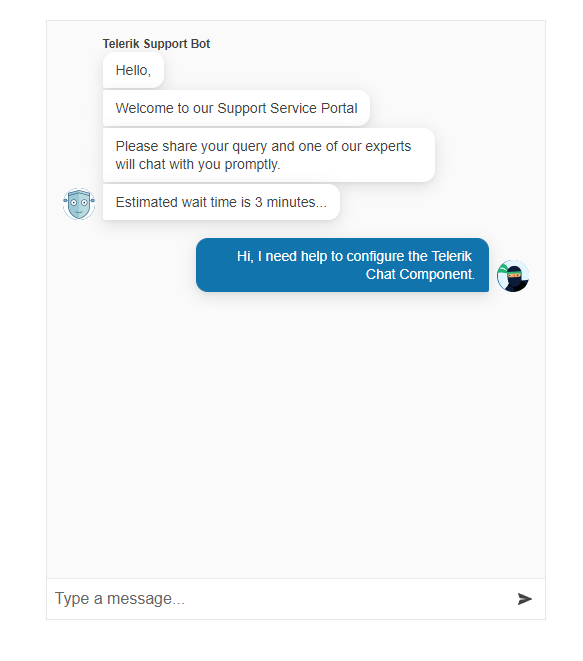
kendoChatBotUserand will iterate an array of strings to render an automated greeting message with the use of therenderMessagemethod.<script> $(document).ready( function () { var kendoChatBotUser = { id: kendo.guid(), name: "Telerik Support Bot", // the name of the use will be shown in the Chat iconUrl: "https://demos.telerik.com/kendo-ui/content/chat/avatar.png" // url for the avatar of the user shown in the Chat }; var primary_messages = ["Hello,","Welcome to our Support Service Portal"] // array of messages renderMessages(primary_messages,kendoChatBotUser) }); function renderMessages(messages,user){ var chat = $("#chat").data("kendoChat"); // access the client-side reference of the Chat component messages.forEach((message,i)=>{ // render a message for each string of the array chat.renderMessage({ type: "text", text: message }, user ); }) } </script>
Explore this Tutorial in REPL
You can continue experimenting with the code sample above by running it in the Telerik REPL server playground:
Next Steps
- Subscribing to Chat Events
- Configuring a Peer-to-Peer Chat
- Automating Chat Responses with a DirectLine Agent (Demo)