Dynamo DB
This article will show you how to access data stored in a DynamoDB table by connecting to the AWS DynamoDB service and visualize the content within a Telerik RadListView element.
Please note that you can use the local version of DynamoDB to setup and test your application. This article shows a real example where an actual DynamoDB web service is used.
Step 1: Create the Application
Create a new Xamarin.Forms application and add the required assemblies in order to use the controls from the Telerik UI for UWP suite. For the purpose of the example, we are going to use the RadListView control to show the different items available within our DynamoDb instance.
Here is how the XAML layout is defined in our sample application
[XAML] Example 1: XAML layout
<Page
    x:Class="uwpDynamoDb.MainPage"
    xmlns="http://schemas.microsoft.com/winfx/2006/xaml/presentation"
    xmlns:x="http://schemas.microsoft.com/winfx/2006/xaml"
    xmlns:local="using:uwpDynamoDb"
    xmlns:d="http://schemas.microsoft.com/expression/blend/2008"
    xmlns:mc="http://schemas.openxmlformats.org/markup-compatibility/2006"
    xmlns:data="using:Telerik.UI.Xaml.Controls.Data"
    mc:Ignorable="d"
    Background="{ThemeResource ApplicationPageBackgroundThemeBrush}">
    <Grid>
        <data:RadListView x:Name="DataGrid"
                          ItemsSource="{Binding Customers}">
            <data:RadListView.ItemTemplate>
                <DataTemplate>
                    <Grid>
                        <StackPanel Orientation="Horizontal" Margin="10, 10, 10, 0">
                            <TextBlock Text="{Binding Name}"
                                       FontSize="16"
                                       FontWeight="Bold"
                                       Foreground="DarkOrange"
                                       VerticalAlignment="Center"/>
                            <TextBlock Text="{Binding Id}"
                                       FontSize="16"
                                       FontWeight="Bold"
                                       Foreground="Black"
                                       VerticalAlignment="Center" />
                        </StackPanel>
                        <StackPanel Orientation="Horizontal" Grid.Row="1" Margin="10, 0, 10, 10">
                            <TextBlock Text="State: "
                                       FontSize="13"
                                       FontStyle="Italic"
                                       Foreground="Gray" />
                            <TextBlock Text="{Binding State}"
                                       FontSize="13"
                                       FontStyle="Italic"
                                       Foreground="Gray" />
                        </StackPanel>
                    </Grid>
                </DataTemplate>
            </data:RadListView.ItemTemplate>
        </data:RadListView>
    </Grid>
</Page>
Step 2: Install the NuGet package
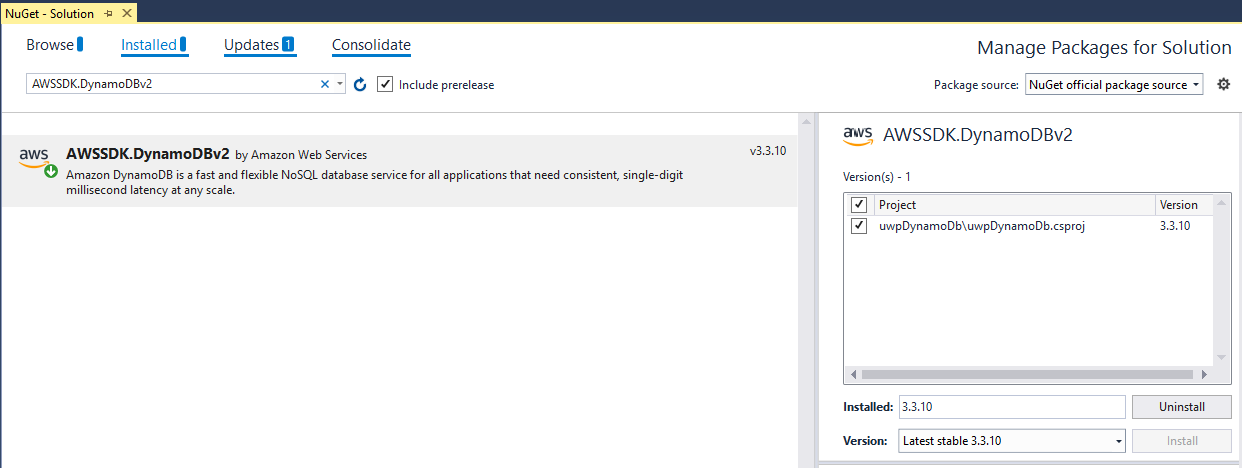
In Visual Studio open the NuGet Package Manager and install the DynamoDB module.
Figure 1: Install the DynamoDB package

Another option is to to type the following command in the NuGet Package Manager Console: PM> Install-Package AWSSDK.DynamoDBv2
note If you do not have a AWS account in Visual Studio please check the Getting Started article.
Step 3: Create the ViewModel
As our database contains a list of customers, define a Customer class that will hold the data for a single record.
[C#] Example 2: The Customer class
public class Customer
{
    public int Id { get; set; }

    public string Name { get; set; }

    public int Employees { get; set; }

    public string State { get; set; }
}
Now add a class called MainWindowViewModel to the example. It will handle all the functionality for managing the DynamoDB database.
First of all, create the Customers collection which will hold the entries from the database and the method that creates the Customers table.
[C#] Example 3: Create the Customers table
class MainWindowViewModel : NotifyPropertyChangedBase
{
    private AmazonDynamoDBClient client;
    private ObservableCollection<Customer> customers;
    public MainWindowViewModel()
    {
        try
        {
            this.client = new AmazonDynamoDBClient("your awsAccessKeyId", "your awsSecretAccessKey", RegionEndpoint.USEast1);
            this.Customers = new ObservableCollection<Customer>();
            this.CreateCustomersTable();
            this.AddCustomers();
            this.LoadData(null);
        }
        catch (Exception ex)
        {
            Debug.WriteLine("Error: failed to create a DynamoDB client; " + ex.Message);
        }
    }

    public ObservableCollection<Customer> Customers
    {
        get { return this.customers; }
        set
        {
            if (this.customers != value)
            {
                this.customers = value;
                this.OnPropertyChanged("Customers");
            }
        }
    }

    private async void CreateCustomersTable()
    {
        List<string> currentTables = client.ListTablesAsync().Result.TableNames;

        if (!currentTables.Contains("Customers"))
        {
            CreateTableRequest createRequest = new CreateTableRequest
            {
                TableName = "Customers",
                AttributeDefinitions = new List<AttributeDefinition>()
            {
                new AttributeDefinition
                {
                    AttributeName = "Id",
                    AttributeType = "N"
                },
                new AttributeDefinition
                {
                    AttributeName = "Name",
                    AttributeType = "S"
                }
            },
                KeySchema = new List<KeySchemaElement>()
            {
                new KeySchemaElement
                {
                    AttributeName = "Id",
                    KeyType = "HASH"
                },
                new KeySchemaElement
                {
                    AttributeName = "Name",
                    KeyType = "RANGE"
                }
            },
            };

            createRequest.ProvisionedThroughput = new ProvisionedThroughput(1, 1);

            CreateTableResponse createResponse;
            try
            {
                createResponse = await client.CreateTableAsync(createRequest);
            }
            catch (Exception ex)
            {
                return;
            }
        }
    }
    . . .
Now that the table is ready you can add some data by adding the following method to the ViewModel.
[C#] Example 4: Add items to the table
 private async void AddCustomers()
    {
        var table = Amazon.DynamoDBv2.DocumentModel.Table.LoadTable(client, "Customers");
        var search = table.Scan(new Amazon.DynamoDBv2.DocumentModel.Expression());
        if (search.Count == 0)
        {
            Document dataObj1 = new Document();
            dataObj1["Name"] = "Telerik";
            dataObj1["Id"] = 2;
            dataObj1["Employees"] = 446;
            dataObj1["State"] = "NY";
            await table.PutItemAsync(dataObj1);

            Document dataObj2 = new Document();
            dataObj2["Name"] = "Progress";
            dataObj2["Id"] = 13;
            dataObj2["Employees"] = 1054;
            dataObj2["State"] = "IL";
            await table.PutItemAsync(dataObj2);

            Document dataObj3 = new Document();
            dataObj3["Name"] = "NativeScript Inc.";
            dataObj3["Id"] = 31;
            dataObj3["Employees"] = 109;
            dataObj3["State"] = "WAS";
            await table.PutItemAsync(dataObj3);
        }
    }
You can then invoke the AddCustomers method in the constructor of the VieWmodel:
[C#] Example 5: Invoke the AddCustomers method in the viewmodel's constructor
    public MainWindowViewModel()
    {
        try
        {
            this.client = new AmazonDynamoDBClient("your awsAccessKeyId", "your awsSecretKeyId", RegionEndpoint.USEast1);
            this.Customers = new ObservableCollection<Customer>();
            this.CreateCustomersTable();
            this.AddCustomers();
            this.LoadData(null);
        }
        catch (Exception ex)
        {
            Debug.WriteLine("Error: failed to create a DynamoDB client; " + ex.Message);
        }
    }
Now set the DataContext of the page where the RadListView element is hosted to be the MainWindowViewModel so that the table is created and the entries are added.
[C#] Example 6: Initialize the MainWindowViewModel
    public StartPage()
    {
        InitializeComponent();
        this.BindingContext = new MainWindowViewModel();
    }
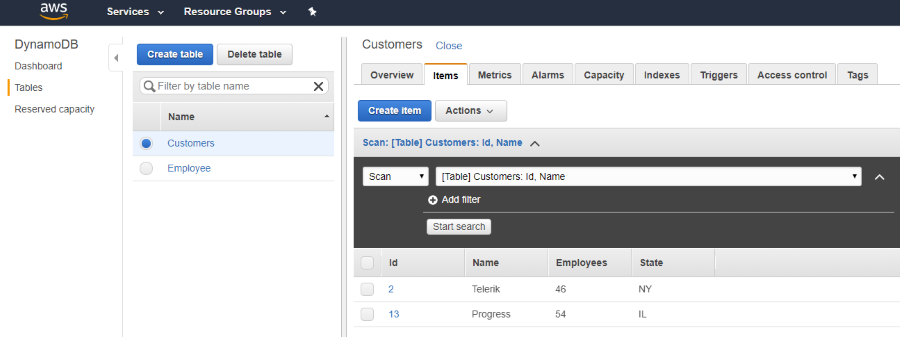
If you run the code at this point you will be able to see the data in your AWS console.

Step 4: Get the Data from DynamoDb
Now you are ready to populate the RadListView control with the data by iterating over the records in the database and adding items to the Customers collection.
[C#] Example 7: Load data from the database
// MainWindowViewModel.cs
private async void LoadData(object obj)
    {
        var table = Amazon.DynamoDBv2.DocumentModel.Table.LoadTable(client, "Customers");
        var search = table.Scan(new Amazon.DynamoDBv2.DocumentModel.Expression());

        var documentList = new List<Document>();
        do
        {
            documentList.AddRange(await search.GetNextSetAsync());

        } while (!search.IsDone);

        var customers = new ObservableCollection<Customer>();
        foreach (var doc in documentList)
        {
            var customer = new Customer();
            foreach (var attribute in doc.GetAttributeNames())
            {
                var value = doc[attribute];
                if (attribute == "Id")
                {
                    customer.Id = Convert.ToInt32(value.AsPrimitive().Value);
                }
                else if (attribute == "Name")
                {
                    customer.Name = value.AsPrimitive().Value.ToString();
                }
                else if (attribute == "Employees")
                {
                    customer.Employees = Convert.ToInt32(value.AsPrimitive().Value);
                }
                else if (attribute == "State")
                {
                    customer.State = value.AsPrimitive().Value.ToString();
                }
            }

            customers.Add(customer);
        }

        this.Customers = customers;
    }
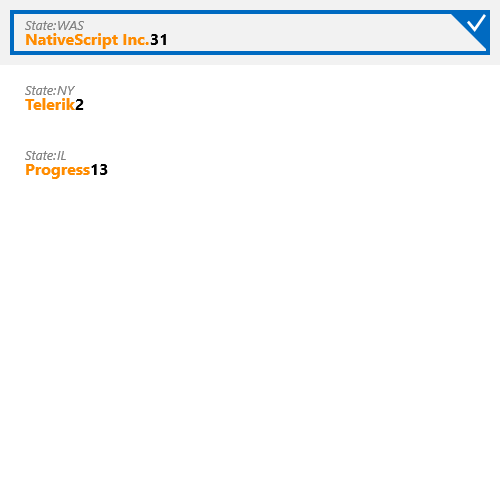
If you now call the LoadData method in the constructor of the viewmodel, the grid will be populated with the entries from the AddCustomers method.
Figure 2: The populated RadListView control
