Using External Assemblies with Custom CLR Objects in the Report Designer
Environment
| Product | Progress® Telerik® Reporting |
| Report Designer | All |
Description
This article provides the required steps to use external assemblies with custom user functions in Telerik Standalone Report Designer.
It is a common requirement to add your own User Functions or bind to custom CLR objects, data models (such as an OpenAccess ORM model), external assemblies with custom data source objects, data feeds (including OData) and web services.
Solution
To expose your data, so it can be utilized by the Object/OpenAccess/Entity data source components, or extend the default behavior of the Telerik Reporting engine with custom user functions, you have to use the AssemblyReferences Element of the Telerik.Reporting configuration section to reference your custom assembly.
Create an Assembly with Custom User Functions
The steps below can be used as an example of creating an assembly with custom user functions. We will use this assembly in the following sections of the current article.
- Open Visual Studio and create a new Class Library project named MyAssembly.
- Add a reference to
Telerik.Reporting.dll. When the assembly is used in the Report Designer its version will be resolved according to the Report Designer version of Telerik Reporting assemblies. -
Create your custom objects:
namespace MyAssembly
{
    using System.Collections;
    using System.Collections.Generic;

    public class Car
    {
        string model;
        int year;

        public Car(string model, int year)
        {
            this.model = model;
            this.year = year;
        }

        public string Model
        {
            get { return this.model; }
            set { this.model = value; }
        }

        public int Year
        {
            get { return this.year; }
            set { this.year = value; }
        }
    }

    public class Cars: List<Car>
    {
        public Cars()
        {
            Car car;
            car = new Car("Honda NSX GT", 2003);
            this.Add(car);

            car = new Car("Nissan Skyline R34 GT-R", 2005);
            this.Add(car);
        }
    }
}
Imports System.Collections Imports System.Collections.Generic Public Class Car Private m_model As String Private m_year As Integer Public Sub New(model As String, year As Integer) Me.m_model = model Me.m_year = year End Sub Public Property Model() As String Get Return Me.m_model End Get Set(value As String) Me.m_model = value End Set End Property Public Property Year() As Integer Get Return Me.m_year End Get Set(value As Integer) Me.m_year = value End Set End Property End Class Public Class Cars Inherits List(Of Car) Public Sub New() Dim car As Car car = New Car("Honda NSX GT", 2003) Me.Add(car) car = New Car("Nissan Skyline R34 GT-R", 2005) Me.Add(car) End Sub End Class Build your project.
Extend the Report Designer Configuration
Once the assembly with our custom logic is built, it should be placed in the folder or a subfolder of the Report Designer executable file. The default installation folder is C:\Program Files (x86)\Telerik\Reporting RX XXXX\Report Designer (C:\Program Files\Telerik\Reporting RX XXXX\Report Designer on 32-bit machines), where 'RX XXXX' stands for the release version and year, e.g R1 2021.
- Locate the Telerik Report Designer executable and its configuration file on your machine (
Telerik.ReportDesigner.exeandTelerik.ReportDesigner.exe.config) -
Place
MyAssembly.dllinto the folder or a subfolder whereTelerik.ReportDesigner.exeresides.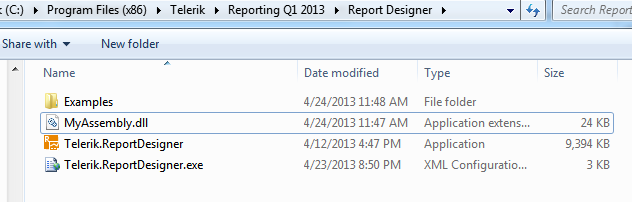
Open the Report Designer’s configuration file with a text editor and navigate to the
<AssemblyReferences>element.-
Uncomment the section and change the name attribute to MyAssembly. Notice that the assembly is referred to only by its name without specifying the extension:
<!-- Add assembly references -->

<!--
<Telerik.Reporting>
    <AssemblyReferences>
        <add name="MyAssembly" version="1.0.0.0" />
    </AssemblyReferences>
</Telerik.Reporting>
-->
Additionally you can add
cultureandpublicKeyTokenattributes to identify the assembly in the<add>element if necessary.Here is a possible configuration extending the Report Designer with the functionality in
MyAssembly.dllassembly:<configuration> ... <runtime> <assemblyBinding xmlns="urn:schemas-microsoft-com:asm.v1"> <probing privatePath="MySubDir; MySubDir\SubDir"/> </assemblyBinding> </runtime> <Telerik.Reporting> <AssemblyReferences> <add name="MyAssembly" version="1.0.0.0"/> </AssemblyReferences> </Telerik.Reporting> ... </configuration>The Standalone Report Designer will look for
MyAssembly.dllin its own folder (where theTelerik.ReportDesigner.exeresides) and inMySubDirandMySubDir\SubDir(using the specified relative paths in the .NET Framework<probing>element). -
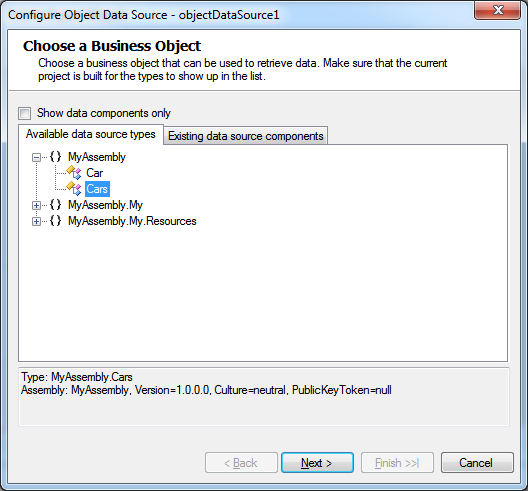
Reopen the Standalone Report Designer and explore the extended functionality.
Use Assembly Located in non-Relative Path
Telerik.Reporting AssemblyReferences section is trying to load the assemblies according to the .NET Framework rules. Thus, in order to use a signed assembly located in a directory different from the application directory or GAC, you have to add a dependentAssembly section to point to the .NET Framework where to look for your assembly. For more information check out the CodeBase Element Microsoft article.
Notes
If the external assembly extending the Report Designer depends on other assemblies, all related assemblies have to be placed in the folder where the Report Designer is located.
In order to deploy a report that uses external assembly check out the KB article Deploying trdx (XML report definition) that uses external assembly.
Use the .NET version of the Standalone Designer when your custom assemblies target .NET assemblies. Check the KB arricle Loading .NET 7 assemblies in the Standalone Report Designer for .NET if you experience issues with .NET 7/8.