Telerik Reporting MCP Server
The Telerik Reporting MCP (Model Context Protocol) server enhances your AI-powered development experience by providing specialized context about Telerik Reporting.
This MCP server enables AI-powered IDEs and tools to generate more accurate, tailored code that leverages Telerik Reporting APIs. You can ask complex questions about integrating Telerik Reporting in web applications, request specific implementations, and generate comprehensive code solutions.
Prerequisites
To use the Telerik Reporting MCP Server, you need:
- .NET 8 or later, or Node.js 18 or later.
- An MCP-compatible client (IDE, code editor, or app) that supports MCP tools (latest version recommended). For example, the latest Visual Studio Code.
- A Telerik user account.
- An active license covering the usage of Telerik Reporting.
- An application that uses the Telerik Reporting.
Installation
Depending on your environment, you can install the Telerik Reporting MCP server in any of the following ways:
-
By using the
dnxscript (.NET 10 or later only) or thedotnetCLI (.NET 8 and .NET 9):-
.NET 10:
dnx Telerik.Reporting.MCP -
.NET 8 and .NET 9:
dotnet tool install Telerik.Reporting.MCP
-
-
By using npm:
npm i @progress/telerik-reporting-mcp
Next, make sure the configuration in your mcp.json is correct, and then add your Telerik license.
Configuring mcp.json
Use the settings in the following table to configure the Telerik Reporting MCP server in the mcp.json file of your code editor. Select the correct value based on your development environment.
| Setting Name | .NET 10 Value | .NET 8/9 Value | Node.js Value |
|---|---|---|---|
| Package Name | "Telerik.Reporting.MCP" |
"Telerik.Reporting.MCP" |
@progress/telerik-reporting-mcp |
| Type | "stdio" |
"stdio" |
stdio |
| Command | "dnx" |
"dotnet" |
npx |
| Arguments | "Telerik.Reporting.MCP", "--yes" |
"tool", "run", "telerik-reporting-assistant" |
-y |
| Server Name | "telerik-reporting-assistant" |
"telerik-reporting-assistant" |
telerik-reporting-assistant |
Configuring Your License
An active Telerik Reporting license is required to use the Telerik Reporting MCP server.
- When installing the MCP server by using the .NET tooling (
dnxordotnet tool install), the license key file will be retrieved automatically if it is present in the default directory on your system (%AppData%\Telerik\telerik-license.txton Windows and~/.telerik/telerik-license.txton Linux). No additional action is required. - When using the .NET tooling, but your license key file is not in the default directory, use one of the options below to configure your license.
-
When using Node.js, add your license key file as an environment variable in your
mcp.jsonfile using one of the options below:-
As a license file path (recommended):
"env": { "TELERIK_LICENSE_PATH": "THE_PATH_TO_YOUR_LICENSE_FILE" } -
As a license key value:
"env": {
    "TELERIK_LICENSE": "YOUR_LICENSE_KEY_HERE"
}
-
Using a license file path is recommended unless you're sharing settings across different systems. Remember to update your license key when necessary.
Visual Studio Configuration
- Early Visual Studio 17.14 versions require the Copilot Chat window to be open when a solution loads for the MCP server to work properly.
- For complete setup instructions, see Use MCP servers in Visual Studio.
The Telerik Reporting MCP server is available as a NuGet package: https://www.nuget.org/packages/Telerik.Reporting.MCP.
Automatic Configuration through the Visual Studio UI
-
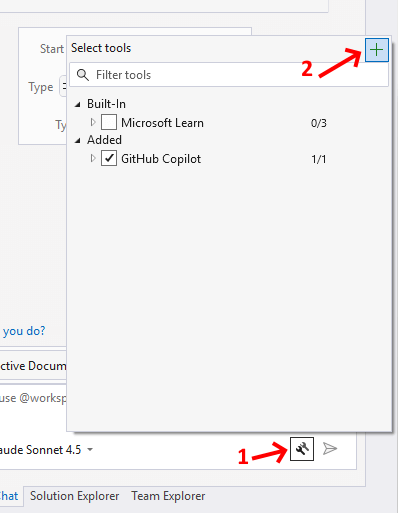
Open the Configure MCP server menu in Visual Studio
- Open the Visual Studio GitHub Copilot Chat
- Click on the button at the bottom right corner to open the Select tools context menu.
- Click on the
+button at the top right corner of the menu to open the Configure MCP server menu.
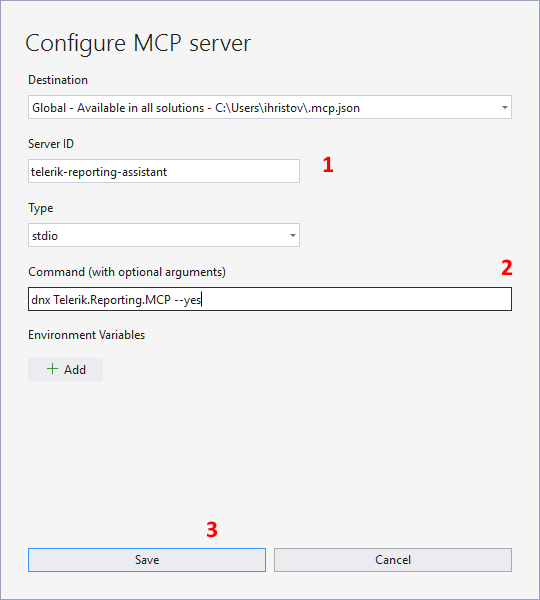
-
Use the following values for the configuration fields:
- In
Destinationselect either Global-Available in all solutions or Solution-Available in this solution. - For
Server IDuse telerik-reporting-assistant. - Select stdio as
Type. - The
Command (with optional arguments)field should contain dnx Telerik.Reporting.MCP --yes. - Click on the
Savebutton to preserve the configuration.
- In
-
Enable the
telerik-reporting-assistanttool in the Copilot Chat window's tool selection dropdown.The
telerik-reporting-assistanttool should now appear in the Select tools context menu. Check it to enable the Telerik Reporting AI Coding Assistant: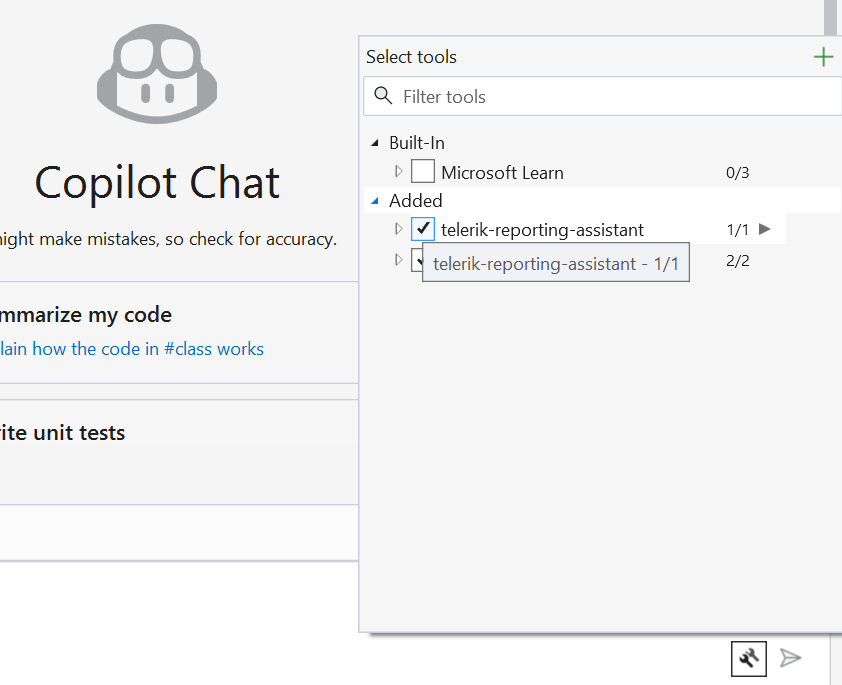
Manual Configuration
The steps below describe the sample procedure for configuring the Telerik Reporting MCP server in Visual Studio.
-
Add an
.mcp.jsonfile to either of the following locations:- For a workspace-specific setup, add the file to the solution's folder.
- For a global setup, add the file to your user directory,
%USERPROFILE%(for example,C:\Users\YourName\.mcp.json).
-
Add the following configuration to the
.mcp.jsonfile:-
In .NET 10:
{ "servers": { "telerik-reporting-assistant": { "type": "stdio", "command": "dnx", "args": ["Telerik.Reporting.MCP", "--yes"], } } } -
In .NET 8 and .NET 9:
{ "servers": { "telerik-reporting-assistant": { "type": "stdio", "command": "dotnet", "args": ["tool", "run", "telerik-reporting-assistant"], } } } -
In Node.js:
{
    "servers": {
        "telerik-reporting-assistant": {
        "type": "stdio",
        "command": "npx",
        "args": ["-y", "@progress/telerik-reporting-mcp@latest"],
        "env": {
                "TELERIK_LICENSE_PATH": "THE_PATH_TO_YOUR_LICENSE_FILE",
                // or
                "TELERIK_LICENSE": "YOUR_LICENSE_KEY"
            }
        }
    }
}
-
Restart Visual Studio.
- Enable the
telerik-reporting-assistanttool in the Copilot Chat window's tool selection dropdown.
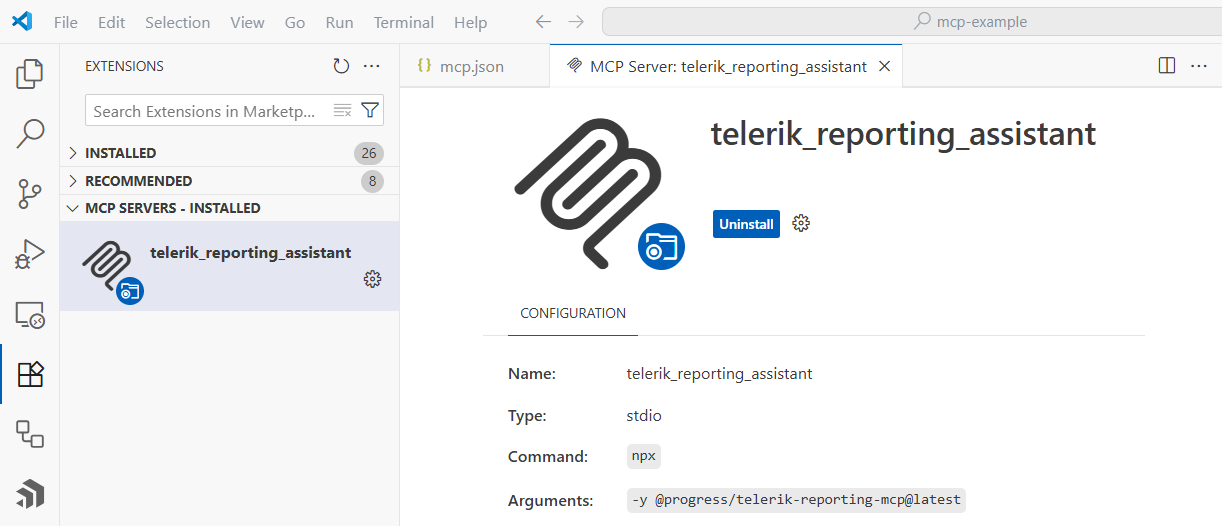
Visual Studio Code
- Visual Studio Code 1.102.1 or later is required to use the Telerik Reporting MCP Server.
- For complete setup instructions, see Use MCP servers in Visual Studio Code.
The basic setup in Visual Studio Code involves the following steps:
- Enable
chat.mcp.enabledin Visual Studio Code settings. -
Create
.vscode/mcp.jsonin your workspace root (or user folder for global setup). The settings below let you use the#telerik-reporting-assistanthandle to call the Telerik Reporting MCP server. To use a custom handle, change the server name in themcp.json.-
In .NET 10:
{ "servers": { "telerik-reporting-assistant": { "type": "stdio", "command": "dnx", "args": ["Telerik.Reporting.MCP", "--yes"], } } } -
In .NET 8 and .NET 9:
{ "servers": { "telerik-reporting-assistant": { "type": "stdio", "command": "dotnet", "args": ["tool", "run", "telerik-reporting-assistant"], } } } -
In Node.js:
{
    "servers": {
        "telerik-reporting-assistant": {
        "type": "stdio",
        "command": "npx",
        "args": ["-y", "@progress/telerik-reporting-mcp@latest"],
        "env": {
                "TELERIK_LICENSE_PATH": "THE_PATH_TO_YOUR_LICENSE_FILE",
                // or
                "TELERIK_LICENSE": "YOUR_LICENSE_KEY"
            }
        }
    }
}
-
-
For global discovery, enable
chat.mcp.discovery.enabledinsettings.json:{ "chat.mcp.discovery.enabled": true } Restart Visual Studio Code.
Cursor
For complete setup instructions, see Model Context Protocol.
Create a .cursor/mcp.json file in your workspace root (or user folder for global setup):
-
In .NET 10:
{ "mcpServers": { "telerik-reporting-assistant": { "type": "stdio", "command": "dnx", "args": ["Telerik.Reporting.MCP", "--yes"], } } } -
In .NET 8 and .NET 9:
{ "mcpServers": { "telerik-reporting-assistant": { "type": "stdio", "command": "dotnet", "args": ["tool", "run", "telerik-reporting-assistant"], } } } -
In Node.js:
{
    "mcpServers": {
        "telerik-reporting-assistant": {
        "type": "stdio",
        "command": "npx",
        "args": ["-y", "@progress/telerik-reporting-mcp@latest"],
        "env": {
                "TELERIK_LICENSE_PATH": "THE_PATH_TO_YOUR_LICENSE_FILE",
                // or
                "TELERIK_LICENSE": "YOUR_LICENSE_KEY"
            }
        }
    }
}
This enables you to call the MCP Server with the #telerik-reporting-assistant handle. To use a custom handle, change the server name in the mcp.json.
Usage
When switching between tasks and files, start a new session in a new chat window to avoid polluting the context with irrelevant or outdated information.
To use the Telerik Reporting MCP Server:
- Choose your preferred mode and model.
At the time of publishing, Claude Sonnet 4 and GPT-5 produce optimal results. - Start your prompt with
#telerik-reporting-assistant(or with '#' followed by your custom MCP server name, if set): -
Inspect the output and verify that the MCP server is used. Look for messages similar to the ones below:
- Visual Studio:
Running telerik-reporting-assistant - Visual Studio Code:
Running telerik-reporting-assistant - Cursor:
Calling MCP tool telerik-reporting-assistant
- Visual Studio:
If the Telerik Reporting MCP server is not used even though it's installed and enabled, double-check the server name in your configuration and try rephrasing your prompt.
- If requested, grant the Telerik Reporting MCP Server permissions to run for this session, workspace, or always.
- Start fresh sessions for unrelated prompts to avoid context pollution.
Improving Server Usage
Determining the Reporting Area: To better specify the context for each prompt, the MCP Server will attempt to determine the Telerik Reporting Area the prompt relates to. These areas represent the supported web frameworks and backend technologies, as listed below as pairs consisting of an identifier and a description:
- AngularWrapper - Angular Report Viewer (wrapper of the HTML5 Report Viewer)
- NativeAngular - Native Angular Report Viewer (built with Kendo UI for Angular)
- BlazorWrapper- Blazor Report Viewer (wrapper of the HTML5 Report Viewer)
- NativeBlazor - Native Blazor Report Viewer (built with Telerik UI for Blazor)
- HTML5 - HTML5 Report Viewer (built with Kendo UI for jQuery)
- React - React Report Viewer (wrapper of the HTML5 Report Viewer)
- RESTService - Reporting REST Service for .NET Framework
- RESTServiceCore - Reporting REST Service for .NET Core/.NET 8+
- General - General question
If the Reporting Area cannot be determined automatically, the MCP Server will display a dialog asking to pick the corresponding area in which the prompt falls in:
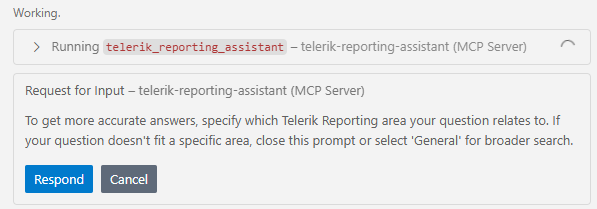
After clicking on the 'Respond' button, the MCP Server will display a drop-down list with all the areas and wait for selecting the corresponding Reporting Area. If there is no applicable entry, please select the 'General' entry at the end of the list.

Custom Instructions: To increase the likelihood of the Telerik MCP server being used, or to call it without the need to mention "telerik-reporting" explicitly, add custom instructions to your AI tool:
Sample Prompts
The following examples demonstrate useful prompts for the Telerik Reporting MCP Server:
- "
#telerik-reporting-assistantAdd a Telerik Report Viewer to my native Angular application." - "
#telerik-reporting-assistantConnect the Telerik Report Viewer to my Telerik Report Server instance."
Visit the Telerik Reporting Prompt Library for more sample prompts.
Usage Limits
A Telerik Subscription license is recommended to use the Telerik Reporting AI Coding Assistant without restrictions. Perpetual license holders and trial users can make a limited number of requests per year.
Connect to Local AI Model
You can use the Telerik Reporting MCP server with local large language models (LLMs):
- Run a local model, for example, through Ollama.
- Use a bridge package like MCP-LLM Bridge.
- Connect your local model to the Telerik MCP server.
This setup allows you to use the Telerik AI Coding Assistant without cloud-based AI models.