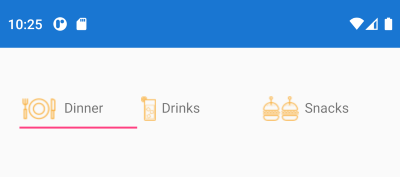
Add images to TabView headers
Environment
| Product Version | R1 2021 |
| Product | TabView for Xamarin |
Description
This help article will show you how to customize the TabView header items and add images to them.
Solution
In general, you can customize the appearance of each TabViewHeaderItem by modifying its ControlTemplate. You can take the default ControlTemplate as a base and add any controls inside it per the requirements you have. Check Customize the TabViewHeaderItem Control Template documentation topic for more details on the matter.
To show an image, you can add an Xamarin.Forms.Image View inside the template.
Here is a sample ControlTemplate with an Image view that should be added to the Page Resources:
<ControlTemplate x:Key="DinnerHeaderControlTemplate">
    <Grid BackgroundColor="Transparent">
        <BoxView IsVisible="{TemplateBinding IsSelected}"
                BackgroundColor="{TemplateBinding SelectedColor}"
                VerticalOptions="End"
                HeightRequest="2" />
        <StackLayout Orientation="Horizontal"
                     Margin="0, 0, 0, 8">
            <Image Source="tab_dinner.png" />
            <Label Text="{TemplateBinding Text}"
                    Margin="0, 0, 0, 2"
                    VerticalOptions="Center"
                    HorizontalOptions="Center" />
        </StackLayout>
    </Grid>
</ControlTemplate>
Then apply thus created DinnerHeaderControlTemplate to the TabViewHeaderItem ControlTemplate property:
<telerikPrimitives:RadTabView x:Name="tabView">
    <telerikPrimitives:RadTabView.Items>
        <telerikPrimitives:TabViewItem>
            <telerikPrimitives:TabViewItem.Header>
                <telerikPrimitives:TabViewHeaderItem Text="Dinner"
                                                     ControlTemplate="{StaticResource DinnerHeaderControlTemplate}" />
            </telerikPrimitives:TabViewItem.Header>
        </telerikPrimitives:TabViewItem>
     </telerikPrimitives:RadTabView.Items>
</telerikPrimitives:RadTabView>
Check the result on Android below:
