Getting Started
This article will guide you through the creation of a WinAppDriver test.
1. Run WinAppDriver.exe from the installation directory (C:\Program Files (x86)\Windows Application Driver) as an administrator and leave it running. Note the address the application is listening to as you will need it later.

2. Add a Unit Test project to the solution of your test application or create a separate solution for it.
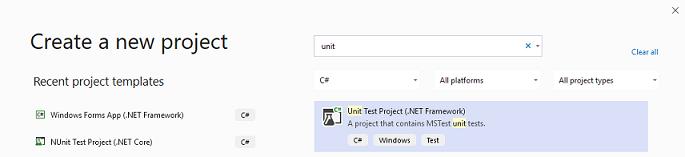
3. Right-click the Unit Test project in Solution Explorer and select Manage NuGet Packages…. Install the latest stable Appium.WebDriver package.
4. Create a TestSession class where you set the AppiumOptions as follows:
Example 1: The TestSession class
public class TestSession
{
    private const string WindowsApplicationDriverUrl = "http://127.0.0.1:4723";
    private const string TestApp = @"D:\TelerikControlsTest\bin\Debug\TelerikControlsTest.exe"; // replace with the actual location of the executable file of the application you want to test

    protected static WindowsDriver<WindowsElement> session;
    public static WindowsDriver<WindowsElement> desktopSession;

    public static void Setup(TestContext context)
    {
        // Launch RadGridView test application if it is not yet launched
        if (session == null || desktopSession == null)
        {
            TearDown();

            // Create a new session to bring up the test application
            AppiumOptions options = new AppiumOptions();
            options.AddAdditionalCapability("app", TestApp);
            options.AddAdditionalCapability("deviceName", "WindowsPC");
            options.AddAdditionalCapability("platformName", "Windows");

            session = new WindowsDriver<WindowsElement>(new Uri(WindowsApplicationDriverUrl), options);
            Assert.IsNotNull(session);
            Assert.IsNotNull(session.SessionId);

            // Set implicit timeout to 1.5 seconds to make element search to retry every 5- ms for at most three times
            session.Manage().Timeouts().ImplicitWait = TimeSpan.FromSeconds(1.5);

            AppiumOptions optionsDesktop = new AppiumOptions();
            optionsDesktop.AddAdditionalCapability("app", "Root");
            optionsDesktop.AddAdditionalCapability("deviceName", "WindowsPC");
            optionsDesktop.AddAdditionalCapability("ms:experimental-webdriver", true);
            desktopSession = new WindowsDriver<WindowsElement>(new Uri(WindowsApplicationDriverUrl), optionsDesktop);
        }
    }

    public static void TearDown()
    {
        if (session != null)
        {
            session.Quit();
            session = null;
        }

        if (desktopSession != null)
        {
            desktopSession.Quit();
            desktopSession = null;
        }
    }
}
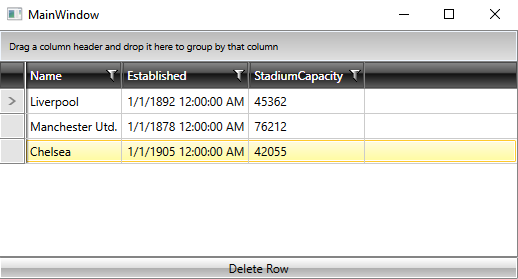
Example 2: The test application setup
<Grid>
    <Grid.RowDefinitions>
        <RowDefinition Height="*" />
        <RowDefinition Height="Auto" />
    </Grid.RowDefinitions>
    <Grid.DataContext>
        <local:MyViewModel />
    </Grid.DataContext>
    <telerik:RadGridView x:Name="gridView" ItemsSource="{Binding Clubs}"/>
    <telerik:RadButton x:Name="deleteButton" Grid.Row="1" Content="Delete Row" Click="OnDeleteButtonClick" />
</Grid>
Example 3: The delete button click handler
private void OnDeleteButtonClick(object sender, RoutedEventArgs e)
{
    this.gridView.PendingCommands.Add(RadGridViewCommands.SelectCurrentItem);
    this.gridView.PendingCommands.Add(RadGridViewCommands.Delete);
    this.gridView.ExecutePendingCommand();
}
6. Next, create the following methods and fields for the class.
Example 4: The TelerikControlsScenarios class
[TestClass]
public class TelerikControlsScenarios : TestSession
{
    private static WindowsElement gridView;
    private static WindowsElement button;

    [ClassInitialize]
    public static void ClassInitialize(TestContext context)
    {
        Setup(context);

        gridView = session.FindElementByAccessibilityId("gridView");
        button = session.FindElementByAccessibilityId("deleteButton");
    }

    [TestMethod]
    public void DeleteGridRow()
    {
    }

    [ClassCleanup]
    public static void ClassCleanup()
    {
        TearDown();
    }
}
- Using the WinAppDriver UI Recorder tool to record tests at runtime
- Writing tests from scratch using the inspect.exe tool for locating elements in your application
7. Launch the WinAppDriver UI Recorder and click Record. Hover over the deleteButton and wait until it starts flashing blue. The Recorder's status bar will change its text from Active to XPath Ready. Once you have recorded a sequence of steps you wish to reproduce, click Pause within the recorder. You can open the actions selector to make certain that all UI actions have been recorded.

All you need to do now is to click the Generate and copy C# code to Clipboard button to copy the code for all recorded actions. You can then paste this code into the DeleteGridRow method and then extend it to test the expected functionality.
Alternatively, you can write the test from scratch.
Example 5: Defining the DeleteGridRow method
[TestMethod]
public void DeleteGridRow()
{
    var gridRowElements = gridView.FindElementsByClassName(@"GridViewRow").ToList();
    Assert.IsTrue(gridRowElements.Count == 3, "Expected rows: 3, Actual rows: " + gridRowElements.Count);

    gridView.Click();

    desktopSession.FindElementByName("Delete Row").Click();

    gridRowElements = gridView.FindElementsByClassName(@"GridViewRow").ToList();
    Assert.IsTrue(gridRowElements.Count == 2, "Expected rows: 2, Actual rows: " + gridRowElements.Count);
}