Configuration
RadScheduleView's predefined ViewDefinitions have various properties, which can be set in order the views to be configured best. Some of them are common for all views, others are specific for each view. In the following section we will go through all common properties.
For more information about the view specific properties, check here.
Title
Gets or sets the title of the view.LargeChangeInterval
LargeChangeInterval
Gets or sets the date time interval with which the current will be increased or decreased when clicking on the navigation buttons in the header of the ScheduleView. The default values of the LargeChangeInterval property are:
1d (1 day) for DayView
7d (7 days) for WeekView
1m (1 month) for MonthView
7d (7 days) for TimelineView
The property is of type DateTimeInterval. In the following example the LargeChangeInterval property of DayView is set to 2 days and of MonthView is set of 2 months and 4 days.
Example 1: Setting the LargeChangeInterval property in XAML
<telerik:RadScheduleView x:Name="scheduleView" AppointmentsSource="{Binding Appointments}">
    <telerik:RadScheduleView.ViewDefinitions>
        <telerik:DayViewDefinition LargeChangeInterval="2d"/>
        <telerik:MonthViewDefinition LargeChangeInterval="2m 4d"/>
    </telerik:RadScheduleView.ViewDefinitions>
</telerik:RadScheduleView>
Example 2: Setting the LargeChangeInterval property in code
dayDefintion.LargeChangeInterval = new Telerik.Windows.Controls.ScheduleView.
DateTimeInterval(2, 0);
monthDefinition.LargeChangeInterval = new Telerik.Windows.Controls.ScheduleView.
DateTimeInterval(4, 2);
SmallChangeInterval
Gets or sets the small change interval of the ScheduleView. It indicates the date time interval with which the current will be increased or decreased when moving the scrollbar. The default values of the SmallChangeInterval are:
7d (7 days) for MonthView
1d (1 day) for TimelineView
Setting the SmallChangeInterval property of a DayViewDefiniton and WeekViewDefinition won’t change the behavior of the view. That is due to that using the vertical scrollbar will not navigate to the next set of days, but will scroll the current view.
The following example shows how to set the SmallChangeInterval property of a MonthViewDefinition to 11 days and of a TimelineViewDefinition to 3 days:
Example 3: Setting the SmallChangeInterval property in XAML
<telerik:RadScheduleView x:Name="scheduleView" AppointmentsSource="{Binding Appointments}">
    <telerik:RadScheduleView.ViewDefinitions>
        <telerik:MonthViewDefinition SmallChangeInterval="11d"/>
        <telerik:TimelineViewDefinition SmallChangeInterval="3d"/>
    </telerik:RadScheduleView.ViewDefinitions>
</telerik:RadScheduleView>
Example 4: Setting the SmallChangeInterval property in code
monthDefintion.SmallChangeInterval = new Telerik.Windows.Controls.ScheduleView.
DateTimeInterval(11, 0);
timelineDefinition.SmallChangeInterval = new Telerik.Windows.Controls.ScheduleView.
DateTimeInterval(3, 0);
DayStartTime
Gets or sets the time used to indicate the start of the TimeRuler. The default value of the DayStartTime for all views is 00:00:00 or 12:00 AM.
The DayStartTime is of type TimeSpan. It will not affect the look of the MonthView, since MonthView does not display time.
The following example illustrates how to set the DayStartTime for DayView, WeekView and TimelineView:
Example 5: Setting the DateStartTime property in XAML
<telerik:RadScheduleView x:Name="scheduleView" AppointmentsSource="{Binding Appointments}">
    <telerik:RadScheduleView.ViewDefinitions>
        <telerik:DayViewDefinition DayStartTime="07:30:00"/>
        <telerik:WeekViewDefinition DayStartTime="08:00:00"/>
        <telerik:TimelineViewDefinition DayStartTime="11:30:00"/>
    </telerik:RadScheduleView.ViewDefinitions>
</telerik:RadScheduleView>
Example 6: Setting the DateStartTime property in code
dayDefintion.DayStartTime = new TimeSpan(7, 30, 00);
weekDefinition.DayStartTime = new TimeSpan(8, 0, 0);
timelineDefinition.DayStartTime = new TimeSpan(11, 30, 0);
MonthViewDefinition and AgendaViewDefinition do not support the DayStartTime property.
DayEndTime
Gets or sets the time used to indicate the end of the view. The default values of the DayStartTime for the view are:
1.00:00:00 (1 day) for DayView
1.00:00:00 (1 day) for WeekView
1.00:00:00 (1 day) for TimelineView
The DayEndTime property is of type TimeSpan. The MonthView will be affected in the following manner – if there are appointments out of the displayed time range, they won’t be displayed in the MonthView also.
The following example illustrates how to set the DayStartTime for DayView, WeekView and TimelineView:
Example 7: Setting the DayEndTime property in XAML
<telerik:RadScheduleView x:Name="scheduleView" AppointmentsSource="{Binding Appointments}">
    <telerik:RadScheduleView.ViewDefinitions>
        <telerik:DayViewDefinition DayEndTime="17:30:00"/>
        <telerik:WeekViewDefinition DayEndTime="18:00:00"/>
        <telerik:TimelineViewDefinition DayEndTime="21:30:00"/>
    </telerik:RadScheduleView.ViewDefinitions>
</telerik:RadScheduleView>
Example 8: Setting the DayEndTime property in code
dayDefintion.DayEndTime = new TimeSpan(17, 30, 00);
weekDefinition.DayEndTime = new TimeSpan(18, 0, 0);
timelineDefinition.DayEndTime = new TimeSpan(21, 30, 0);
MonthViewDefinition and AgendaViewDefinition do not support the DayEndTime property.
VisibleDays
Gets or sets the visible dates in the view. It indicates the count of the dates that will be shown in the view. The default values of the VisibleDays property are:
1 day for DayView
7 days for WeekView
42 days for MonthView
7 days for TimelineView
The following code-snippet illustrates how to set the VisibleDays property in XAML and in code-behind for all predefined views:
Example 9: Setting the VisibleDays property in XAML
<telerik:RadScheduleView x:Name="scheduleView" AppointmentsSource="{Binding Appointments}">
    <telerik:RadScheduleView.ViewDefinitions>
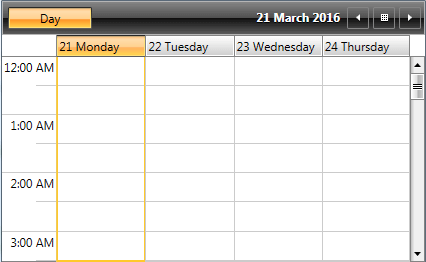
        <telerik:DayViewDefinition VisibleDays="4"/>
        <telerik:WeekViewDefinition VisibleDays="11"/>
        <telerik:MonthViewDefinition VisibleDays="21" />
        <telerik:TimelineViewDefinition VisibleDays="9"/>
    </telerik:RadScheduleView.ViewDefinitions>
</telerik:RadScheduleView>
Example 10: Setting the VisibleDays property in code
dayDefintion.VisibleDays = 4;
weekDefinition.VisibleDays = 11;
monthDefintion.VisibleDays = 21;
timelineDefinition.VisibleDays = 9;
Figure 1: RadScheduleView with VisibleDays set
FirstDayOfWeek
Gets or sets the first weekday with which the week will start according to the view. It affects only the WeekView and MonthView. Once set, it will override the FirstDayOfWeek property of the ScheduleView and the one that is default for the culture.
StretchGroupHeaders
If set to True (default value) and there is more available space in the ViewDefintion left, it will be distributed among the groups.
Example 11: Setting the StretchGroupHeaders property
<telerik:RadScheduleView x:Name="scheduleView" AppointmentsSource="{Binding Appointments}" >
    <telerik:RadScheduleView.ViewDefinitions>
        <telerik:DayViewDefinition VisibleDays="3" StretchGroupHeaders="False"  />
    </telerik:RadScheduleView.ViewDefinitions>
</telerik:RadScheduleView>
Figure 2: RadScheduleView with StretchGroupHeaders set

Orientation
Gets or sets the orientation of the view. When the orientation is horizontal the TimeRuler is also horizontally oriented, but the GroupHeaders are oriented vertically and vice versa.
Values can be Vertical or Horizontal. Not present in MonthView. This is measured according to the position of the TimeRuler. The default values of Orientation property are:
Vertical for DayView
Vertical for WeekView
Horizontal for TimelineView
The following code-snippets show how to set the Orientation property in XAML and code-behind:
Example 12: Setting the Orientation property in XAML
<telerik:RadScheduleView x:Name="scheduleView" AppointmentsSource="{Binding Appointments}">
    <telerik:RadScheduleView.ViewDefinitions>
        <telerik:DayViewDefinition Orientation="Horizontal" />
        <telerik:WeekViewDefinition Orientation="Horizontal"/>
        <telerik:TimelineViewDefinition Orientation="Vertical"/>
    </telerik:RadScheduleView.ViewDefinitions>
</telerik:RadScheduleView>
Example 13: Setting the Orientation property in code
dayDefintion.Orientation = Orientation.Horizontal;
weekDefinition.Orientation = Orientation.Horizontal;
timelineDefinition.Orientation = Orientation.Vertical;
The following figures show the how the Orientation property affects the views.
Figure 3: DayView with Horizontal Orientation
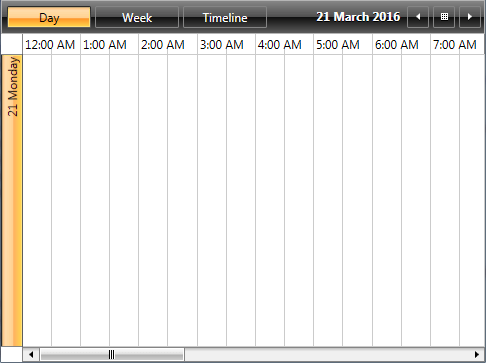
Figure 4: WeekView with Horizontal Orientation
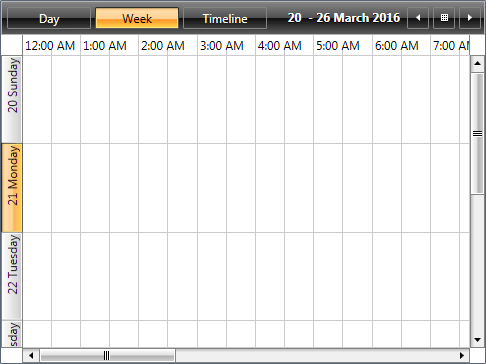
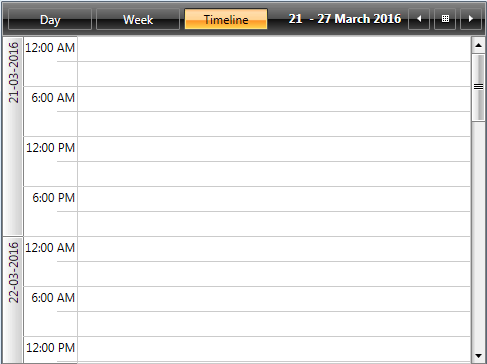
Figure 5: TimelineView with Vertical Orientation
GroupFilter
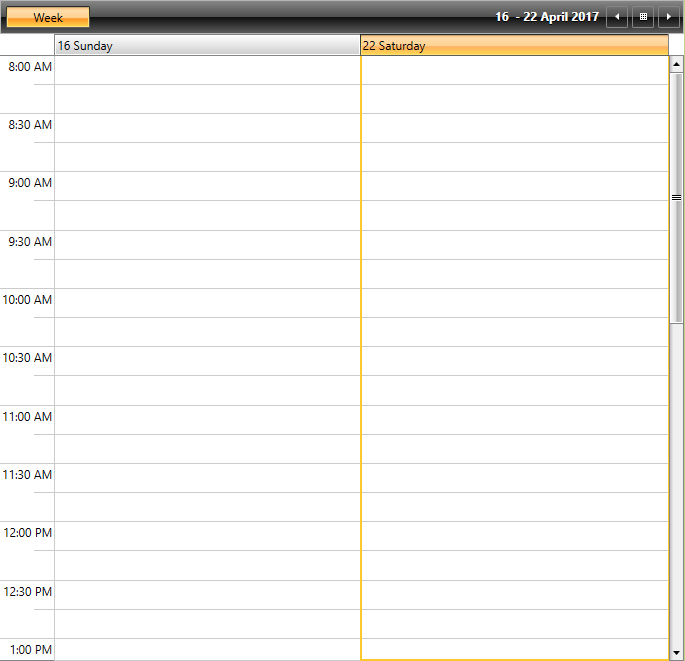
The GroupFilter property can be used when in a grouped scenario a given group needs to be excluded. It is a predicate that takes a given group as a parameter and returns a boolean value determining whether the group should take part in the grouping operation or not. The following example demonstrates how RadScheduleView can display only weekends or only working days through its GroupFilter.
Example 14: Defining the GroupFilter predicate in the view model
public class MyViewModel : ExampleViewModel<Appointment>
{
     private Func<object, bool> groupFilter;

     public MyViewModel()
     {
         this.groupFilter = new Func<object, bool>(this.GroupFilterFunc);
     }

     public Func<object, bool> GroupFilter
     {
         get
         {
             return this.groupFilter;
         }
         private set
         {
             if (this.groupFilter != value)
             {
                 this.groupFilter = value;
                 this.OnPropertyChanged(() => this.GroupFilter);
             }
         }
     }

     private bool GroupFilterFunc(object groupName)
     {
         if (groupName is DateTime)
         {
             return ((DateTime)groupName).DayOfWeek == DayOfWeek.Saturday
                 || ((DateTime)groupName).DayOfWeek == DayOfWeek.Sunday;
         }
         return true;
     }
}
Example 15: Applying the GroupFilter to a WeekView
<telerik:RadScheduleView AppointmentsSource="{Binding Appointments}">
        <telerik:RadScheduleView.ViewDefinitions>
            <telerik:WeekViewDefinition GroupFilter="{Binding GroupFilter}" DayStartTime="08:00" DayEndTime="20:00"/>
        </telerik:RadScheduleView.ViewDefinitions>
Figure 6: WeekView with applied GroupFilter
SubGroupsFilter
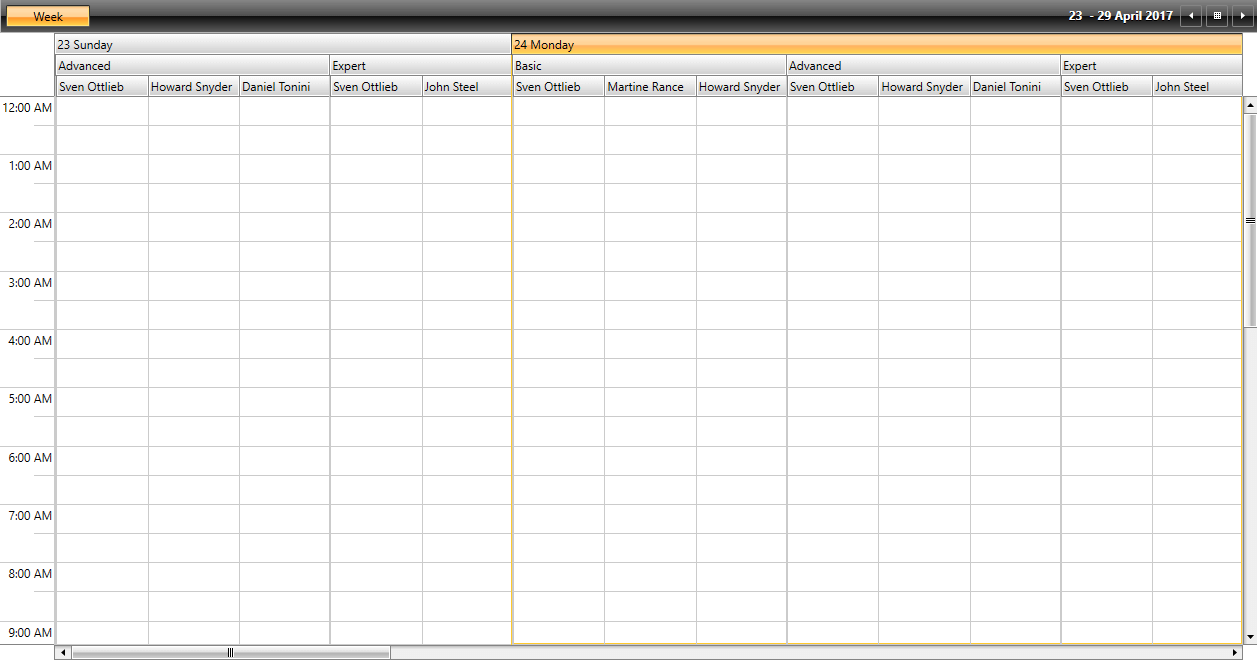
As of R2 2017 RadScheduleView exposes the SubGroupsFilter mechanism. It provides the option to control whether a given item should be visible in a particular group or not. The following example demonstrates how RadScheduleView can be populated with some sample Resources and how they can be visualized in a given group and hidden in another.
Example 16: Defining the SubGroupsFilter in the view model
public class MyViewModel : ExampleViewModel<Appointment>
{
     private Func<IGroupInfo, bool> subGroupsFilter;

     public MyViewModel()
     {
        this.subGroupsFilter = new Func<IGroupInfo, bool>(this.FilterSpeakersByRooms);
     }

    public Func<IGroupInfo, bool> SubGroupsFilter
    {
        get
        {
            return this.subGroupsFilter;
        }
        private set
        {
            this.subGroupsFilter = value;
            this.OnPropertyChanged(() => this.SubGroupsFilter);
        }
    }

    private bool FilterSpeakersByRooms(IGroupInfo groupInfo)
    {
        if (groupInfo != null)
        {
            var currentResource = groupInfo.Name as Resource;

            var parentResource = groupInfo.ParentGroupInfo.Name as Resource;

            if (currentResource != null && parentResource != null)
            {
                // John Steel has only Expert level subjects.
                if (currentResource.ResourceType == "Speaker")
                {
                    if (currentResource.ResourceName == "John Steel" && parentResource.ResourceName != "Expert")
                    {
                        return false;
                    }

                    // Howard Snyder has only Basic and Advanced level subjects.
                    if (currentResource.ResourceName == "Howard Snyder" && parentResource.ResourceName == "Expert")
                    {
                        return false;
                    }

                    // Martine Rance has only Basic level subjects.
                    if (currentResource.ResourceName == "Martine Rance" && parentResource.ResourceName != "Basic")
                    {
                        return false;
                    }

                    // Daniel Tonini has only Advanced level subjects.
                    if (currentResource.ResourceName == "Daniel Tonini" && parentResource.ResourceName != "Advanced")
                    {
                        return false;
                    }
                }
            }

            DateTime date;
            // Hide the Advanced subgroup for the days that have no advanced subjects.
            if (DateTime.TryParse(groupInfo.ParentGroupInfo.Name.ToString(), out date))
            {
                if (currentResource.ResourceName == "Basic" && (date.DayOfWeek >= DayOfWeek.Friday || date.DayOfWeek == DayOfWeek.Sunday))
                {
                    return false;
                }
            }
        }

        return true;
    }
}
Example 17: Populating RadScheduleView with Resources and binding the SubGroupsFilter
<telerik:RadScheduleView AppointmentsSource="{Binding Appointments}">
        <telerik:RadScheduleView.ViewDefinitions>
            <telerik:WeekViewDefinition SubGroupsFilter="{Binding SubGroupsFilter}"/>
        </telerik:RadScheduleView.ViewDefinitions>
        <telerik:RadScheduleView.ResourceTypesSource>
            <telerik:ResourceTypeCollection>
                <telerik:ResourceType Name="Speaker">
                    <telerik:Resource ResourceName="Sven Ottlieb" />
                    <telerik:Resource ResourceName="Martine Rance" />
                    <telerik:Resource ResourceName="Howard Snyder" />
                    <telerik:Resource ResourceName="Daniel Tonini" />
                    <telerik:Resource ResourceName="John Steel" />
                </telerik:ResourceType>
                <telerik:ResourceType Name="Level">
                    <telerik:Resource ResourceName="Basic" />
                    <telerik:Resource ResourceName="Advanced" />
                    <telerik:Resource ResourceName="Expert" />
                </telerik:ResourceType>
            </telerik:ResourceTypeCollection>
        </telerik:RadScheduleView.ResourceTypesSource>
        <telerik:RadScheduleView.GroupDescriptionsSource>
            <telerik:GroupDescriptionCollection >
                <telerik:DateGroupDescription />
                <telerik:ResourceGroupDescription ResourceType="Level" />
                <telerik:ResourceGroupDescription ResourceType="Speaker" />
            </telerik:GroupDescriptionCollection>
        </telerik:RadScheduleView.GroupDescriptionsSource>
    </telerik:RadScheduleView>
Figure 7: WeekView with applied SubGroupsFilter
