Customize the Rotation Step
In RadDiagram each RadDiagramItem can be rotated. This operation is implemented by a RotationService.
In order to learn more about the different Diagramming Services, you can examine the Services article.
In this tutorial we will examine a solution that takes a user-defined value and uses it to define the step of a rotation operation in a RadDiagram instance.
First, let's create a sample RadDiagram definition that has two RadDiagramShape objects.
<telerik:RadDiagram x:Name="diagram" IsSnapToGridEnabled="False">
    <telerik:RadDiagramShape Geometry="{telerik:FlowChartShape ShapeType=BeginLoopShape}"
                             Position="400 300" />
    <telerik:RadDiagramShape Geometry="{telerik:FlowChartShape ShapeType=ExternalDataShape}"
                             Position="500 400" />
</telerik:RadDiagram>
Please note that in the RadDiagram definition, the SnapToGrid feature is disabled. If you enable it, you don't have to create a new RotationService to customize the rotation step. Instead you can take advantage of the RotationAngleSnap constant. It allows you to set the snapping angle when rotating items in a grid-snapping enabled RadDiagram. The default value of this constant is 5 degrees. And it can be easily changed by setting DiagramConstants.RotationAngleSnap = 55, but you will have to add a using statement for the Telerik.Windows.Diagrams.Core namespace.
Next we can add a TextBox control to let the user define the rotation step:
<StackPanel Width="200" HorizontalAlignment="Left">
    <TextBlock FontSize="16"
               FontWeight="Bold"
               Text="Rotating: " />
    <TextBox x:Name="rotationStep"
             MaxWidth="160"
             Text="" />
</StackPanel>
Now that our view is ready, we can configure the default rotation mechanism to take into account the rotation step defined by a user. In order to do so, we will have to create a custom RotationService and use it within our diagramming instance.
The first step is to define a new class, let's call it MyRotation, that derives from the RotationService. As the RotationService has a virtual method that calculates the angle of each rotation operation, we will override this method and implement logic that takes a user-defined value and uses it to calculate the rotation angle. This means that we need to define an int property and use it in the CalculateRotationAngle method implementation:
public class MyRotation : RotationService
{
    private int rotationStep;

    public MyRotation(RadDiagram owner)
        : base(owner as IGraphInternal)
    {
        //initialize the RotationStep property
        this.RotationStep = 1;
    }

    public int RotationStep
    {
        get
        {
            return this.rotationStep;
        }
        set
        {
            this.rotationStep = value;
        }
    }

    protected override double CalculateRotationAngle(Point newPoint)
    {
        //take the angle calculated by the default rotation mechanism
        var angle = base.CalculateRotationAngle(newPoint);
        //change that angle based on the user-defined value of the RotationStep property
        return angle = Math.Floor(angle / this.RotationStep) * this.RotationStep;
    }
}
Public Class MyRotation
    Inherits RotationService

    Private rStep As Integer

    Public Sub New(ByVal owner As RadDiagram)
        MyBase.New(TryCast(owner, IGraphInternal))
        Me.RotationStep = 1
    End Sub

    Public Property RotationStep() As Integer
        Get
            Return Me.rStep
        End Get
        Set(ByVal value As Integer)
            Me.rStep = value
        End Set
    End Property

    Protected Overrides Function CalculateRotationAngle(ByVal newPoint As Point) As Double
        Dim angle = MyBase.CalculateRotationAngle(newPoint)
        angle = Math.Floor(angle / Me.RotationStep) * Me.RotationStep
        Return angle
    End Function
End Class
Finally, we need to configure the diagram to use our custom rotation implementation instead of the default RotationService. This is why we need to create a new instance of the MyRotation class in the code-behind file of our view. Then we need to make sure that the RotationStep property is used as a binding path for the Text property of the rotationStep:
private MyRotation newRotationService;
private void InitializeNewServices()
{
    //initialize the newRotationService and define a default RotationStep
    this.newRotationService = new MyRotation(this.diagram) { RotationStep = 45 };
    //create a binding with Path=RotationStep
    Binding binding = new Binding("RotationStep");
    //use the newRotationService as a source of the binding
    binding.Source = this.newRotationService;
    binding.Mode = BindingMode.TwoWay;
    //apply the binding on the rotationStep TextBox
    this.rotationStep.SetBinding(TextBox.TextProperty, binding);
}
Private newRotationService As MyRotation
Private Sub InitializeNewServices()

    'initialize the newRotationService and define a default RotationStep'
    Me.newRotationService = New MyRotation(Me.diagram) With {
        .RotationStep = 45
    }
    'create a binding with Path=RotationStep'
    Dim binding As New Binding("RotationStep")
    'use the newRotationService as a source of the binding'
    binding.Source = Me.newRotationService
    binding.Mode = BindingMode.TwoWay
    'apply the binding on the rotationStep TextBox'
    Me.rotationStep.SetBinding(TextBox.TextProperty, binding)
End Sub
And now we can use the newRotationService instance and register it through the ServiceLocator:
private MyRotation newRotationService;
public Example()
{
    InitializeComponent();

    this.InitializeNewServices();
    this.diagram.ServiceLocator.Register<IRotationService>(this.newRotationService);
}
Private newRotationService As MyRotation

Public Sub New()
    InitializeComponent()

    Me.InitializeNewServices()
    Me.diagram.ServiceLocator.Register(Of IRotationService)(Me.newRotationService)
End Sub
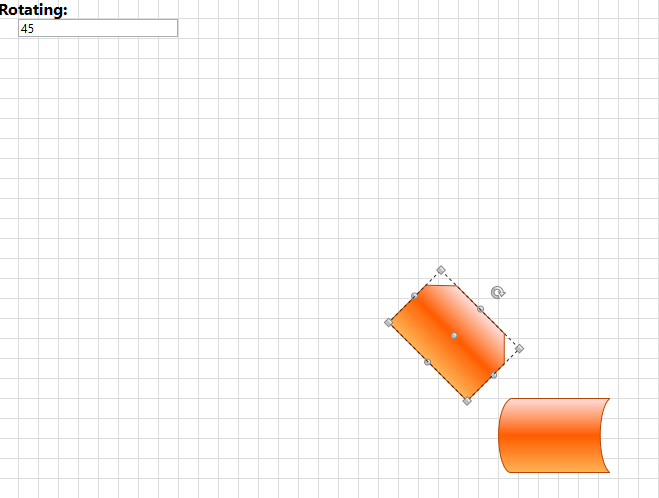
If you run the solution now, the rotationStep will display a value of 45. This is why you will be able to rotate the RadDiagramShapes with 45° on every step.
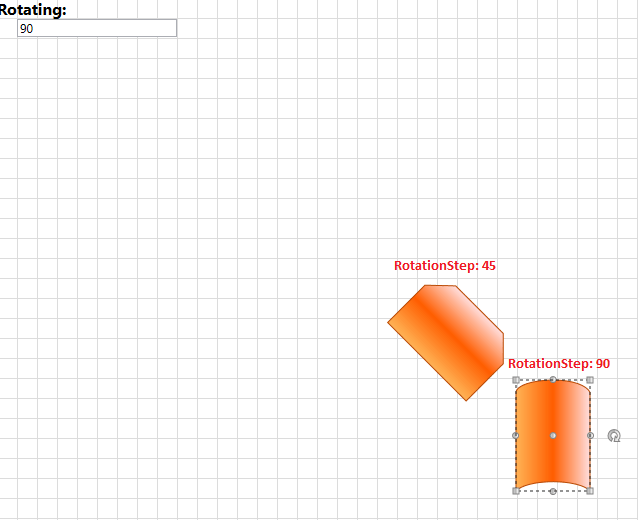
And if you enter a RotationStep of 90, you will be able to rotate the RadDiagramShapes with 90° on every step.
Find a runnable project of the previous example in the WPF Samples GitHub repository.