Styling the Point Marks
The easiest approach that you can use in order to style the point marks is to use the complex Appearance property of the ISeriesDefinition interface. This interface is implemented by all of the series definitions available in the RadChart control. The Appearance property exposes another complex property - PointMark. It exposes the following shortcut visual properties:
Fill - gets or sets the brush that describes the fill of the point mark.
Stroke - gets or sets the brush that describes the stroke of the point mark.
StrokeThickness - gets or sets the stroke thickness of the point mark.
Shape- gets or sets the shape of the point mark, which corresponds to a value of the Telerik.Windows.Controls.Charting.MarkerShape enumerator.
Currently, changing the point marks appearance could be done only via the provided API. Declarative customizations are not supported.
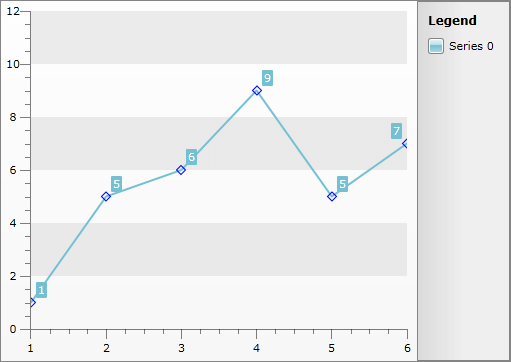
For example, you can change the appearance of the point marks for a LineSeries in the following way.
LineSeriesDefinition l = new LineSeriesDefinition();
l.Appearance.PointMark.Stroke = new SolidColorBrush(Colors.Blue);
l.Appearance.PointMark.StrokeThickness = 1;
l.Appearance.PointMark.Fill = new SolidColorBrush(Colors.Transparent);
l.Appearance.PointMark.Shape = MarkerShape.Diamond;
this.radChart.DefaultSeriesDefinition = l;
Dim l As New LineSeriesDefinition()
l.Appearance.PointMark.Stroke = New SolidColorBrush(Colors.White)
l.Appearance.PointMark.StrokeThickness = 1
l.Appearance.PointMark.Fill = New SolidColorBrush(Colors.Transparent)
l.Appearance.PointMark.Shape = MarkerShape.Diamond
Me.radChart.DefaultSeriesDefinition = l
Here is the result.
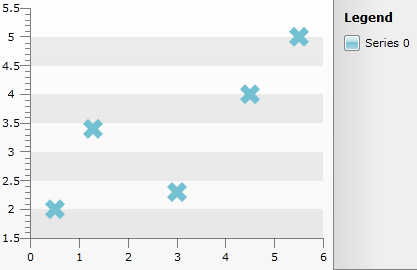
Customize Scatter/Bubble Series
Changing the shape of the pointmark can be done by retemplating the Scatter/Point control (the class that represents 1 point on the screen). You can create a custom style for your scatter points as shown below and apply it to the series via ItemStyle property:
<Style x:Key="CustomPoint" TargetType="telerik:PointMark">
    <Setter Property="Size" Value="20" />
    <Setter Property="Template">
        <Setter.Value>
            <ControlTemplate TargetType="telerik:PointMark">
                <Canvas>
                    <Path x:Name="PART_PointMarkPath"
                          Canvas.Left="{TemplateBinding PointMarkCanvasLeft}"
                          Canvas.Top="{TemplateBinding PointMarkCanvasTop}"
                          Width="{TemplateBinding Size}"
                          Height="{TemplateBinding Size}"
                          Data="F1 M 6.5,3.5 L 3.5,0.5 0.5,3.5 3.5,6.5 0.5,9.5 3.5,12.5 6.5,9.5 9.5,12.5 12.5,9.5 9.5,6.5 12.5,3.5 9.5,0.5 6.5,3.5 Z"
                          Stretch="Fill"
                          Style="{TemplateBinding ShapeStyle}" />
                </Canvas>
            </ControlTemplate>
        </Setter.Value>
    </Setter>
</Style>
<Style x:Key="CustomScatter" TargetType="telerik:ScatterPoint">
    <Setter Property="Template">
        <Setter.Value>
            <ControlTemplate TargetType="telerik:ScatterPoint">
                <Canvas x:Name="PART_MainContainer">
                    <telerik:PointMark x:Name="PART_PointMark"
                                       Canvas.Top="{TemplateBinding StartPointY}"
                                       PointMarkCanvasLeft="{TemplateBinding PointMarkCanvasLeft}"
                                       PointMarkCanvasTop="{TemplateBinding PointMarkCanvasTop}"
                                       ShapeStyle="{TemplateBinding PointMarkShapeStyle}"
                                       Style="{StaticResource CustomPoint}" />
                </Canvas>
            </ControlTemplate>
        </Setter.Value>
    </Setter>
</Style>
The result is shown below: