BringIntoView Support
The RadTreeView API offers BringIntoView support through several methods:
When you invoke any of these methods, the RadTreeView will attempt to bring the provided item into view.
BringIndexIntoView()
The BringIndexIntoView() method can only work for immediate items. However, please note that the method won't be able to bring a RadTreeViewItem into view before the item containers have been generated.
Consider the following example. A RadTreeView is data bound to a collection of business objects.
Example 1: Declaring a RadTreeView control in XAML
<Grid x:Name="LayoutRoot"
        Background="White">
    <Grid.Resources>
        <DataTemplate x:Key="treeViewTemplate">
            <TextBlock Text="{Binding Title}" />
        </DataTemplate>
    </Grid.Resources>
    <telerik:RadTreeView x:Name="RadTreeView">
        <telerik:RadTreeViewItem x:Name="RadTreeViewItem"
                                 Header="MyItems"
                                 ItemTemplate="{StaticResource treeViewTemplate}">
        </telerik:RadTreeViewItem>
    </telerik:RadTreeView>
</Grid>
Example 2: The class holds a collection of a business objects
public class MyViewModel
{
    private static int idCounter;
    private string title;
    public MyViewModel()
    {
        this.Id = idCounter++;
    }
    public int Id
    {
        get;
        protected set;
    }
    public String Title
    {
        get
        {
            return this.title;
        }
        set
        {
            if ( this.title != value )
            {
                this.title = value;
            }
        }
    }
}
//.....
RadTreeViewItem.ItemsSource = Enumerable.Range( 1, 40 ).Select( i => new MyViewModel()
{
    Title = "Item " + i
} ).ToList();
Public Class MyViewModel
 Private Shared idCounter As Integer
 Private m_title As String
 Public Sub New()
  Me.Id = System.Math.Max(System.Threading.Interlocked.Increment(idCounter),idCounter - 1)
 End Sub
 Public Property Id() As Integer
  Get
   Return m_Id
  End Get
  Protected Set
   m_Id = Value
  End Set
 End Property
 Private m_Id As Integer
 Public Property Title() As [String]
  Get
   Return Me.m_title
  End Get
  Set
   If Me.m_title <> value Then
    Me.m_title = value
   End If
  End Set
 End Property
End Class
Figure 1: The tree view after being populated with business objects
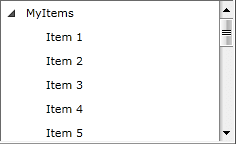
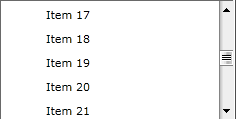
If you want to programmatically scroll to "Item 20" (thus bringing this item into view), you could try scenario in Example 3.
Example 3: Bring RadTreeViewItem into view by its index
private void BringItemIntoView()
{
    this.RadTreeViewItem.BringIndexIntoView( 20 );
}
Private Sub BringItemIntoView()
    Me.RadTreeViewItem.BringIndexIntoView(20)
End Sub
Figure 2: The result of RadTreeViewItem into view by its index
BringItemIntoView()
RadTreeView offers a second method, BringItemIntoView(), that works similarly to the BringIndexIntoView() method.
Example 4: Bring an item into the view by its Title
private void BringItemIntoView()
{
    MyViewModel viewModel = dataSource.First( v => v.Title == "Item 20" );
    this.RadTreeViewItem.BringItemIntoView( viewModel );
}
Private Sub Button_Click(sender As Object, e As RoutedEventArgs)
    Dim viewModel As MyViewModel = dataSource.First(Function(v) v.Title = "Item 20")
    Me.RadTreeViewItem.BringItemIntoView(viewModel)
End Sub
Please keep in mind that the BringItemIntoView() method can only work for immediate items and only as long as all RadTreeViewItem containers have been generated.
The BringItemIntoView() method makes an internal call to the BringIndexIntoView() method and this is why it is better to consider using the BringIndexIntoView() method instead whenever possible.
BringPathIntoView()
You can use the BringPathIntoView() method even in scenarios where not all RadTreeViewItem containers are generated. This is possible due to its implementation, which makes sure that the RadTreeView has loaded its containers, before starting a recursive search through its items. This makes it the best choice for bringing virtualized items into view.
Since the main purpose of the BringPathIntoView() method is to allow you to bring virtualized items into view, you need to make sure that your view models can build a path to each RadTreeViewItem. This is important because the BringPathIntoView() method recursively traverses the hierarchy of data items displayed inside the RadTreeView to search for an item based on its path.
Another important note about the implementation of the method is that it uses the TextSearch.TextPath attached property to match the path to the RadTreeViewItem containers.
The TextSearch.TextPath attached property is part of the Telerik.Windows.Controls namespace and this is why you can reach it through the following alias: xmlns:telerik="http://schemas.telerik.com/2008/xaml/presentation" like this:
<telerik:RadTreeView telerik:TextSearch.TextPath="Name"/>
Consider the RadTreeView definition in Example 5.
Example 5: Declaring a RadTreeView control in XAML
<telerik:RadTreeView x:Name="myTreeView" Width="300" IsVirtualizing="True" telerik:TextSearch.TextPath="Name">
    <telerik:RadTreeView.ItemTemplate>
        <HierarchicalDataTemplate ItemsSource="{Binding Children}">
            <TextBlock Text="{Binding Name}" />
        </HierarchicalDataTemplate>
    </telerik:RadTreeView.ItemTemplate>
</telerik:RadTreeView>
The business items displayed in the RadTreeView are described with the classes shown in Example 6:
Example 6: The view model describing treeview and its business objects
public class MainViewModel : ObservableCollection<DataItem>
{
    public MainViewModel()
    {
        for (int i = 0; i < 25; i++)
        {
            DataItem item = new DataItem() { Name = String.Format("Item {0}", i) };
            for (int j = 0; j < 3; j++)
            {
                item.Children.Add(new DataItem { Name = String.Format("Item {0}.{1}", i, j) });
            }
            this.Add(item);
        }
    }
}

public class DataItem
{
    public string Name { get; set; }
    public ObservableCollection<DataItem> Children { get; set; }

    public DataItem()
    {
        this.Children = new ObservableCollection<DataItem>();
    }
}
Public Class MainViewModel
    Inherits ObservableCollection(Of DataItem)
    Public Sub New()
        For i As Integer = 0 To 24
            Dim item As New DataItem() With {.Name = [String].Format("Item {0}", i)}
            For j As Integer = 0 To 2
                item.Children.Add(New DataItem() With {.Name = [String].Format("Item {0}.{1}", i, j)})
            Next
            Me.Add(item)
        Next
    End Sub
End Class

Public Class DataItem
    Public Property Name() As String
        Get
            Return itemName
        End Get
        Set
            itemName = Value
        End Set
    End Property
    Private itemName As String
    Public Property Children() As ObservableCollection(Of DataItem)
        Get
            Return itemChildren
        End Get
        Set
            itemChildren = Value
        End Set
    End Property
    Private itemChildren As ObservableCollection(Of DataItem)

    Public Sub New()
        Me.Children = New ObservableCollection(Of DataItem)()
    End Sub
End Class
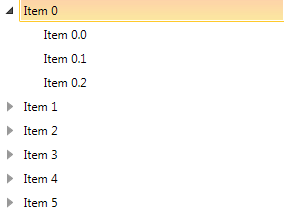
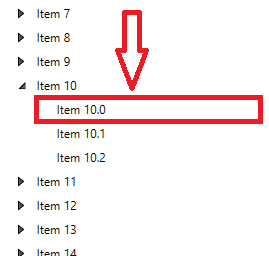
Figure 3: Default positioned of the brought item
BringPathIntoView() Overloads
BringPathIntoView method has two overloads that you can use to bring an item.
-
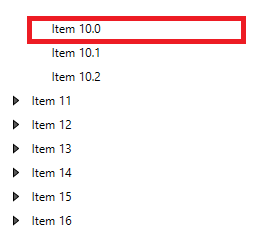
BringPathIntoView(string path): The path parameter is the path of the RadTreeViewItem that you want to bring into the view.
Example 7: Bring the RadTreeViewItem by its path on the top of the viewport
    string path = "Item 10\Item 10.1";
    myTreeView.BringPathIntoView(path);
Dim path As String = "Item 10\Item 10.1" myTreeView.BringPathIntoView(path)Figure 4: Default positioned of the brought item
-
BringPathIntoView(string path, Point offset): The offset parameter is of type Point and specifies the offset from the top left corner of the tree where the item will be scrolled to.
For example, when you set the second parameter, you can adjust the parent and the last child to fit into the view if there is enough space.
Example 8: Bring the RadTreeViewItem by its path and set the offset position of the item
    string path = "Item 10\Item 10.1";
    myTreeView.BringPathIntoView(path,new Point(0,100));
Dim path As String = "Item 10\Item 10.1" myTreeView.BringPathIntoView(path,New Point(0,100))Figure 5: The item is positioned with 100 pixels offset from the top of the viewport
You can find a complete solution demonstrating the BringPathIntoView() method implementation in the How to Use BringPathIntoView Method help article in our documentation.