Building Hierarchical Grid
This tutorial will walk you through the process of displaying hierarchical data in RadGridView. It will not cover the creation of a Silverlight application, adding RadGridView to your UserControl or how to define columns. If you need information on any of these topics please read the Getting Started topic.
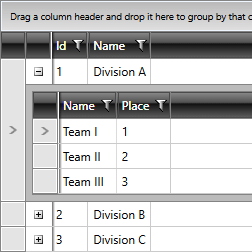
The final result should look like the one displayed on Figure 1.
Figure 1: Hierarchical RadGridView

Assuming that you have already created a Silverlight application and defined the RadGridView control, it is time to prepare the sample data for it.
Preparing the Data
The sample data is represented by teams divided into divisions. First create the class that will represent a single team.
Example 1: The Team class
public class Team
{
    public int Id
    {
        get;
        set;
    }
    public string Name
    {
        get;
        set;
    }
    public int Place
    {
        get;
        set;
    }
}
Public Class Team
    Private _Id As Integer
    Public Property Id() As Integer
        Get
            Return _Id
        End Get
        Set(ByVal value As Integer)
            _Id = value
        End Set
    End Property

    Private _Name As String
    Public Property Name() As String
        Get
            Return _Name
        End Get
        Set(ByVal value As String)
            _Name = value
        End Set
    End Property

    Private _Place As Integer
    Public Property Place() As Integer
        Get
            Return _Place
        End Get
        Set(ByVal value As Integer)
            _Place = value
        End Set
    End Property
End Class
The class that represents a single division will contain a collection of Team objects.
Example 2: The Division class
public class Division
{
    public int Id
    {
        get;
        set;
    }
    public string Name
    {
        get;
        set;
    }
    public List<Team> Teams
    {
        get;
        set;
    }
}
Public Class Division
    Private _Id As Integer
    Public Property Id() As Integer
        Get
            Return _Id
        End Get
        Set(ByVal value As Integer)
            _Id = value
        End Set
    End Property

    Private _Name As String
    Public Property Name() As String
        Get
            Return _Name
        End Get
        Set(ByVal value As String)
            _Name = value
        End Set
    End Property

    Private _Teams As List(Of Team)
    Public Property Teams() As List(Of Team)
        Get
            Return _Teams
        End Get
        Set(ByVal value As List(Of Team))
            _Teams = value
        End Set
    End Property
End Class
Note that if you want to support two way binding your classes should implement the INotifyPropertyChanged interface and raise the PropertyChanged event every time a property value changes.
Create a DivisionsService class and implement a static method GetDivisions. For the purpose of this tutorial it will return an observable collection containing several hard-coded divisions.
Example 3: The DivisionsService class
public class DivisionsService
{
    public static ObservableCollection<Division> GetDivisions()
    {
        ObservableCollection<Division> divisions = new ObservableCollection<Division>();
        Division dA = new Division();
        dA.Name = "Division A";
        dA.Id = 1;
        dA.Teams = new List<Team>();
        Team team1 = new Team();
        team1.Id = 1;
        team1.Name = "Team I";
        team1.Place = 1;
        dA.Teams.Add(team1);
        Team team2 = new Team();
        team2.Id = 2;
        team2.Name = "Team II";
        team2.Place = 2;
        dA.Teams.Add(team2);
        Team team3 = new Team();
        team3.Id = 3;
        team3.Name = "Team III";
        team3.Place = 3;
        dA.Teams.Add(team3);
        divisions.Add(dA);
        Division dB = new Division();
        dB.Name = "Division B";
        dB.Id = 2;
        dB.Teams = new List<Team>();
        Team teamRed = new Team();
        teamRed.Id = 1;
        teamRed.Name = "Team Red";
        teamRed.Place = 1;
        dB.Teams.Add(teamRed);
        Team teamGreen = new Team();
        teamGreen.Id = 2;
        teamGreen.Name = "Team Green";
        teamGreen.Place = 2;
        dB.Teams.Add(teamGreen);
        Team teamBlue = new Team();
        teamBlue.Id = 3;
        teamBlue.Name = "Team Blue";
        teamBlue.Place = 3;
        dB.Teams.Add(teamBlue);
        divisions.Add(dB);

        Division dC = new Division();
        dC.Name = "Division C";
        dC.Id = 3;
        dC.Teams = new List<Team>();
        Team teamAlpha = new Team();
        teamAlpha.Id = 1;
        teamAlpha.Name = "Team Alpha";
        teamAlpha.Place = 1;
        dC.Teams.Add(teamAlpha);
        Team teamBeta = new Team();
        teamBeta.Id = 2;
        teamBeta.Name = "Team Beta";
        teamBeta.Place = 2;
        dC.Teams.Add(teamBeta);
        Team teamGama = new Team();
        teamGama.Id = 3;
        teamGama.Name = "Team Gama";
        teamGama.Place = 3;
        dC.Teams.Add(teamGama);
        divisions.Add(dC);
        return divisions;
    }
}
Public Class DivisionsService
    Public Shared Function GetDivisions() As ObservableCollection(Of Division)
        Dim divisions As New ObservableCollection(Of Division)()

        Dim dA As New Division()
        dA.Name = "Division A"
        dA.Id = 1
        dA.Teams = New List(Of Team)()
        Dim team1 As New Team()
        team1.Id = 1
        team1.Name = "Team I"
        team1.Place = 1
        dA.Teams.Add(team1)
        Dim team2 As New Team()
        team2.Id = 2
        team2.Name = "Team II"
        team2.Place = 2
        dA.Teams.Add(team2)
        Dim team3 As New Team()
        team3.Id = 3
        team3.Name = "Team III"
        team3.Place = 3
        dA.Teams.Add(team3)
        divisions.Add(dA)

        Dim dB As New Division()
        dB.Name = "Division B"
        dB.Id = 2
        dB.Teams = New List(Of Team)()
        Dim teamRed As New Team()
        teamRed.Id = 1
        teamRed.Name = "Team Red"
        teamRed.Place = 1
        dB.Teams.Add(teamRed)
        Dim teamGreen As New Team()
        teamGreen.Id = 2
        teamGreen.Name = "Team Green"
        teamGreen.Place = 2
        dB.Teams.Add(teamGreen)
        Dim teamBlue As New Team()
        teamBlue.Id = 3
        teamBlue.Name = "Team Blue"
        teamBlue.Place = 3
        dB.Teams.Add(teamBlue)
        divisions.Add(dB)

        Dim dC As New Division()
        dC.Name = "Division C"
        dC.Id = 3
        dC.Teams = New List(Of Team)()
        Dim teamAlpha As New Team()
        teamAlpha.Id = 1
        teamAlpha.Name = "Team Alpha"
        teamAlpha.Place = 1
        dC.Teams.Add(teamAlpha)
        Dim teamBeta As New Team()
        teamBeta.Id = 2
        teamBeta.Name = "Team Beta"
        teamBeta.Place = 2
        dC.Teams.Add(teamBeta)
        Dim teamGama As New Team()
        teamGama.Id = 3
        teamGama.Name = "Team Gama"
        teamGama.Place = 3
        dC.Teams.Add(teamGama)
        divisions.Add(dC)

        Return divisions
    End Function
End Class
Now after the sample data is prepared you are ready to bind it to the RadGridView. To do this set the ItemsSource property of the grid to the collection returned by the GetDivisions method. But first define the following columns.
Example 4: Defining the RadGridView
<telerik:RadGridView x:Name="HierarchicalGridView"
                 AutoGenerateColumns="False">
    <telerik:RadGridView.Columns>
        <telerik:GridViewDataColumn DataMemberBinding="{Binding Id}"
                                Header="Id" />
        <telerik:GridViewDataColumn DataMemberBinding="{Binding Name}"
                                Header="Name" />
    </telerik:RadGridView.Columns>
</telerik:RadGridView>
Set the ItemsSource in the code-behind file of your UserControl.
Example 5: Setting the control's ItemsSource
this.HierarchicalGridView.ItemsSource = DivisionsService.GetDivisions();
Me.HierarchicalGridView.ItemsSource = DivisionsService.GetDivisions()
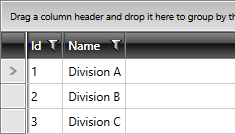
If you run the application at this stage you will observe the result from Figure 2.
Figure 2: RadGridView without a hierarchy

Defining ChildTableDefinitions
The next step is to make the RadGridView display the collections of teams as children of the respective rows. To do that use the ChildTableDefinitions property of the RadGridView and define a new GridViewTableDefinition with the following relation.
Example 6: Defining ChildTableDefinitions
<telerik:RadGridView x:Name="HierarchicalGridView" AutoGenerateColumns="False">
    <telerik:RadGridView.ChildTableDefinitions>

        <telerik:GridViewTableDefinition>
            <telerik:GridViewTableDefinition.Relation>
                <telerik:PropertyRelation ParentPropertyName="Teams" />
            </telerik:GridViewTableDefinition.Relation>
        </telerik:GridViewTableDefinition>

    </telerik:RadGridView.ChildTableDefinitions>
    <telerik:RadGridView.Columns>
        <telerik:GridViewDataColumn DataMemberBinding="{Binding Id}"
                                Header="Id" />
        <telerik:GridViewDataColumn DataMemberBinding="{Binding Name}"
                                Header="Name" />
    </telerik:RadGridView.Columns>
</telerik:RadGridView>
You can read more about the GridViewTableDefinition here.
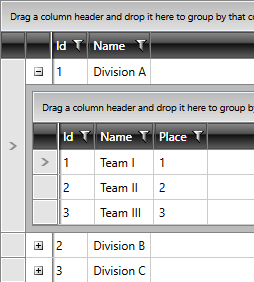
After defining the definitions you will observe the hierarchical grids as illustrated on Figure 3.
Figure 3: RadGridView with a hierarchy

HierarchyChildTemplate
If you need to set properties of the child RadGridView instances, you can use the HierarchyChildTemplate.
Example 7: Setting the control's HierarchyChildTemplate
<telerik:RadGridView x:Name="HierarchicalGridView" AutoGenerateColumns="False" GroupRenderMode="Flat">
    <telerik:RadGridView.ChildTableDefinitions>
        <telerik:GridViewTableDefinition>
            <telerik:GridViewTableDefinition.Relation>
                <telerik:PropertyRelation ParentPropertyName="Teams" />
            </telerik:GridViewTableDefinition.Relation>
        </telerik:GridViewTableDefinition>
    </telerik:RadGridView.ChildTableDefinitions>
    <telerik:RadGridView.Columns>
        <telerik:GridViewDataColumn DataMemberBinding="{Binding Id}"
                        Header="Id" />
        <telerik:GridViewDataColumn DataMemberBinding="{Binding Name}"
                        Header="Name" />
    </telerik:RadGridView.Columns>
    <telerik:RadGridView.HierarchyChildTemplate>
        <DataTemplate>
            <telerik:RadGridView ShowGroupPanel="False" AutoGenerateColumns="False" ItemsSource="{Binding Teams}" GroupRenderMode="Flat">
                <telerik:RadGridView.Columns>
                    <telerik:GridViewDataColumn DataMemberBinding="{Binding Name}"
                        Header="Name" />
                    <telerik:GridViewDataColumn DataMemberBinding="{Binding Place}"
                        Header="Place" />
                </telerik:RadGridView.Columns>
            </telerik:RadGridView>
        </DataTemplate>
    </telerik:RadGridView.HierarchyChildTemplate>
</telerik:RadGridView>
The final result is observed on Figure 4.
Figure 4: Customized child grids

You can also use the HierarchyChildTemplateSelector property to specify a DataTemplateSelector and provide different templates for the child elements based on the parent row which is expanded.
To learn more about the Hierarchical Grids you can visit the Hierarchical GridView section.