Place Rad Controls in Diagram Shapes
This tutorial demonstrates how to use UI for Silverlight in the content of a RadDiagramShape component.
As the RadDiagramShape essentially derives from a ContentControl, its Content can wrap other controls. For the purpose of this tutorial we will use a RadCalendar and a RadGridView and will display both in RadDiagramShapes. We will also connect these shapes with a RadDiagramConnection.
Let's start by defining a RadDiagram instance in our view:
<Grid x:Name="LayoutRoot" Background="White">
    <Grid.RowDefinitions>
        <RowDefinition Height="Auto" />
        <RowDefinition Height="*" />
    </Grid.RowDefinitions>
    <TextBlock HorizontalAlignment="Center" Text="Hosting Telerik controls in shapes" />
    <telerik:RadDiagram x:Name="diagram"
                        Grid.Row="1"
                        Grid.RowSpan="1"
                        ActiveTool="PointerTool"
                        Background="White"
                        IsBackgroundSurfaceVisible="false"
                        Zoom="1">
    </telerik:RadDiagram>
</Grid>
Next, we can add a RadDiagramShape that contains a RadGridView component. We will define these controls in our XAML view:
<Grid x:Name="LayoutRoot" Background="White">
    <Grid.RowDefinitions>
        <RowDefinition Height="Auto" />
        <RowDefinition Height="*" />
    </Grid.RowDefinitions>
    <TextBlock HorizontalAlignment="Center" Text="Hosting Telerik controls in shapes" />
    <telerik:RadDiagram x:Name="diagram"
                        Grid.Row="1"
                        Grid.RowSpan="1"
                        ActiveTool="PointerTool"
                        Background="White"
                        IsBackgroundSurfaceVisible="false"
                        Zoom="1">
        <telerik:RadDiagramShape x:Name="gridShape"
                                Position="600,50"
                                UseGlidingConnector="true"
                                HorizontalContentAlignment="Stretch"
                                VerticalContentAlignment="Stretch">
            <Grid>
                <Grid.RowDefinitions>
                    <RowDefinition Height="30" />
                    <RowDefinition />
                </Grid.RowDefinitions>
                <TextBlock Text="Dragging area" HorizontalAlignment="Center" FontSize="16" />
                <telerik:RadGridView ItemsSource="{Binding}"
                                    Grid.Row="1"
                                    Background="LightBlue"
                                    BorderBrush="SteelBlue" />
            </Grid>
        </telerik:RadDiagramShape>
    </telerik:RadDiagram>
</Grid>
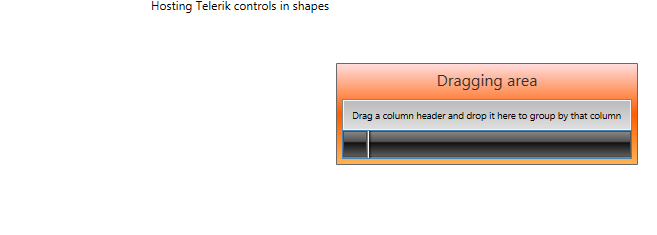
If you run the solution at this point, you should get the following diagramming structure:

And as our RadGridView is currently empty, we can go ahead and populate it with sample data. For that purpose, we first need to define a custom data class - let's name it ProductSales:
public class ProductSales
{
    public ProductSales(int quantity, int month, string monthName)
    {
        this.Quantity = quantity;
        this.Month = month;
        this.MonthName = monthName;
    }

    public int Quantity { get; set; }
    public int Month { get; set; }
    public string MonthName { get; set; }
}
Public Class ProductSales
    Public Sub New(quantity As Integer, month As Integer, monthName As String)
        Me.Quantity = quantity
        Me.Month = month
        Me.MonthName = monthName
    End Sub

    Public Property Quantity() As Integer
        Get
            Return m_Quantity
        End Get
        Set(value As Integer)
            m_Quantity = Value
        End Set
    End Property
    Private m_Quantity As Integer
    Public Property Month() As Integer
        Get
            Return m_Month
        End Get
        Set(value As Integer)
            m_Month = Value
        End Set
    End Property
    Private m_Month As Integer
    Public Property MonthName() As String
        Get
            Return m_MonthName
        End Get
        Set(value As String)
            m_MonthName = Value
        End Set
    End Property
    Private m_MonthName As String
End Class
Next in our code-behind we can create a method that returns a list of ProductSales and use its result as a DataContext of the view:
private static List<ProductSales> GetProductSales()
{
    var persons = new List<ProductSales>
    {
        new ProductSales(154, 1, "January"),
        new ProductSales(138, 2, "February"),
        new ProductSales(143, 3, "March"),
        new ProductSales(120, 4, "April"),
        new ProductSales(135, 5, "May"),
        new ProductSales(125, 6, "June"),
        new ProductSales(179, 7, "July"),
        new ProductSales(170, 8, "August"),
        new ProductSales(198, 9, "September"),
        new ProductSales(187, 10, "October"),
        new ProductSales(193, 11, "November"),
        new ProductSales(212, 12, "December")
    };
    return persons;
}
public Example()
{
    InitializeComponent();
    this.DataContext = GetProductSales();
}
Private Shared Function GetProductSales() As List(Of ProductSales)
    Dim persons = New List(Of ProductSales)() From {
        New ProductSales(154, 1, "January"),
        New ProductSales(138, 2, "February"),
        New ProductSales(143, 3, "March"),
        New ProductSales(120, 4, "April"),
        New ProductSales(135, 5, "May"),
        New ProductSales(125, 6, "June"),
        New ProductSales(179, 7, "July"),
        New ProductSales(170, 8, "August"),
        New ProductSales(198, 9, "September"),
        New ProductSales(187, 10, "October"),
        New ProductSales(193, 11, "November"),
        New ProductSales(212, 12, "December")
    }
    Return persons
End Function
Public Sub New()
    InitializeComponent()
    Me.DataContext = GetProductSales()
End Sub
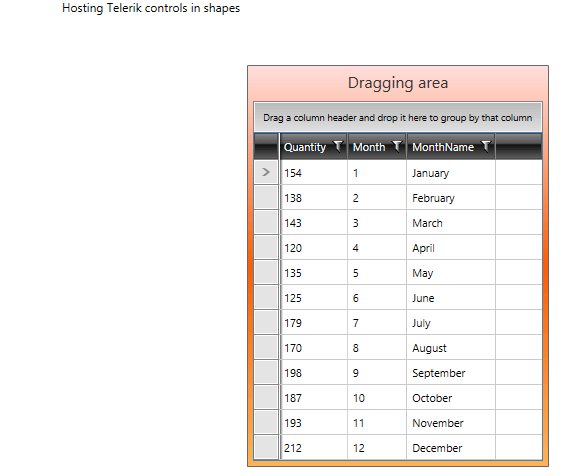
Now if we run the solution we will have a populated RadGridView control inside the RadDiagramShape.

We can also define a shape in the code-behind file and set its content to any RadControl. Please have a look at the example below as it demonstrates how to create a RadDiagramShape and use a RadCalendar in its Content:
public Example()
{
    InitializeComponent();
    this.DataContext = GetProductSales();
    this.Loaded += this.OnLoaded;
}

private void OnLoaded(object sender, RoutedEventArgs routedEventArgs)
{
    // the alternative to this code approach is to set the ContentTemplate in XAML
    // See the documentation on this - http://www.telerik.com/help/wpf/raddiagrams-features-shapes.html
    var calendar = new RadDiagramShape()
    {
        Position = new Point(20, 150),
        Content = new RadCalendar { SelectedDate = DateTime.Now.AddDays(254), Margin = new Thickness(10) },
        Background = new SolidColorBrush(Colors.Blue),
        BorderBrush = new SolidColorBrush(Colors.DarkGray),
        BorderThickness = new Thickness(1),
        UseGlidingConnector = true,
        HorizontalContentAlignment = HorizontalAlignment.Stretch,
        VerticalContentAlignment = VerticalAlignment.Stretch
    };
    this.diagram.AddShape(calendar);
}
Public Sub New()
    InitializeComponent()
    Me.DataContext = GetProductSales()
    AddHandler Me.Loaded, AddressOf Me.OnLoaded
End Sub

Private Sub OnLoaded(sender As Object, routedEventArgs As RoutedEventArgs)
    ' the alternative to this code approach is to set the ContentTemplate in XAML '
    ' See the documentation on this - http://www.telerik.com/help/wpf/raddiagrams-features-shapes.html '
    Dim calendar = New RadDiagramShape() With {
            .Position = New Point(20, 150),
            .Content = New RadCalendar() With
                        {
                            .SelectedDate = DateTime.Now.AddDays(254),
                            .Margin = New Thickness(10)
                        },
            .Background = New SolidColorBrush(Colors.Blue),
            .BorderBrush = New SolidColorBrush(Colors.DarkGray),
            .BorderThickness = New Thickness(1),
            .UseGlidingConnector = True,
            .HorizontalContentAlignment = HorizontalAlignment.Stretch,
            .VerticalContentAlignment = VerticalAlignment.Stretch
    }
    Me.diagram.AddShape(calendar)
End Sub
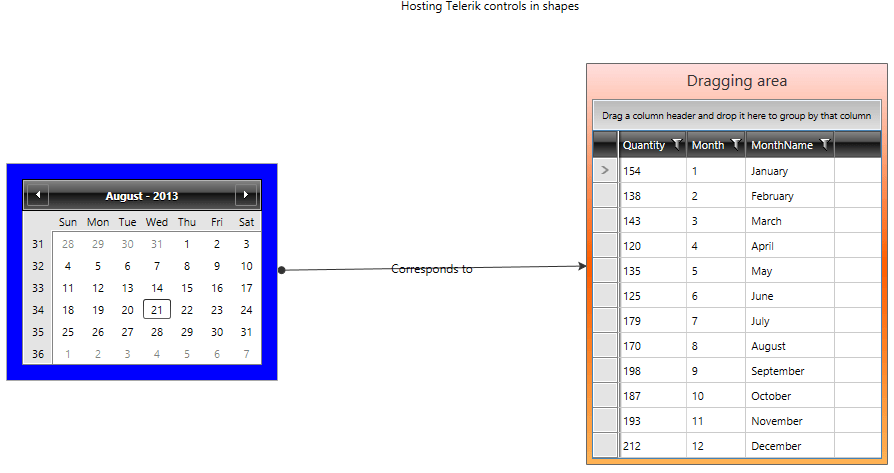
Running the project now should display two shapes within the RadDiagram instance:

Finally, we can connect these shapes using a single connection. Let's set it up in the OnLoaded() method implementation:
private void OnLoaded(object sender, RoutedEventArgs routedEventArgs)
{
    // the alternative to this code-approach is to set the ContentTemplate in XAML
    // See the documentation on this, http://www.telerik.com/help/wpf/raddiagrams-features-shapes.html
    var calendar = new RadDiagramShape()
    {
        //...
    };
    this.diagram.AddShape(calendar);

    var con = this.diagram.AddConnection(this.diagram.Shapes[1], this.diagram.Shapes[0]) as RadDiagramConnection;
    con.Content = "Corresponds to";
    con.SourceCapType = CapType.Arrow6Filled;
    con.TargetCapType = CapType.Arrow2Filled;
}
Private Sub OnLoaded(sender As Object, routedEventArgs As RoutedEventArgs) '
    ' the alternative to this code-approach is to set the ContentTemplate in XAML '
    ' See the documentation on this, http://www.telerik.com/help/wpf/raddiagrams-features-shapes.html
    Dim calendar = New RadDiagramShape() From {
                                                ...
                                              }
    Me.diagram.AddShape(calendar)

    Dim con = TryCast(Me.diagram.AddConnection(Me.diagram.Shapes(1), Me.diagram.Shapes(0)), RadDiagramConnection)
    con.Content = "Corresponds to"
    con.SourceCapType = CapType.Arrow6Filled
    con.TargetCapType = CapType.Arrow2Filled
End Sub

Find a runnable project of the previous example in the WPF Samples GitHub repository.