Use MVVM in RadDiagram
The following help article will demonstrate how to bind the RadDiagram in MVVM scenario using the extension ViewModels which are part of the Telerik.Windows.Controls.Diagrams.Extensions.dll project.
- Sample MVVM RadDiagram
- Using MVVM to populate RadDiagram with ContainerShapes
- Bind the source and target connector positions of the connection
Please note that the examples in this tutorial are showcasing Telerik Windows8 theme. In the Setting a Theme article you can find more information on how to set an application-wide theme.
The DiagrammingFramework comes with a predefined set of ViewModels, further described in the DiagramExtensions ViewModels tutorial. We will take advantage of these built-in models bellow to quickly build MVVM diagramming solutions.
Sample MVVM RadDiagram
A sample MVVM implementation has basically 3 steps:
1. Set up the ViewModels
To start, in a basic MVVM application we need ViewModels to describe the connections and shapes within a RadDiagram instance. And then we need to create a class to describe the collection that will hold the nodes and links of a diagramming structure. Telerik Diagrams Extensions offer three ViewModels that can serve as base implementations of a GraphSource:
For simplicity, in this first example we will use the GraphSourceBase class and we will create a new ViewModel class deriving from it:
Example 1: Creating ViewModel
using Telerik.Windows.Controls.Diagrams.Extensions.ViewModels;
public class DiagramViewModel : GraphSourceBase<NodeViewModelBase, LinkViewModelBase<NodeViewModelBase>>
{
    public DiagramViewModel()
    {
        var first = new NodeViewModelBase
        {
            Content = "First item",
            Position = new Point(50, 100)
        };
        var second = new NodeViewModelBase
        {
            Content = "Second item",
            Position = new Point(150, 100),
            RotationAngle = 45
        };
        var third = new NodeViewModelBase
        {
            Content = "Third item",
            Position = new Point(250, 100)
        };
        this.AddNode(first);
        this.AddNode(second);
        this.AddNode(third);
        this.AddLink(new LinkViewModelBase<NodeViewModelBase>(first, second));
        this.AddLink(new LinkViewModelBase<NodeViewModelBase>(second, third));
    }
}
Imports Telerik.Windows.Controls.Diagrams.Extensions.ViewModels
Public Class DiagramViewModel
    Inherits GraphSourceBase(Of NodeViewModelBase, LinkViewModelBase(Of NodeViewModelBase))
    Public Sub New()
        Dim first = New NodeViewModelBase With {.Content = "First item", .Position = New Point(50, 100)}
        Dim second = New NodeViewModelBase With {.Content = "Second item", .Position = New Point(150, 100), .RotationAngle = 45}
        Dim third = New NodeViewModelBase With {.Content = "Third item", .Position = New Point(250, 100)}
        Me.AddNode(first)
        Me.AddNode(second)
        Me.AddNode(third)
        Me.AddLink(New LinkViewModelBase(Of NodeViewModelBase)(first, second))
        Me.AddLink(New LinkViewModelBase(Of NodeViewModelBase)(second, third))
    End Sub
End Class
It is important to add all nodes in the graph source before the links that connect them. Otherwise, the connection could be missed when the visual elements are created (RadDiagramShape and RadDiagramConnection).
The GraphSourceBase
2. Configure the View
Once we have all ViewModels in place, we can go ahead and define a RadDiagram instance in our view to consume the business data. We can use style bindings and DataTemplates to apply bindings on the RadDiagramConnection and RadDiagramShape properties.
Example 2: Creating custom style for the connections and shapes
<Style TargetType="telerik:RadDiagramShape">
      <Setter Property="Position" Value="{Binding Position}" />
      <Setter Property="RotationAngle" Value="{Binding RotationAngle}" />
      <Setter Property="ContentTemplate">
        <Setter.Value>
          <DataTemplate>
            <TextBlock Text="{Binding Content}"/>
          </DataTemplate>
        </Setter.Value>
      </Setter>
 </Style>
<Style  TargetType="telerik:RadDiagramConnection">
      <Setter Property="ContentTemplate"  >
        <Setter.Value>
          <DataTemplate>
            <TextBlock Text="{Binding Content}"/>
          </DataTemplate>
        </Setter.Value>
      </Setter>
</Style>
3. Associate the ViewModel with the View
The final step is to assign the GraphSource property of the RadDiagram to the ViewModel:
Example 3: Declaring RadDiagram in XAML
<telerik:RadDiagram x:Name="xDiagram"/>
Example 4: Setting the GraphSource property
xDiagram.GraphSource = new DiagramViewModel();
xDiagram.GraphSource = New DiagramViewModel()
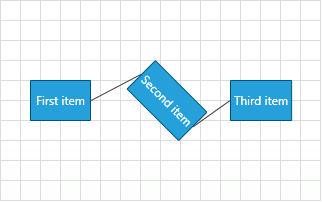
So as a result of our MVVM implementation, the RadDiagram instance contains the following 3 shapes and 2 connections:

In order to use bi-directional MVVM, the DiagramViewModel must implement the IObservableGraphSource interface. Check out the DataBinding article for further information.
Using MVVM to populate RadDiagram with ContainerShapes
The RadDiagramContainerShapes are essentially considered shapes and therefore in a databinding scenario, they are part of the Nodes collection in the RadDiagram GraphSource. However, as a container can wrap a collection of shapes, we need to make sure its data model has a children collection as well. The RadDiagram Extensions expose a ContainerNodeViewModelBase that can serve as a base ViewModel for RadDiagramContainerShapes. The ContainerNodeViewModelBase derives from the NodeViewModelBase, which means that you can add it in the Items collection of any GraphSourceBase implementation.
For the purpose of this example, we will create the following ViewModels:
Brand: A class deriving from the ContainerNodeViewModelBase ViewModel that represents a container node.
Model: A class deriving from the NodeViewModelBase ViewModel that represents a node.
Link: A class deriving from the LinkViewModelBase ViewModel that represent a link.
CarsGraphSource - a class deriving from the ObservableGraphSourceBase ViewModel that represent the RadDiagram GraphSource.
Example 5: Creating ViewModels
public class Brand : ContainerNodeViewModelBase<object>
{
}
public class Model : NodeViewModelBase
{

}
public class Link : LinkViewModelBase<NodeViewModelBase>
{

}
public class CarsGraphSource : ObservableGraphSourceBase<NodeViewModelBase, Link>
{
    public CarsGraphSource()
    {
        Brand vwGroup = new Brand() { Content = "Volkswagen Group", Position = new Point(250, 100) };

        Brand bentley = new Brand() { Content = "Bentley", Position = new Point(250, 100) };
        Model continental = new Model() { Content = "Continental GT", Position = new Point(250, 100) };
        bentley.AddItem(continental);
        vwGroup.AddItem(bentley);

        Brand bugatti = new Brand() { Content = "Bugatti", Position = new Point(475, 100) };
        Model veyron = new Model() { Content = "Bugatti Veyron", Position = new Point(475, 100) };
        bugatti.AddItem(veyron);
        vwGroup.AddItem(bugatti);

        Brand vw = new Brand() { Content = "Volkswagen", Position = new Point(220, 400) };
        Model polo = new Model() { Content = "Polo", Position = new Point(220, 400) };
        Model golf = new Model() { Content = "Golf", Position = new Point(340, 400) };
        Model passat = new Model() { Content = "Passat", Position = new Point(240, 460) };
        vw.AddItem(polo);
        vw.AddItem(golf);
        vw.AddItem(passat);
        Link groupToVw = new Link() { Content = "Owns", Source = vwGroup, Target = vw };

        Brand audi = new Brand() { Content = "Audi", Position = new Point(520, 400) };
        Model r8 = new Model() { Content = "R8", Position = new Point(520, 400) };
        Model a4 = new Model() { Content = "A4", Position = new Point(640, 400) };
        Model a6 = new Model() { Content = "A6", Position = new Point(540, 460) };
        audi.AddItem(r8);
        audi.AddItem(a4);
        audi.AddItem(a6);
        Link groupToAudi = new Link() { Content = "Owns", Source = vwGroup, Target = audi };

        this.AddNode(vw);
        this.AddNode(audi);
        this.AddNode(vwGroup);

        this.AddLink(groupToVw);
        this.AddLink(groupToAudi);
    }
}
Public Class Brand
    Inherits ContainerNodeViewModelBase(Of Object)
End Class
Public Class Model
    Inherits NodeViewModelBase

End Class
Public Class Link
    Inherits LinkViewModelBase(Of NodeViewModelBase)

End Class
Public Class CarsGraphSource
    Inherits ObservableGraphSourceBase(Of NodeViewModelBase, Link)
    Public Sub New()
        Dim vwGroup As New Brand() With {
             .Content = "Volkswagen Group",
             .Position = New Point(250, 100)
        }

        Dim bentley As New Brand() With {
             .Content = "Bentley",
             .Position = New Point(250, 100)
        }
        Dim continental As New Model() With {
             .Content = "Continental GT",
             .Position = New Point(250, 100)
        }
        bentley.AddItem(continental)
        vwGroup.AddItem(bentley)

        Dim bugatti As New Brand() With {
             .Content = "Bugatti",
             .Position = New Point(475, 100)
        }
        Dim veyron As New Model() With {
             .Content = "Bugatti Veyron",
             .Position = New Point(475, 100)
        }
        bugatti.AddItem(veyron)
        vwGroup.AddItem(bugatti)

        Dim vw As New Brand() With {
             .Content = "Volkswagen",
             .Position = New Point(220, 400)
        }
        Dim polo As New Model() With {
             .Content = "Polo",
             .Position = New Point(220, 400)
        }
        Dim golf As New Model() With {
             .Content = "Golf",
             .Position = New Point(340, 400)
        }
        Dim passat As New Model() With {
             .Content = "Passat",
             .Position = New Point(240, 460)
        }
        vw.AddItem(polo)
        vw.AddItem(golf)
        vw.AddItem(passat)
        Dim groupToVw As New Link() With {
             .Content = "Owns",
             .Source = vwGroup,
             .Target = vw
        }

        Dim audi As New Brand() With {
             .Content = "Audi",
             .Position = New Point(520, 400)
        }
        Dim r8 As New Model() With {
             .Content = "R8",
             .Position = New Point(520, 400)
        }
        Dim a4 As New Model() With {
             .Content = "A4",
             .Position = New Point(640, 400)
        }
        Dim a6 As New Model() With {
             .Content = "A6",
             .Position = New Point(540, 460)
        }
        audi.AddItem(r8)
        audi.AddItem(a4)
        audi.AddItem(a6)
        Dim groupToAudi As New Link() With {
             .Content = "Owns",
             .Source = vwGroup,
             .Target = audi
        }

        Me.AddNode(vw)
        Me.AddNode(audi)
        Me.AddNode(vwGroup)

        Me.AddLink(groupToVw)
        Me.AddLink(groupToAudi)
    End Sub
End Class
Please note that the ContainerNodeViewModelBase exposes a collection of InternalItems and this is why in the CarsGraphSource constructor, all Brand instances are populated with Model instances.
Next, we can go ahead and define a RadDiagram control in our View:
Example 7: Defining RadDiagram in XAML
<telerik:RadDiagram x:Name="diagram"
                    ConnectionEditTemplate="{StaticResource editTemplate}"
                    ConnectionTemplate="{StaticResource contentTemplate}"
                    IsSnapToGridEnabled="False"
                    IsSnapToItemsEnabled="False"
                    ShapeEditTemplate="{StaticResource editTemplate}"
                    ShapeTemplate="{StaticResource contentTemplate}">
    <telerik:RadDiagram.ContainerShapeStyle>
        <Style TargetType="telerik:RadDiagramContainerShape">
            <Setter Property="Position" Value="{Binding Position, Mode=TwoWay}" />
            <Setter Property="ContentTemplate" Value="{StaticResource contentTemplate}" />
            <Setter Property="EditTemplate" Value="{StaticResource editTemplate}" />
        </Style>
    </telerik:RadDiagram.ContainerShapeStyle>
    <telerik:RadDiagram.ShapeStyle>
        <Style TargetType="telerik:RadDiagramShape">
            <Setter Property="Position" Value="{Binding Position, Mode=TwoWay}" />
        </Style>
    </telerik:RadDiagram.ShapeStyle>
</telerik:RadDiagram>
And finally, we need to set the RadDiagram GraphSource property:
Example 8: Setting GraphSource property
public Example()
{
    InitializeComponent();
    this.diagram.GraphSource = new CarsGraphSource();
}
Public Sub New()
    InitializeComponent()

    Me.diagram.GraphSource = New CarsGraphSource()
End Sub
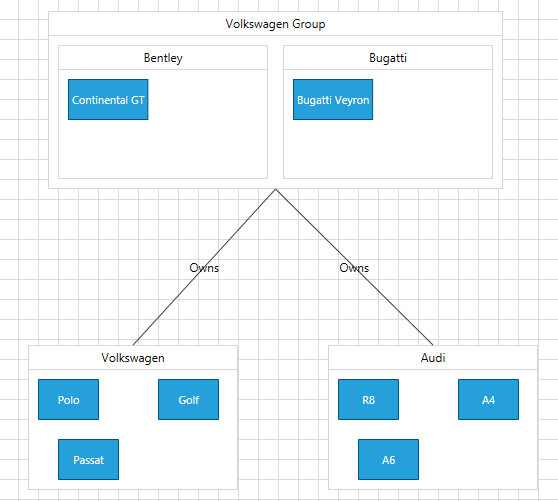
If you run the application now, the RadDiagram should display the following structure:

Find a runnable project of the previous example in the WPF Samples GitHub repository.
Bind the source and target connector positions of the connection
To bind the SourceConnectorPoistion and TargetConnectorPoistion properties of the RadDiagramConnection you can create string properties in your LinkViewModelBase
Note that the diagram expects the SourceConnectorPosition and TargetConnectorPosition properties to have default values set.
Example 10: Creating string SourceConnectorPosition and TargetConnectorPosition properties
public class Link : LinkViewModelBase<NodeViewModelBase>
{
    public Link()
    {
        this.SourceConnectionName = ConnectorPosition.Auto;
        this.TargetConnectionName = ConnectorPosition.Auto;
    }

    private string _sourceConnectionName;
    public string SourceConnectionName
    {
        get { return _sourceConnectionName; }
        set
        {
            _sourceConnectionName = value;
            OnPropertyChanged("SourceConnectionName");
        }
    }

    private string _targetConnectionName;
    public string TargetConnectionName
    {
        get { return _targetConnectionName; }
        set
        {
            _targetConnectionName = value;
            OnPropertyChanged("TargetConnectionName");
        }
    }
}
Example 11: Binding SourceConnectorPosition and TargetConnectorPosition in XAML
<Style  TargetType="telerik:RadDiagramConnection">
    <Setter Property="SourceConnectorPosition" Value="{Binding SourceConnectionName,Mode=TwoWay}" />
    <Setter Property="TargetConnectorPosition" Value="{Binding TargetConnectionName,Mode=TwoWay}" />
</Style>