Custom Attributes
RadToolBar items provide a special collection called Attributes. You can use this collection to expand the information stored with the items. The Attributes collection lets you store any number of attributes as name/value pairs.You can specify custom attributes declaratively in the too bar item tag or programmatically using the Attributes collection of the items. You can also access custom attributes client-side, using the get_attributes collection of the toolbar item client-side object.
Using Attributes declaratively
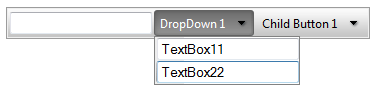
This example shows how to use custom attributes declaratively to display extra information in toolbar items:
To customize the toolbar items, this example uses an ItemTemplate for the items in the toolbar. The custom attributes of the item are used to bind the controls in the template. The template controls are bound using data-binding expressions with typical ASP.NET format and syntax, e.g. "<%# DataBinder.Eval(Container, "Attributes['DisaplayName']") %>". The DisplayName is a custom attribute.
<telerik:RadToolBar RenderMode="Lightweight" ID="RadToolBar1" runat="server">
    <Items>
        <telerik:RadToolBarButton runat="server" Text="Button 1" DisplayName="TextBox1">
            <ItemTemplate>
                <input type="text" value='<%# DataBinder.Eval(Container, "Attributes['DisplayName']") %>' />
            </ItemTemplate>
        </telerik:RadToolBarButton>
        <telerik:RadToolBarDropDown runat="server" Text="DropDown 1" DisplayName="DropDown">
            <Buttons>
                <telerik:RadToolBarButton runat="server" Text="Child Button 1" DisplayName="TextBox11">
                    <ItemTemplate>
                        <input type="text" value='<%# DataBinder.Eval(Container, "Attributes['DisplayName']") %>' />
                    </ItemTemplate>
                </telerik:RadToolBarButton>
                <telerik:RadToolBarButton runat="server" Text="Child Button 2" DisplayName="TextBox21">
                    <ItemTemplate>
                        <input type="text" value='<%# DataBinder.Eval(Container, "Attributes['DisplayName']") %>' />
                    </ItemTemplate>
                </telerik:RadToolBarButton>
            </Buttons>
        </telerik:RadToolBarDropDown>
        <telerik:RadToolBarSplitButton runat="server" Text="SplitButton 1" DisplayName="SplitButton">
            <Buttons>
                <telerik:RadToolBarButton runat="server" Text="Child Button 1">
                </telerik:RadToolBarButton>
                <telerik:RadToolBarButton runat="server" Text="Child Button 2">
                </telerik:RadToolBarButton>
            </Buttons>
        </telerik:RadToolBarSplitButton>
    </Items>
</telerik:RadToolBar>
Before the template can use the custom attributes in its data-binding expressions, the application needs to explicitly bind the items by calling the DataBind method of the RadToolBarItems objects:
protected void Page_Load(object sender, EventArgs e)
{
    if (!Page.IsPostBack)
    {
        for (int i = 0; i < RadToolBar1.Items.Count; i++)
        {
            RadToolBar1.Items[i].DataBind();
        }
    }
}
Protected Sub Page_Load(ByVal sender As Object, ByVal e As EventArgs) Handles Me.Load

    If Not Page.IsPostBack Then
        Dim i As Integer = 0
        While i < RadToolBar1.Items.Count
            RadToolBar1.Items(i).DataBind()
            i = i + 1
        End While
    End If
End Sub
Using custom attributes in server-side code
You can add any name/value pair (value must be string) in the Attributes collection of each RadToolBarItem and retrieve it later.
RadToolBarButton button = new RadToolBarButton();
button.Attributes["DisplayName"] = "CustomText";
RadToolBarDropDown dropDown = new RadToolBarDropDown();
dropDown.Attributes["DisplayName"] = "CustomText";
RadToolBarSplitButton splitButton = new RadToolBarSplitButton();
splitButton.Attributes["Displayname"] = "CustomText";
Dim button As New RadToolBarButton()
button.Attributes("DisplayName") = "CustomText"
Dim dropDown As New RadToolBarDropDown()
dropDown.Attributes("DisplayName") = "CustomText"
Dim splitButton As New RadToolBarSplitButton()
splitButton.Attributes("Displayname") = "CustomText"
Using custom attributes client-side
Custom attributes are exposed in the client-side API as well. Each client-side instance of RadToolBarItems has a collection named attributesthat contains all custom attributes for the respective item. This example demonstrates how to show some custom attributes for the toolbar items. The last two lines of code show how to set a custom attribute to the split button using a pure client-side code.
var toolBar = $find("<%=RadToolBar1.ClientID %>");
var button = toolBar.findItemByText("Button 1");
alert(button.get_attributes().getAttribute("DisplayName"));
var dropDown = toolBar.findItemByText("DropDown 1");
alert(dropDown.get_attributes().getAttribute("DisplayName"));
var splitButton = toolBar.findItemByText("SplitButton 1");
alert(splitButton.get_attributes().getAttribute("DisplayName"));
splitButton.get_attributes().setAttribute("NewAttributename", "NewAttributeValue");
alert(splitButton.get_attributes().getAttribute("NewAttributename"));