Custom Icons
This help article shows how to use custom icons (images or font icons) in RadSplitButton.
Image Icons
To display an image icon on the splitbutton, you need to set the Icon.Url property to point to the URL of the desired image. In the ContextMenu Items, Images can be added as described in the Adding Images to Items article.
![]()
<telerik:RadSplitButton ID="RadSplitButton2" runat="server" Text="Button With Custom Image Icon">
    <Icon Url="https://demos.telerik.com/aspnet-ajax/button/examples/customicons/images/eFind.png" />
    <ContextMenu>
        <Items>
            <telerik:RadMenuItem Text="Action1" ImageUrl="https://demos.telerik.com/aspnet-ajax/button/examples/customicons/images/eClose.png"></telerik:RadMenuItem>
            <telerik:RadMenuItem Text="Action2" ImageUrl="https://demos.telerik.com/aspnet-ajax/button/examples/customicons/images/eTools.png"></telerik:RadMenuItem>
        </Items>
    </ContextMenu>
</telerik:RadSplitButton>
Hovered and Active States
RadSplitButton also provides an easy way to show different icon when the mouse is over the Button, or the button is pressed. To do this, use the HoveredCssClass and PressedCssClass properties exposed by the Icon tag. The same is valid for the Items in the embedded context menu with the help of ImageUrl, HoveredImageUrl, ImageClickedUrl properties as explained in the Adding Images to Items article.
Font Icons
You can use custom font icons in RadSplitButton as well. To do that, follow the steps below:
-
Load the stylesheet with the desired font icons on the page.
<link rel="stylesheet" href="myCustomFontStyleSheet.css" /> ````- Override the font-family of the button's icon element with the target one.
.RadSplitButton .rbIcon.rbPrimaryIcon:before, .RadMenu_Context .rmItem .rmLeftImage:before{ font-family: myCustomFont; } ```` -
Set the custom font icon class to the Icon.CssClass property.
ASP.NET
<telerik:RadSplitButton ID="RadSplitButton1" runat="server" Text="Button With Custom Font Icon">
    <Icon CssClass="myCustomFontIconClass" />
</telerik:RadSplitButton>

<telerik:RadSplitButton ID="RadSplitButton1" runat="server" Text="Button with Icon">
    <Icon CssClass="myCustomFontIconClass" />
    <ContextMenu>
        <Items>
            <telerik:RadMenuItem Text="Action 1" EnableImageSprite="true" SpriteCssClass="myCustomFontIconClass"></telerik:RadMenuItem>
            <telerik:RadMenuItem Text="Action 2" EnableImageSprite="true" SpriteCssClass="myCustomFontIconClass"></telerik:RadMenuItem>
        </Items>
    </ContextMenu>
</telerik:RadSplitButton>
Sample of SplitButton with FontAwesome icons:
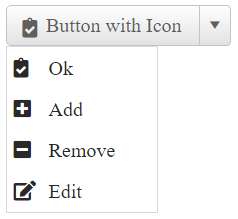
Below is the code for achieving this appearance:
<style>
    .RadButton .rbIcon.rbPrimaryIcon::before,
    .RadMenu_Context .rmItem .rmLeftImage:before {
        font-family: "Font Awesome 5 Free";
        font-weight: 900;
    }
</style>
<telerik:RadSplitButton ID="RadSplitButton1" runat="server" Text="Button with Icon" Skin="Silk">
    <Icon CssClass="fas fa-clipboard-check" />
    <ContextMenu>
        <Items>
            <telerik:RadMenuItem Text="Ok" EnableImageSprite="true" SpriteCssClass="fas fa-clipboard-check"></telerik:RadMenuItem>
            <telerik:RadMenuItem Text="Add" EnableImageSprite="true" SpriteCssClass="fas fa-plus-square"></telerik:RadMenuItem>
            <telerik:RadMenuItem Text="Remove" EnableImageSprite="true" SpriteCssClass="fas fa-minus-square"></telerik:RadMenuItem>
            <telerik:RadMenuItem Text="Edit" EnableImageSprite="true" SpriteCssClass="fas fa-edit"></telerik:RadMenuItem>
        </Items>
    </ContextMenu>
</telerik:RadSplitButton>
You can also change the font-size and color of the font icon as described in the Fine Tune help article.
Check out how to use Font Awesome icons along with Telerik controls in the 4 Ways to Embed Font Awesome in Telerik UI for ASP.NET AJAX Controls blog post.