Binding to Hierarchical DataSource
Some data sources are inherently hierarchical. These include SiteMapDataSource and XmlDataSource. When data-bound to these types of data sources, RadMenu automatically creates the menu item hierarchy. There is no need to use the DataFieldID and DataFieldParentID properties.
Binding to SiteMapDataSource
When binding to SiteMapDataSource, there is no need to set any properties to map fields from the data source to properties of the menu items. This is because site maps have a strictly defined structure.
The SiteMapDataSource control defines the structure of your Web site. You can have only one sitemap per site. By default the SiteMapDataSource control uses the default Site Navigation Provider. This provider lets you define the structure of your site, separating the real page structure of the site on one hand, and the UI presentation on the other.
The default site navigation provider is XML-based. It should stay in the root level of your project and should be named web.sitemap. Using the Site Navigation API provided in ASP.NET v2.0, you can write your own Site Navigation Provider and expose the navigation information from any back-end system, if needed.
Setting the SiteMapDataSource control
Before adding the SiteMapDataSource control to your page, you need to add the Site Navigation Provider.
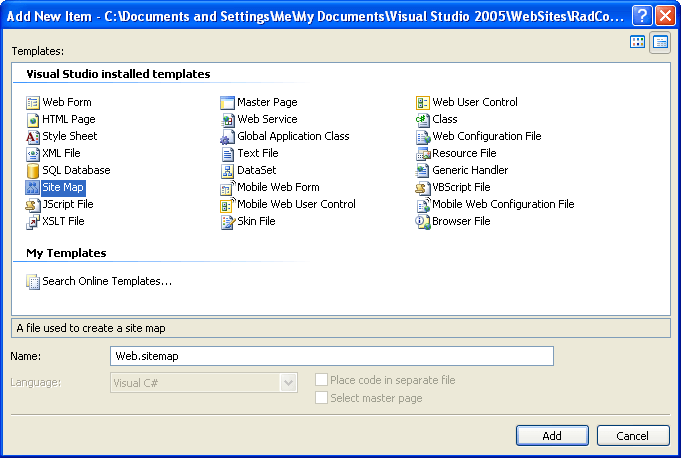
In the Solution Explorer, choose Add New Item... In the templates dialog, select Site Map:

Click the Add button. Visual Studio generates the web.sitemap file with the initial code:
<?xml version="1.0" encoding="utf-8" ?>
<sitemap xmlns="http://schemas.microsoft.com/AspNet/SiteMap-File-1.0">
    <siteMapNode url="" title=""  description="">
        <siteMapNode url="" title=""  description="" />
        <siteMapNode url="" title=""  description="" />
    </siteMapNode>
</sitemap>
- Populate the Web.sitemap file. Here is an example:
<?xml version="1.0" encoding="utf-8" ?>
<sitemap xmlns="http://schemas.microsoft.com/AspNet/SiteMap-File-1.0">
  <siteMapNode url="https://www.telerik.com" title="Telerik" description="Telerik home page">
    <siteMapNode url="https://www.telerik.com/radcontrols" title="Telerik RadControls for ASP.NET" description="Telerik RadControls for ASP.NET" >
        <siteMapNode url="https://www.telerik.com/radeditor" title="Telerik RadEditor" description="Telerik RadEditor control"/>
    </siteMapNode>
    <siteMapNode url="https://www.telerik.com/radnavigation" title="Telerik RadNavigation controls" description="Telerik RadNavigation controls" />
  </siteMapNode>
</sitemap>
The url must be unique for each node. Avoid using backslashes "\" for your URLs. Backslashes may cause problems with some browsers. Instead, we use the slash character "/".
Drag a SiteMapDataSource instance from the Toolbox to your Web page.
Set the ShowStartingNode property of the SiteMapDataSource component to False. This allows you to use multiple menu items at the root level.
Binding the SiteMapDataSource to Telerik RadMenu
From the RadMenu property pane, set the DataSourceID to the ID of the SiteMapDataSource control.
Each siteMapNode has three attributes which are mapped automatically to the respective properties:
url - Maps to the NavigateUrl property.The path can be either relative (using the ~/), or absolute.
title - Maps to the Text property.
description - Maps to the ToolTip property.
- To set additional properties or overwrite already populated fields, use the ItemDataBound event. The example below overwrites the TooTip property with the Text value of the item and sets the Value property to a concatenated string of [Text] + "_Value".
protected void RadMenu1_ItemDataBound(object sender, Telerik.Web.UI.RadMenuEventArgs e)
{
    e.Item.ToolTip = (string)DataBinder.Eval(e.Item.DataItem, "title");
    e.Item.Value = (string)DataBinder.Eval(e.Item.DataItem, "title") + "_Value";
}
Protected Sub RadMenu1_ItemDataBound(ByVal sender As Object, ByVal e As Telerik.Web.UI.RadMenuEventArgs)
    e.Item.ToolTip = CStr(DataBinder.Eval(e.Item.DataItem, "title"))
    e.Item.Value = CStr(DataBinder.Eval(e.Item.DataItem, "title")) + "_Value"
End Sub
Binding to XmlDataSource
When binding to an XmlDataSource, RadMenu creates the menu item hierarchy automatically. However, unlike SiteMapDataSource, properties such as Text and NavigateUrl are not automatically populated.
Consider the following example:
- Add the following xml file in the App_Data folder:
<?xml version="1.0" encoding="utf-8" ?>
<Items Text="">
  <Item Text="European cities" Url="" >
    <Item Text="Sofia" Url="https://en.wikipedia.org/wiki/Sofia" />
    <Item Text="Berlin" Url="https://en.wikipedia.org/wiki/Berlin" />
    <Item Text="Paris" Url="https://en.wikipedia.org/wiki/Paris" />
  </Item>
  <Item Text="North American cities" Url="">
    <Item Text="Boston" Url="https://en.wikipedia.org/wiki/Boston" />
    <Item Text="San Francisco" Url="https://en.wikipedia.org/wiki/San_Francisco" />
    <Item Text="Seattle" Url="https://en.wikipedia.org/wiki/Seattle" />
    <Item Text="Toronto" Url="https://en.wikipedia.org/wiki/Toronto" />
  </Item>
  <Item Text="South American cities" Url="">
    <Item Text="Rio de Janeiro" Url="https://en.wikipedia.org/wiki/Rio_De_Janeiro" />
    <Item Text="Buenos Aires" Url="https://en.wikipedia.org/wiki/Buenos_aires" />
  </Item>
  <Item Text="Asian cities" Url="">
    <Item Text="Tokyo" Url="https://en.wikipedia.org/wiki/Tokyo" />
    <Item Text="Seul" Url="https://en.wikipedia.org/wiki/Seul" />
    <Item Text="Beijing" Url="https://en.wikipedia.org/wiki/Beijing" />
    <Item Text="Tehran" Url="https://en.wikipedia.org/wiki/Teheran" />
  </Item>
  <Item Text="African cities" Url="">
    <Item Text="Kano" Url="https://en.wikipedia.org/wiki/Kano" />
    <Item Text="Johannesburg" Url="https://en.wikipedia.org/wiki/Johannesburg" />
    <Item Text="BeninCity" Url="https://en.wikipedia.org/wiki/Benin" />
  </Item>
</Items>
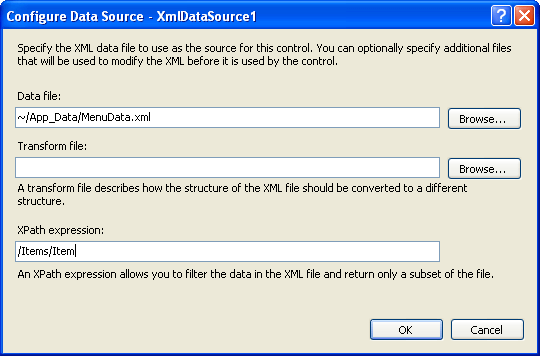
Drag an instance of XmlDataSource onto your Web form and configure the control:
Set the Data file to the XML file you just added.
Set the XPath expression to "/Items/Item". This removes the starting node of the XML file so that you can have multiple root-level menu items.

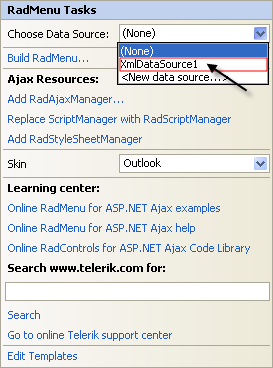
Set the DataSourceID of your RadMenu to the ID of the XmlDataSource or choose the XMLDataSource from the smart tag:

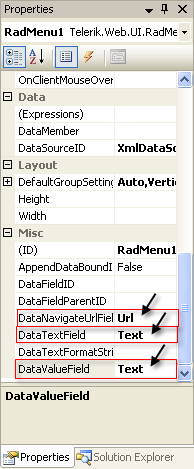
Map the Text, Value and NavigateUrl fields by setting the DataTextField, DataValueField and DataNavigateUrlField properties:

This example has no separate field for value, so it uses the Text field for the Value property, for illustrative purposes.
- As with the SiteMapDataSource example above, you can map additional properties using the ItemDataBound event:
protected void RadMenu1_ItemDataBound(object sender, Telerik.Web.UI.RadMenuEventArgs e)
{
    if (e.Item.Level > 0) //set tooltip only for child items
    {
        XmlElement element = (XmlElement)e.Item.DataItem;
        e.Item.ToolTip = "Read more about " + element.Attributes["Text"].Value;
    }
}
Protected Sub RadMenu1_ItemDataBound(ByVal sender As Object, ByVal e As Telerik.Web.UI.RadMenuEventArgs)
    If e.Item.Level > 0 Then 'set tooltip only for child items
        Dim element As XmlElement = DirectCast(e.Item.DataItem, XmlElement)
        e.Item.ToolTip = "Read more about " + element.Attributes("Text").Value
    End If
End Sub
Here is also the Markup in which above steps resulted in:
<telerik:RadMenu runat="server" ID="RadMenu1" RenderMode="Lightweight"
    OnItemDataBound="RadMenu1_ItemDataBound"
    DataSourceID="menuXmlDS"
    DataTextField="Text" DataValueField="Text" DataNavigateUrlField="Url">
</telerik:RadMenu>

<asp:XmlDataSource runat="server" ID="menuXmlDS" XPath="/Items/Item"
        DataFile="~/App_Data/MenuData.xml" />
protected void RadMenu1_ItemDataBound(object sender, Telerik.Web.UI.RadMenuEventArgs e)
{
    if (e.Item.Level > 0) //set tooltip only for child items
    {
        XmlElement element = (XmlElement)e.Item.DataItem;
        e.Item.ToolTip = "Read more about " + element.Attributes["Text"].Value;
    }
}
Protected Sub RadMenu1_ItemDataBound(ByVal sender As Object, ByVal e As Telerik.Web.UI.RadMenuEventArgs)
    If e.Item.Level > 0 Then 'set tooltip only for child items
        Dim element As XmlElement = DirectCast(e.Item.DataItem, XmlElement)
        e.Item.ToolTip = "Read more about " + element.Attributes("Text").Value
    End If
End Sub