Custom ToolStrip
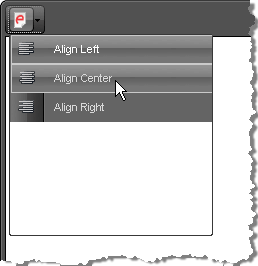
ToolStrips are useful dropdowns that contain a group of tools with related functionality and can be a very convenient means of arranging tools used in the editor. An example of a simple ToolStrip with a group of alignment tools is shown below:
Set a custom raster image for the Classic Render Mode
<style>
    /* The generic class name is re<toolName> */
    a.reTool .MyToolStrip,
    a.reTool .MyToolStrip:hover
    {
        background-image: url(images/some-image.png);
        background-repeat: no-repeat;
        /* optionally, tweak the position */
        /*background-position: 2px 2px;*/
    }

    /* remove the built-in icon */
    a.reTool .MyToolStrip:before
    {
        content: "";
    }
</style>
...
<telerik:RadEditor RenderMode="Lightweight" runat="server" ID="RadEditor1">
    <Tools>
        <telerik:EditorToolGroup>
            <telerik:EditorToolStrip Name="MyToolStrip">
                <telerik:EditorTool Name="JustifyLeft" />
                <telerik:EditorTool Name="JustifyCenter" />
                <telerik:EditorTool Name="JustifyRight" />
            </telerik:EditorToolStrip>
        </telerik:EditorToolGroup>
    </Tools>
</telerik:RadEditor>
You can also create a toolstrip via the ToolsFile.xml file, e.g.
<editortoolstrip name="Apply Formatting">
    <EditorTool Name="Bold" />
    <EditorTool Name="Italic" />
    <EditorTool Name="Underline" />
</editortoolstrip>
In order to apply an image to be used as the ToolStrip icon with the Classic RenderMode, you need to set a style with the following structure:
.reToolbar.<skinName> .<commandName>
{
    background-image: url(MyImage.gif);
}

/* for example*/
.reToolbar.Default .MyToolStrip
{
    background-image: url(some-image.png);
}