Code Snippets
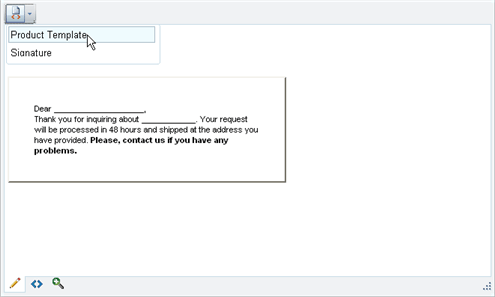
The Code snippets dropdown (<tool name="InsertSnippet" />) is a convenient tool for inserting predefined chunks of content (HTML) like signatures, product description templates, custom tables, etc. These chunks of content are kept in the Snippets collection. You can add to the Snippets collection declaratively, programmatically and using the ToolsFile.

Using the Snippets Collection Declaratively
<telerik:RadEditor RenderMode="Lightweight" runat="server" ID="RadEditor1">
    <Snippets>
        <telerik:EditorSnippet Name="Product Template">
            <!-- my table HTML snippet -->
            <table>
                <tr>
                    <td>
                        <img src='https://www.telerik.com/DEMOS/ASPNET/Editor/Img/productLogo.gif' />
                    </td>
                </tr>
            </table>
        </telerik:EditorSnippet>
    </Snippets>
</telerik:RadEditor>
Using Snippets Programmatically
Use the Snippets collection Add() method to include new items in the list.In the following example, we construct a new set of code snippets with two items - a Product Template and an e-mail Signature:
RadEditor1.Snippets.Add("Product Template", "<table> <tr> <td><img src='https://www.telerik.com/DEMOS/ASPNET/Editor/Img/productLogo.gif' /> </td></tr></table>");
RadEditor1.Snippets.Add("Signature", "<strong>John Smith</strong><br>Sales Manager<br>");
RadEditor1.Snippets.Add("Product Template", "<table> <tr> <td><img src='https://www.telerik.com/DEMOS/ASPNET/Editor/Img/productLogo.gif' /> </td></tr></table>")
RadEditor1.Snippets.Add("Signature", "<strong>John Smith</strong><br>Sales Manager<br>")
To create a dropdown with image thumbnails, insert the img tag as the first argument of the Add() method. The img tag content is the path to the image source:

RadEditor1.Snippets.Add("<img src='./RadControls/Editor/Skins/Default/Buttons/Cut.gif' /> test", "test");
RadEditor1.Snippets.Add("<img src='./RadControls/Editor/Skins/Default/Buttons/Cut.gif' /> test", "test")
Using the ToolsFile
You can also populate the Custom links dropdown using the ToolsFile.xml file. For the HTML code to be interpreted correctly in the XML file, enclose the code in <![CDATA[ ]]> as shown in the example below:

<snippets>
    <snippet name="Product Template">
        <![CDATA[
            <div style="width:300px;border:2px outset #D8D2BD;padding:34px;font-family:Arial, Verdana; font-size:11px;background- color:#F1EFE6;">
                Dear ********************,<br>
                Thank you for inquiring about ************. Your request will be processed in 48 hours and shipped at the address you have provided.
                <b>Please, contact us if you have any problems.</b>
            </div>
        ]]>
    </snippet>
    <snippet name="Signature">
        <![CDATA[
            <strong>John Smith</strong>
            <br>Sales Manager<br>
            ...
            ************************************************
         ]]>
    </snippet>
</snippets>
To set an image icon in an "Insert Code Snippet" item, put an IMG tag either in front of or next to the Title inside the name attribute of the respective snippet tag:<snippet name="<img src='https://www.telerik.com/RadControls/Editor/Skins/Custom/buttons/AjaxSpellCheck.gif' />Order Confirmation">
You should also encode the < and > tags symbols of the IMG tag with < and >.
Bear in mind that RadEditor will persist its state (including the Code Snippets set) between postbacks. In order to create a new set of Code Snippets (e.g. for different users), you will need to clear it first. This can be done using Remove() or Clear() methods from the Snippets collection.