Getting Started with the Telerik WebForms Diagram
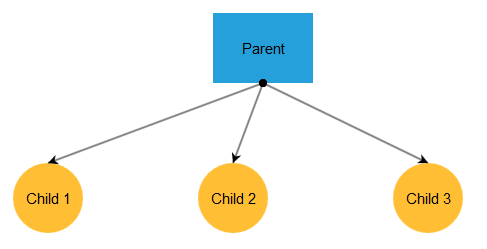
The following tutorial demonstrates how you can add a simple RadDiagram control with several shapes and connections. The end result will be similar to Figure 1:
Figure 1: A RadDiagram configuration with a few shapes and connections

Add a ScriptManager control on a Web Form.
-
Add a RadDiagram control on this AJAX-enabled Web Form:
Example 1: Declaration of a RadDiagram control.
ASP.NET
<asp:ScriptManager runat="server" ID="ScriptManager1" /> <telerik:RadDiagram ID="RadDiagram1" runat="server"> </telerik:RadDiagram> -
Add a few shapes in the ShapesCollection of the diagram. It is recommended to set different values for their X and Y properties so that they are not positioned on the same location.
Setting the Id property of each shape is important, because you will need it when creating connections.
-
Set some of the properties of the shapes like Background, Type, Width and Height to make them distinctive.
Example 2: The diagram now contains several shapes
ASP.NET
<asp:ScriptManager runat="server" ID="ScriptManager1"  />
<telerik:RadDiagram ID="RadDiagram1" runat="server">
    <ShapesCollection>
        <telerik:DiagramShape Id="DiagramShape5" Width="100" Height="70" X="260" Y="100" Type="rectangle">
            <ContentSettings Text="Parent" />
            <FillSettings Color="#25a0da" />
        </telerik:DiagramShape>
        <telerik:DiagramShape Id="DiagramShape6" Height="70" X="60" Y="250" Type="circle">
            <ContentSettings Text="Child 1" />
            <FillSettings Color="#FFBE33" />
        </telerik:DiagramShape>
        <telerik:DiagramShape Id="DiagramShape7" Height="70" X="245" Y="250" Type="circle">
            <ContentSettings Text="Child 2" />
            <FillSettings Color="#FFBE33" />
        </telerik:DiagramShape>
        <telerik:DiagramShape Id="DiagramShape8" Height="70" X="440" Y="250" Type="circle">
            <ContentSettings Text="Child 3" />
            <FillSettings Color="#FFBE33" />
        </telerik:DiagramShape>
    </ShapesCollection>
</telerik:RadDiagram>
Add some connections between the shapes in the diagram to the ConnectionsCollections. It is important to specify valid shapes from which a connection starts and to which it ends. If the ShapeId property in FromSettings and ToSettings contains an Id of a non-existent shape, the connection will not be created.
You can configure some of the properties of the connections like StartCap, EndCap, FromSetting > Connector and ToSetting > Connector to specify the starting and ending point of a connection, as well as the appearance of the connection's start and end cap.
-
Press F5 to run the application. You will see the diagram that is displayed in Figure 1. From this point you can start interacting with the diagram using the actions that are described in the Rich User Interaction help article.
Example 3: The shapes in the diagram are connected
ASP.NET
<asp:ScriptManager runat="server" ID="ScriptManager1"  />
<telerik:RadDiagram ID="RadDiagram1" runat="server">
    <ShapesCollection>
        <telerik:DiagramShape Id="DiagramShape1" Width="100" Height="70" X="260" Y="100" Type="rectangle">
            <ContentSettings Text="Parent" />
            <FillSettings Color="#25a0da" />
        </telerik:DiagramShape>
        <telerik:DiagramShape Id="DiagramShape2" Height="70" X="60" Y="250" Type="circle">
            <ContentSettings Text="Child 1" />
            <FillSettings Color="#FFBE33" />
        </telerik:DiagramShape>
        <telerik:DiagramShape Id="DiagramShape3" Height="70" X="245" Y="250" Type="circle">
            <ContentSettings Text="Child 2" />
            <FillSettings Color="#FFBE33" />
        </telerik:DiagramShape>
        <telerik:DiagramShape Id="DiagramShape4" Height="70" X="440" Y="250" Type="circle">
            <ContentSettings Text="Child 3" />
            <FillSettings Color="#FFBE33" />
        </telerik:DiagramShape>
    </ShapesCollection>
    <ConnectionsCollection>
        <telerik:DiagramConnection StartCap="FilledCircle" EndCap="ArrowEnd">
            <FromSettings Connector="Bottom" ShapeId="DiagramShape1" />
            <ToSettings Connector="Top" ShapeId="DiagramShape2" />
        </telerik:DiagramConnection>
        <telerik:DiagramConnection StartCap="FilledCircle" EndCap="ArrowEnd">
            <FromSettings Connector="Bottom" ShapeId="DiagramShape1" />
            <ToSettings Connector="Top" ShapeId="DiagramShape3" />
        </telerik:DiagramConnection>
         <telerik:DiagramConnection StartCap="FilledCircle" EndCap="ArrowEnd">
            <FromSettings Connector="Bottom" ShapeId="DiagramShape1" />
            <ToSettings Connector="Top" ShapeId="DiagramShape4" />
        </telerik:DiagramConnection>
    </ConnectionsCollection>
</telerik:RadDiagram>