This article explains how to start using Telerik UI for Android in Eclipse after you have completed the download steps.
The Telerik UI for Android Eclipse distribution comes as a set of Eclipse Shared Library projects. To be able to use Telerik UI for Android in Eclipse, you will need to complete the following steps:
\sdk\extras\android\support\v7\ within your main Android SDK installation folder. You will need to import them into your worskpace as well. The latest available version of Telerik UI for Android is built with versions 23.1.1 and targets API 23. The suite uses features that have been added with these versions which means that you need to reference the same appcompat version in your build.gradle and target the same API (or optionally newer versions in case they doesn't contain breaking changes). Please note, that the Target API level is different than the Minimum API level. UI for Android supports API 14 as a Minimum API level. Here's more about the difference between Minimum and Target API Levels.
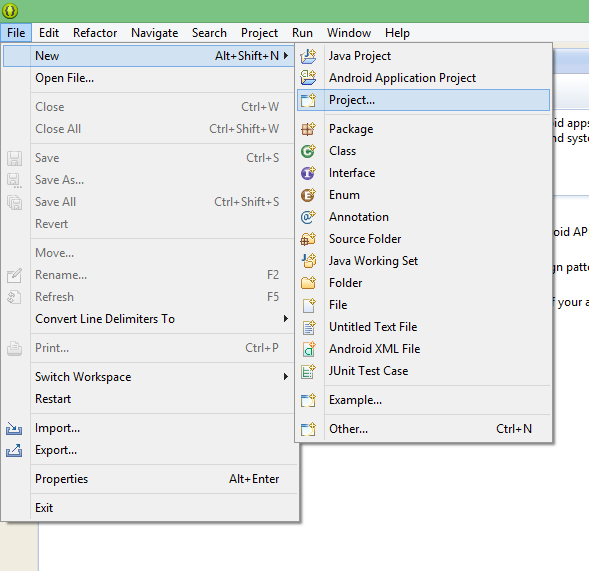
Select File -> New -> Project from the menu bar in Eclipse.
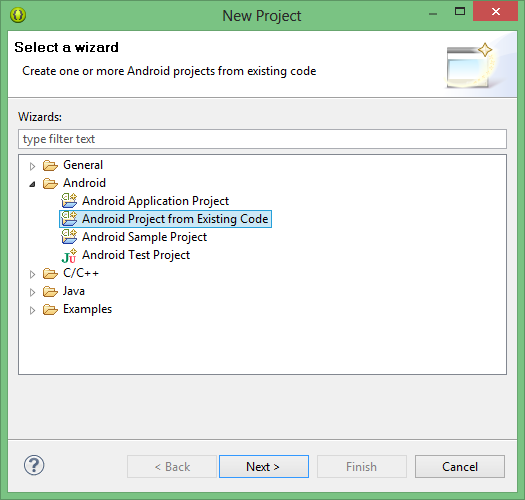
In the New Project Wizard, select Android -> Android Project from Existing Code and click Next.
Use Browse to navigate to the Controls\Eclipse folder inside the installation folder of Telerik UI for Android and then click Finish. Please note that in Windows you may not be able to complete this step if the controls are installed in Program Files. If this is the case you can go to the installation folder for Eclipse (C:\Program Files (x86)\Telerik\UI for Android [Version]\Controls\Eclipse) and copy the contents to a safe location (or run Eclipse as administrator). Then you will be able to create the project from the copied code.
Now you should have a workspace containing everything necessary to use Telerik UI for Android.
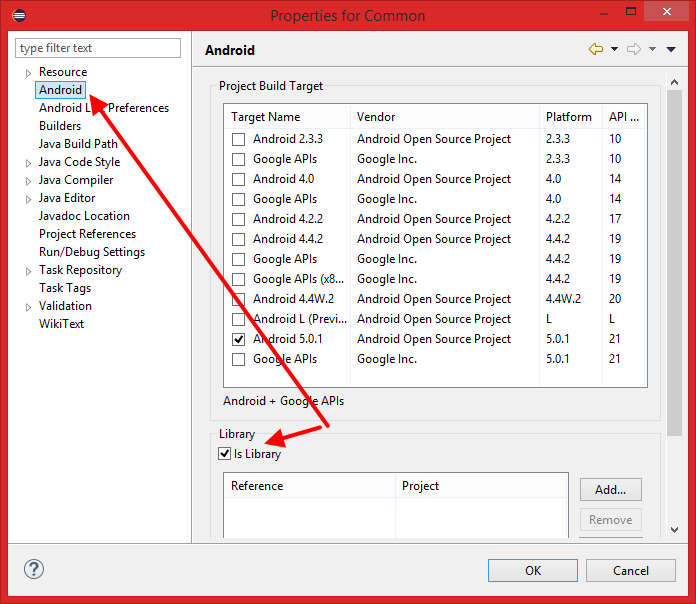
Right-click on each project and select Properties. Make sure the project is marked as library:
Add the following support libraries as explained in the 'Adding libraries with resources' section of this article :
appcompat and recyclerview libraries. Make sure you import them if you are using the Telerik UI for Android modules that require them as explained in the installation contents and dependencies section.Your workspace is now ready to use Telerik UI for Android.
To create a new Android Application project in Eclipse select File -> New -> Android Application Project.
Fill in the required information about your application project and make sure that you select API 14: Ice Cream Sandwich or newer as Minimum Required SDK.
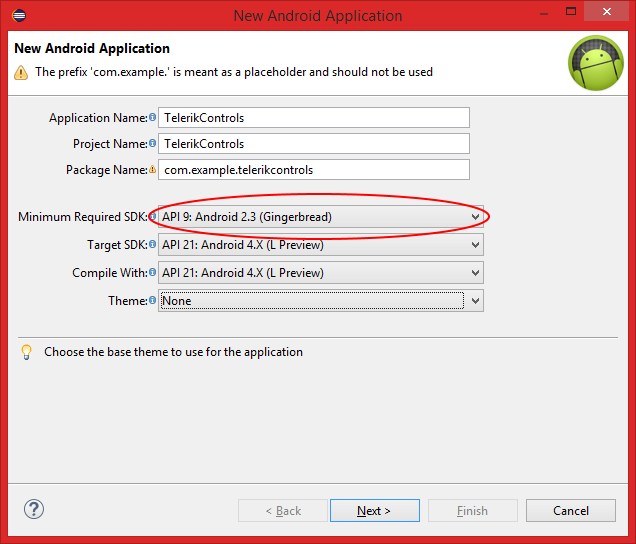
You can fill the other settings from the wizard according to your preferences.
Make sure you have imported the v7 AppCompat and v7 RecyclerView libraries and reference them if needed. For more information on which Telerik UI for Andriod modules require these libraries, take a look at the installation contents and dependencies section.
Right-click the project in the Package Explorer and select Properties. Select Android and click Add and select the needed library projects from those you have already imported following the steps from the Importing the Shared Library projects into your workspace.
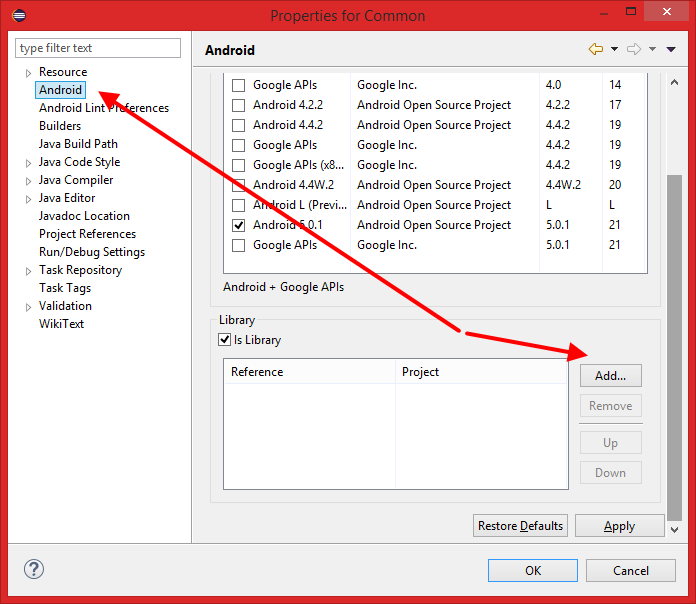
Click OK. After you rebuild the solution, you will be ready to use the controls from Telerik UI for Android inside your application.
We have prepared an Examples solution which you can find in the extracted archive (or the installation folder of Telerik UI for Android). In order to run the demo, you need to prepare your workspace by following the steps from the previous section. Then you can continue with the import of the Examples solution:
Create another new project from existing code by using the files you will find inside the Eclipse\Examples folder in your main Telerik UI for Android installation folder (C:\Program Files (x86)\Telerik\UI for Android [Version]\Examples if you installed the controls). Again, you may not have a permission to create the project from code inside Program Files, so you may need to copy the content to another folder before the import.
Add the following support libraries as explained in the 'Adding libraries with resources' section of this article :
You will also need to reference the Google Play Services library which is located in the \extras\google\google_play_services\libproject\google-play-services_lib subfolder of your Android SDK installation folder. This is done similarly to the AppCompat libraries. If you need further guidance regarding the Play Services lib integration, you can take a look at the official guide provided by Google: Adding Google Play Services in Eclipse ADT project
Another external reference, that you will need is the Fresco library. More about it you can read from its official documentation.
After referencing the required libraries, you will need to reference the Telerik UI for Android framework to be able to run the examples application. Right-click the Examples project in the Package Explorer and select Properties. Select Android and click Add and select all library projects you have just imported by following the steps from the Importing the Shared Library projects into your Workspace section.

Add the folder java to the Java Build Path list:
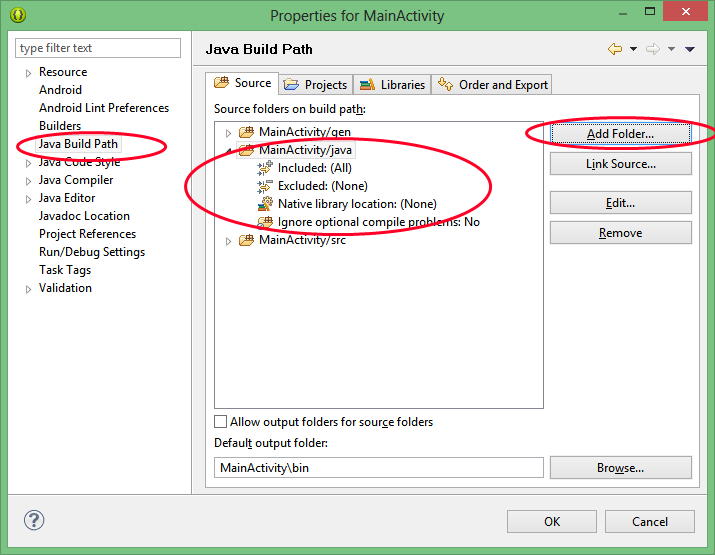
You can rebuild the solution and deploy it on your Android device and/or emulator.