Using NUnit
Telerik Testing Framework comes with built-in support for NUnit 2.5 and higher. The latest release of NUnit can be downloaded here.
If you have a 64-bit machine, be sure to use the 32-bit version of NUnit (nunit-x86.exe) and not the 64-bit version (nunit.exe).
Telerik Automation Infrastructure comes with the following features to facilitate integration with NUnit:
Telerik Testing Framework comes with a BaseTest base class under its TestTemplates namespace that can be used as the base class for all your Telerik automation tests running under NUnit. The base class provides the following integration features:
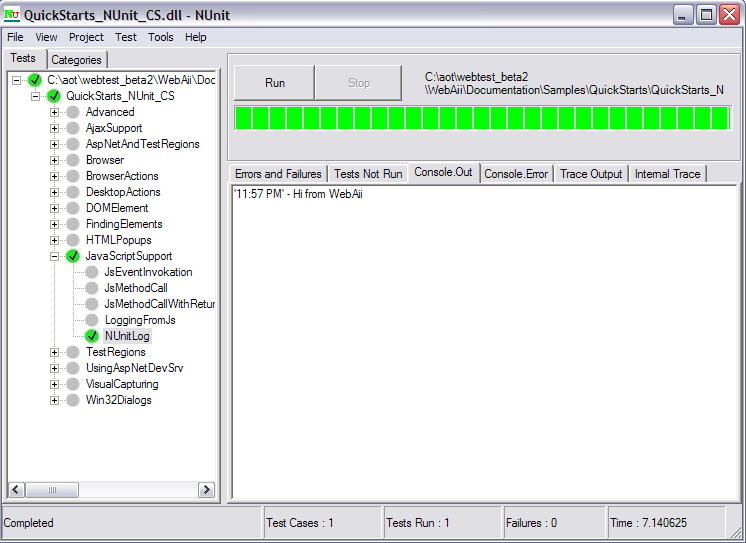
Unifies the log content. Any logging from Telerik automation using its Log object will also be logged to NUnit's output including logging from JavaScript. For example:
[Test]
public void NUnitLog()
{
     Log.WriteLine("Hi from WebAii");
}
<Test()> _
Public Sub NUnitLog()

     Log.WriteLine("Hi from WebAii")

End Sub
NUnit log:
Telerik settings can be read directly from the app.Config of your test project. This allows you to configure your Telerik tests using the same .config file that you might be using to store your connection strings or other settings for your test suite.
When installing Telerik Testing Framework, a new fully commented NUnit item template will be added to your list of available templates. This will enable you to start using Telerik Testing Framework by simply selecting it from the Add->New Item tool menu (or context menu) available to your VS project. You are provided with both a C# and a VB.NET template.
Getting Started Using NUnit
In this section we will walk you through the steps to get you started using Telerik Testing Framework with NUnit.
Once you have completed installing Telerik Testing Framework on the target machine, start your Visual Studio environment and open your NUnit test library in Visual Studio or create a new one if you are starting from scratch.
Once you have created the project, select the project node in the Solution Explorer and right-click. Then select Add->New Item... (NOTE: Do not use Add->New Test)
Visual Studio will pop-up the Add New Item dialog as shown below.
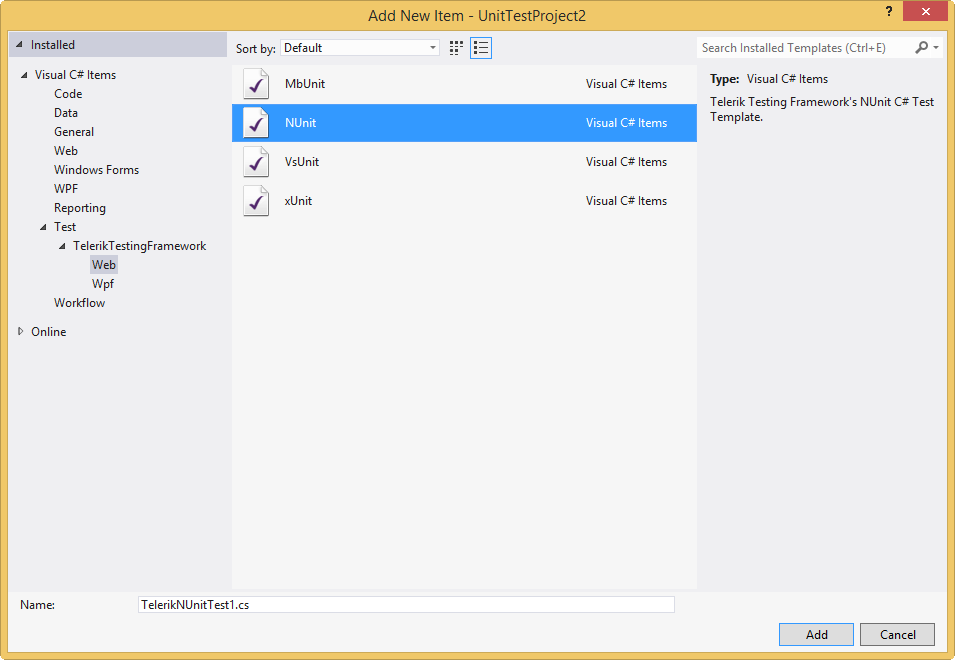
Expand the Test node displayed on the left then select Telerik Testing Framework. You should see four templates as shown in the image above.
Select the NUnit template.
Enter a name for your test and click Add.
At this point, you should have a new test added to your project and you should be ready to go. The template will automatically add a reference of ArtOfTest.WebAii.dll to your project that contains the Telerik infrastructure and all the initialization and clean-up routines will be setup in your new unit test file.
If you haven't already done so, you'll need to add references to the NUnit dll's nunit.core.dll and nunit.framework.dll.
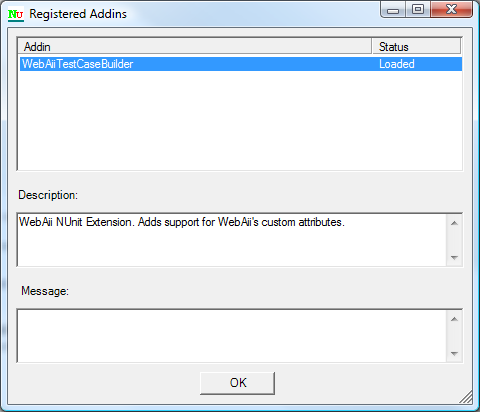
IMPORTANT: If you plan to use Telerik Testing Framework attributes with NUnit (optional), please make sure to install the NUnit Extension dll. To do that:
Download the NUnit Extension source from here.
Compile the sources against your version of NUnit and copy the dll into your %ProgramFiles%\NUnit xxx\bin\addins folder.
That's it! Verify that the extension is installed correctly from NUnit by checking the (Tools-Addins) dialog. It should look like this:
- Start writing your automated Telerik unit tests.
Telerik's NUnit Template
Telerik NUnit tests inherit from a base test class called BaseTest that lives in the ArtOfTest.WebAii.TestTemplate namespace. The base class, in addition to providing the integration benefits described above, provides:
- Short-cuts to the commonly used objects within your test code. For example, instead of always typing Manager.ActiveBrowser.Find, there is a first class Find object exposed off the BaseTest class that is set to the Manager.ActiveBrowser.Find instance. The following are the objects and their short-cuts that the base class provides:
| Object reference | Shortcut name |
|---|---|
| Manager.ActiveBrowser | ActiveBrowser |
| Manager.ActiveBrowser.Find | Find |
| Manager.ActiveBrowser.Actions | Actions |
| Manager.Desktop | Desktop |
| Manager.Log | Log |
| Manager | Manager |
Takes care of creating the Manager object and setting up all the above short cuts.
Reads the .config file (if available) and reads the Telerik settings from it and initializes Telerik Testing Framework according to these settings.
Sets up the proper delegates so that logging from both Telerik and NUnit is done to the same log file.
The base class also offers different options that you might want to choose from depending on the scenarios and your testing environment. The Telerik template installed on your machines, by default uses the following initialization:
Initialize(new TestContextWriteLine(Console.Out.WriteLine));
Initialize(New TestContextWriteLine(AddressOf Console.Out.WriteLine))
The above initialization passes in a delegate to the WriteLine method of NUnit so that you can unify the logging across both frameworks. If that initialization does not work for you, you can choose to pass in different parameters or choose to do your own custom setup of the framework. For example, if you want to override some of the settings from the .config file in one or two of your test cases, you can simply do the following:
// This will get a new Settings object. If a configuration
// section exists, then settings from that section will be
// loaded

Settings settings = GetSettings();

// Override the settings you want. For example:
settings.DefaultBrowser = BrowserType.FireFox;

// Now call Initialize again with your updated settings object
Initialize(settings, new TestContextWriteLine(Console.Out.WriteLine));
' This will get a new Settings object. If a configuration
' section exists, then settings from that section will be
' loaded

Dim mySettings As Settings = GetSettings()

' Override the settings you want. For example:
mySettings.DefaultBrowser = BrowserType.FireFox

' Now call Initialize again with your updated settings object
Initialize(mySettings, New TestContextWriteLine(AddressOf Console.Out.WriteLine))
Also if you don't really want to unify the logging and would prefer the framework to perform its own logging in a custom folder, you can simply use the following overload:
Initialize(myCustomLocation);
Initialize(myCustomLocation)
For more information on Telerik Testing Framework's settings & configuration please refer to the Settings and Configuration topic.
Starting Automation
Now that we have an understanding of the template, we can start automating right away. Pick your test method and start writing your automation test code for your unit test. For example:
[Test]
[Description("My simple demo")]
public void SimpleTest()
{
     // Launch an instance of the browser
     Manager.LaunchNewBrowser();

     // Navigate to google.com
     ActiveBrowser.NavigateTo("http://www.google.com");

     // verify the title is actually Google.
     Assert.AreEqual("Google", ActiveBrowser.Find.ByTagIndex("title", 0).InnerText);
}
<Test(), _
Description("My simple demo")> _
Public Sub SimpleTest()

     ' Launch an instance of the browser
     Manager.LaunchNewBrowser()

     ' Navigate to google.com
     ActiveBrowser.NavigateTo("http://www.google.com")

     ' verify the title is actually Google.
     Assert.AreEqual("Google", ActiveBrowser.Find.ByTagIndex("title", 0).InnerText)

End Sub