Rows and Columns
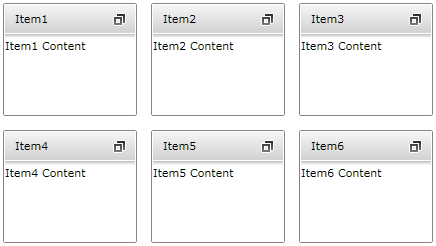
By default all TileViewItems are ordered automatically like in the screenshot below:
<telerik:RadTileView>
    <telerik:RadTileViewItem Header="Item1">
        <TextBlock Text="Item1 Content" />
    </telerik:RadTileViewItem>
    <telerik:RadTileViewItem Header="Item2">
        <TextBlock Text="Item2 Content" />
    </telerik:RadTileViewItem>
    <telerik:RadTileViewItem Header="Item3">
        <TextBlock Text="Item3 Content" />
    </telerik:RadTileViewItem>
    <telerik:RadTileViewItem Header="Item4">
        <TextBlock Text="Item4 Content" />
    </telerik:RadTileViewItem>
    <telerik:RadTileViewItem Header="Item5">
        <TextBlock Text="Item5 Content" />
    </telerik:RadTileViewItem>
    <telerik:RadTileViewItem Header="Item6">
        <TextBlock Text="Item6 Content" />
    </telerik:RadTileViewItem>
</telerik:RadTileView>

Setting the number of Columns
To set the number of columns you can use the ColumnsCount property:
<telerik:RadTileView ColumnsCount="2">
    <telerik:RadTileViewItem Header="Item1">
        <TextBlock Text="Item1 Content" />
    </telerik:RadTileViewItem>
    <telerik:RadTileViewItem Header="Item2">
        <TextBlock Text="Item2 Content" />
    </telerik:RadTileViewItem>
    <telerik:RadTileViewItem Header="Item3">
        <TextBlock Text="Item3 Content" />
    </telerik:RadTileViewItem>
    <telerik:RadTileViewItem Header="Item4">
        <TextBlock Text="Item4 Content" />
    </telerik:RadTileViewItem>
    <telerik:RadTileViewItem Header="Item5">
        <TextBlock Text="Item5 Content" />
    </telerik:RadTileViewItem>
    <telerik:RadTileViewItem Header="Item6">
        <TextBlock Text="Item6 Content" />
    </telerik:RadTileViewItem>
</telerik:RadTileView>

To set the maximum number of columns you can use the MaxColumns property:
<telerik:RadTileView MaxColumns="2">
    <telerik:RadTileViewItem Header="Item1">
        <TextBlock Text="Item1 Content" />
    </telerik:RadTileViewItem>
    <telerik:RadTileViewItem Header="Item2">
        <TextBlock Text="Item2 Content" />
    </telerik:RadTileViewItem>
    <telerik:RadTileViewItem Header="Item3">
        <TextBlock Text="Item3 Content" />
    </telerik:RadTileViewItem>
    <telerik:RadTileViewItem Header="Item4">
        <TextBlock Text="Item4 Content" />
    </telerik:RadTileViewItem>
    <telerik:RadTileViewItem Header="Item5">
        <TextBlock Text="Item5 Content" />
    </telerik:RadTileViewItem>
    <telerik:RadTileViewItem Header="Item6">
        <TextBlock Text="Item6 Content" />
    </telerik:RadTileViewItem>
</telerik:RadTileView>
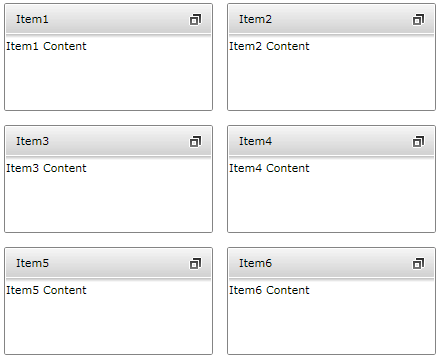
The result from the above code is displayed below. As you can see now the items are ordered in two columns:

Setting the number of Rows
To set the number of rows you can use the RowsCount property.
<telerik:RadTileView RowsCount="1">
    <telerik:RadTileViewItem Header="Item1">
        <TextBlock Text="Item1 Content" />
    </telerik:RadTileViewItem>
    <telerik:RadTileViewItem Header="Item2">
        <TextBlock Text="Item2 Content" />
    </telerik:RadTileViewItem>
    <telerik:RadTileViewItem Header="Item3">
        <TextBlock Text="Item3 Content" />
    </telerik:RadTileViewItem>
    <telerik:RadTileViewItem Header="Item4">
        <TextBlock Text="Item4 Content" />
    </telerik:RadTileViewItem>
    <telerik:RadTileViewItem Header="Item5">
        <TextBlock Text="Item5 Content" />
    </telerik:RadTileViewItem>
    <telerik:RadTileViewItem Header="Item6">
        <TextBlock Text="Item6 Content" />
    </telerik:RadTileViewItem>
</telerik:RadTileView>

To set the maximum number of rows you can use the MaxRows property:
<telerik:RadTileView MaxRows="1">
    <telerik:RadTileViewItem Header="Item1">
        <TextBlock Text="Item1 Content" />
    </telerik:RadTileViewItem>
    <telerik:RadTileViewItem Header="Item2">
        <TextBlock Text="Item2 Content" />
    </telerik:RadTileViewItem>
    <telerik:RadTileViewItem Header="Item3">
        <TextBlock Text="Item3 Content" />
    </telerik:RadTileViewItem>
    <telerik:RadTileViewItem Header="Item4">
        <TextBlock Text="Item4 Content" />
    </telerik:RadTileViewItem>
    <telerik:RadTileViewItem Header="Item5">
        <TextBlock Text="Item5 Content" />
    </telerik:RadTileViewItem>
    <telerik:RadTileViewItem Header="Item6">
        <TextBlock Text="Item6 Content" />
    </telerik:RadTileViewItem>
</telerik:RadTileView>
As you can see now the items are ordered in one row only:

When both ColumnsCount/MaxColumns and RowsCount/MaxRows properties are set, the value of ColumnsCount/MaxColumns will have a priority.
<telerik:RadTileView ColumnsCount="2" RowsCount="1">
    <telerik:RadTileViewItem Header="Item1">
        <TextBlock Text="Item1 Content" />
    </telerik:RadTileViewItem>
    <telerik:RadTileViewItem Header="Item2">
        <TextBlock Text="Item2 Content" />
    </telerik:RadTileViewItem>
    <telerik:RadTileViewItem Header="Item3">
        <TextBlock Text="Item3 Content" />
    </telerik:RadTileViewItem>
    <telerik:RadTileViewItem Header="Item4">
        <TextBlock Text="Item4 Content" />
    </telerik:RadTileViewItem>
    <telerik:RadTileViewItem Header="Item5">
        <TextBlock Text="Item5 Content" />
    </telerik:RadTileViewItem>
    <telerik:RadTileViewItem Header="Item6">
        <TextBlock Text="Item6 Content" />
    </telerik:RadTileViewItem>
</telerik:RadTileView>
As you can see from the image below only the ColumnsCount property is respected:

Setting Rows and Columns Size
You can control the height of the restored tiles using the RadTileView RowHeight property. The RowHeight property is of type GridLength and support the following values:
Absolute sizing - sets exact height to the restored tiles
Star sizing (*) - the available height will be distributed equally among the restored tiles
Auto sizing - each restored tile will take as much space as it needs.
In order to set the width of the restored tiles, you need to set the RadTileView ColumnWidth property. The ColumnWidth property is of type GridLength and support the following values:
Absolute sizing - sets exact width to the restored tiles
Star sizing (*) - the available width will be distributed equally among the restored tiles
Auto sizing - each restored tile will take as much space as it needs.
The RadTileView exposes two properties that allow you to define the size of the minimized items:
MinimizedRowHeight - specifies the height of the minimized items. It is of type GridLength and therefore it allows defining absolute, start and auto sizing.
MinimizedColumnWidth - specifies the width of the minimized tiles. It is of type GridLength and therefore it allows defining absolute, start and auto sizing.
Please note that the RadTileViewItem also allows you to specify each item's size using the following properties:
- RestoredHeight/RestoredWidth - specifies the size of the tile in a Restored state
- MinimizedHeight/MinimizedWidth - specifies the size of the tile in a Minimized state