Get the Resource of the Clicked Slot/Appointment
In many scenarios you may need to implement a RadContextMenu within the RadScheduleView and depending on the clicked item to execute custom logic. This article will demonstrate an approach how to get the Resource of the clicked Appointment or Slot in RadScheduleView and use it as Header of a RadMenuItem.
Let’s start with the following RadScheduleView definition which includes Resources and a RadContextMenu attached:
Example 1: Defining RadScheduleView
<telerik:RadScheduleView AppointmentsSource="{Binding Appointments}">
    <telerik:RadScheduleView.ViewDefinitions>
        <telerik:DayViewDefinition />
        <telerik:WeekViewDefinition />
        <telerik:MonthViewDefinition />
    </telerik:RadScheduleView.ViewDefinitions>
    <telerik:RadScheduleView.ResourceTypesSource>
        <telerik:ResourceTypeCollection>
            <telerik:ResourceType Name="Location">
                <telerik:Resource ResourceName="Room 1" />
                <telerik:Resource ResourceName="Room 2" />
            </telerik:ResourceType>
        </telerik:ResourceTypeCollection>
    </telerik:RadScheduleView.ResourceTypesSource>
    <telerik:RadScheduleView.GroupDescriptionsSource>
        <telerik:GroupDescriptionCollection>
            <telerik:DateGroupDescription />
            <telerik:ResourceGroupDescription ResourceType="Location" />
        </telerik:GroupDescriptionCollection>
    </telerik:RadScheduleView.GroupDescriptionsSource>
    <telerik:RadContextMenu.ContextMenu>
        <telerik:RadContextMenu>
            <telerik:RadMenuItem Header="New Appointment" />
            <telerik:RadMenuItem Header="Edit Appointment" />
            <telerik:RadMenuItem Header="Delete Appointment" />
        </telerik:RadContextMenu>
    </telerik:RadContextMenu.ContextMenu>
</telerik:RadScheduleView>
Determine Whether an Appointment or a Slot is Clicked
When an Appointment is selected, the SelectedSlot property of RadScheduleView will be set to null. Respectively, when a Slot is clicked, the SelectedAppointment property will have a null value.
The process of determining whether an Appointment or a Slot is clicked will be demonstrated through the following steps.
1. Define the needed IValueConverters.
The built-in NullToVisibilityConverer will set the Visibility of the MenuItems according the value of the SelectedAppointment and the SelectedSlot. When the value is null the converter will return Visibility.Collapsed.
Example 2: Defined the needed IValueConverters
<Grid.Resources>
    <telerik:NullToVisibilityConverter x:Key="NullToVisibilityConverter"/>
    <local:ClickedElementToResourceNameConverter x:Key="ClickedElementToResourceNameConverter" />
</Grid.Resources>
2. Implement the ClickedElementToResourceNameConverter.
As its name hints, it will get the clicked item and return a simple string with Resource name.
Example 3: Implement the ClickedElementToResourceNameConverter
public class ClickedElementToResourceNameConverter : IValueConverter
{
    public object Convert(object value, Type targetType, object parameter, System.Globalization.CultureInfo culture)
    {
        if (value is Appointment)
        {
            var appointment = value as Appointment;

            return "The Resource for this Appointment is: " + appointment.Resources.First();

        }
        else if (value is Slot)
        {
            var slot = value as Slot;

            return "The Resource for this Slot is: " + slot.Resources.First();
        }

        return null;
    }

    public object ConvertBack(object value, Type targetType, object parameter, System.Globalization.CultureInfo culture)
    {
        return value;
    }
}
3. Add two additional RadMenuItems. The first one will be shown when an Appointment is clicked and the second one when a Slot is clicked.
In order to get the SelectedAppointment and the SelectedSlot, the Menu property of RadMenuItem can be used. It holds a reference to the UIElement on which the RadContextMenu is attached. This way, the values of the SelectedAppointment and SelectedSlot properties will be easily fetched through binding and used in the Header of the RadMenuItem.
Define the two RadMenuItems
<telerik:RadMenuItem
        Header="{Binding Path=Menu.UIElement.SelectedAppointment, RelativeSource={RelativeSource Self}, Converter={StaticResource ClickedElementToResourceNameConverter}}"
        Visibility="{Binding Header, RelativeSource={RelativeSource Self}, Converter={StaticResource NullToVisibilityConverter}}" />
<telerik:RadMenuItem
        Header="{Binding Path=Menu.UIElement.SelectedSlot, RelativeSource={RelativeSource Self}, Converter={StaticResource ClickedElementToResourceNameConverter}}"
        Visibility="{Binding Header, RelativeSource={RelativeSource Self}, Converter={StaticResource NullToVisibilityConverter}}" />
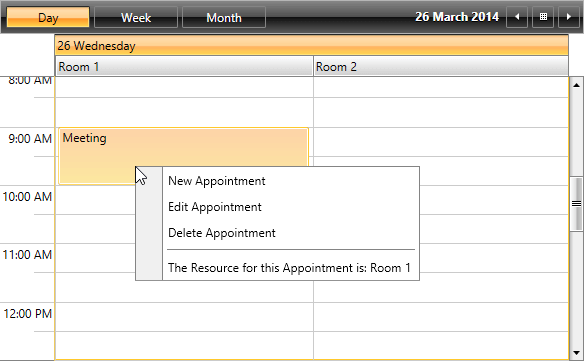
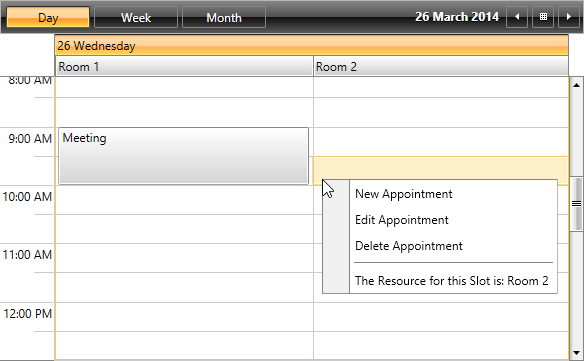
Figure 1 and Figure 2 demonstrate the final result.
Figure 1: When an Appointment is clicked the RadContextMenu will have information about its Resource

Figure 2: When an empty Slot is clicked the RadContextMenu will have information about its Resource
