Getting Started with the PivotGridV2
This tutorial explains how to set up a basic Telerik UI for ASP.NET MVC PivotGridV2 and highlights the major steps in the configuration of the component.
You will create a PivotContainer that will hold the PivotConfiguratorV2, the PivotGridV2 component, and the PivotConfiguratorButton. Next, you will define the PivotConfiguratorV2 and initialize the PivotGridV2 component configured for Ajax data binding to an Online Analytical Processing (OLAP) cube. After that, you will handle the PivotGridV2 events and call the saveAsExcel() method to export the data to Excel.
Prerequisites
To successfully complete the tutorial, you need a project that is already configured to use the Telerik UI for ASP.NET MVC components:
To create a new pre-configured project for the Telerik UI for ASP.NET MVC components, you can use a project template.
To manually configure an existing project by using NuGet, see the Adding Telerik UI through NuGet.
1. Prepare the CSHTML File
The first step is to add the required directives at the top of the .cshtml document:
-
To use the Telerik UI for ASP.NET MVC HtmlHelpers:
@using Kendo.Mvc.UI
Optionally, you can structure the View content by adding the desired HTML elements like headings, divs, paragraphs, and others.
@using Kendo.Mvc.UI
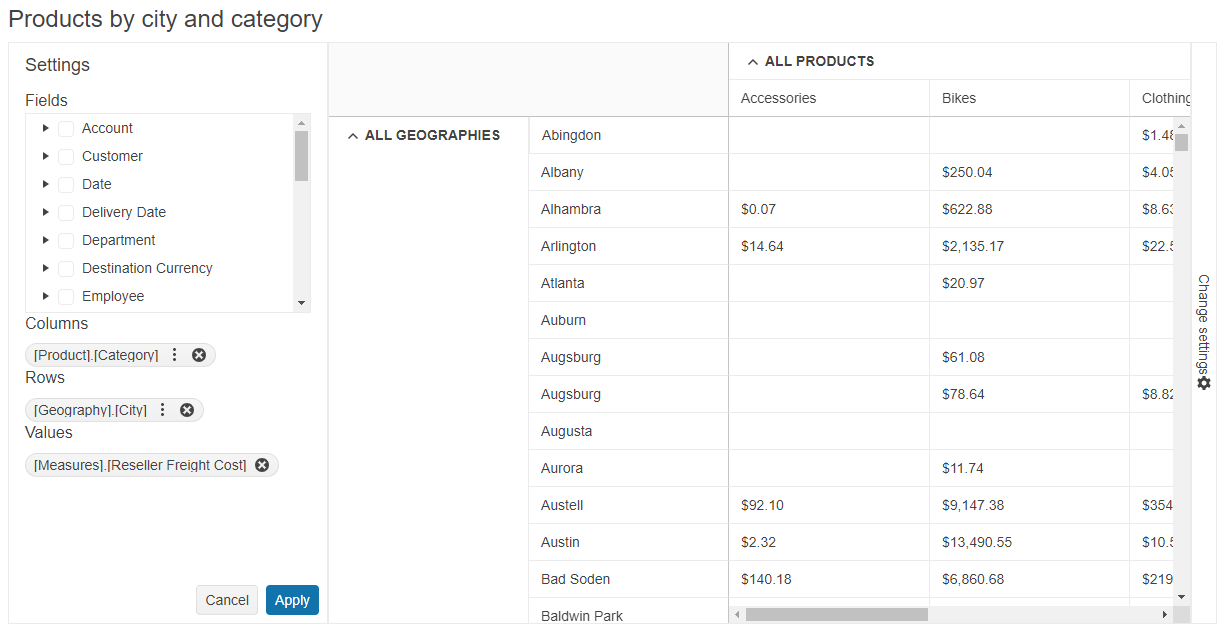
<h4>Products by city and category</h4>
<div>
</div>
2. Declare the PivotContainer and PivotConfiguratorButton
Declare the PivotContainer that will hold the pivot configurator component and the PivotConfiguratorButton that toggles the visibility of the related PivotConfiguratorV2.
    @(Html.Kendo().PivotContainer()
        .Name("container")
        .ConfiguratorPosition("right")
        .Content(@<text>
            @(Html.Kendo().PivotConfiguratorButton()
                .Name("toggleConfiguratorBtn")
                .Text("Toggle Configurator")
                .Configurator("configurator")
            )
        </text>)
    )
3. Initialize the PivotConfiguratorV2
Define the PivotConfiguratorV2 supplementary component into the PivotContainer declaration. The configurator allows you to control the column and row dimensions and the measure fields of the PivotGridV2. Also, enable its Filterable and Sortable options to filter and sort the rows and columns.
    @(Html.Kendo().PivotContainer()
        .Name("container")
        .ConfiguratorPosition("right")
        .Content(@<text>
            @(Html.Kendo().PivotConfiguratorV2()
                .Name("configurator")
                .Sortable()
                .Filterable()
            )

            @(Html.Kendo().PivotConfiguratorButton()
                .Name("toggleConfiguratorBtn")
                .Text("Toggle Configurator")
                .Configurator("configurator")
            )
        </text>)
    )
4. Initialize the PivotGridV2
Use the PivotGridV2 HtmlHelper to add the component to a page:
- The
Name()configuration method is mandatory as its value is used for theidand thenameattributes of the PivotGridV2 element. - The
Configurator()option sets theName()of the defined PivotConfiguratorV2 that is connected to the component. - Add the
DataSource()configuration option and set its type toXmla. Configure the OLAP service dll (https://demos.telerik.com/olap/msmdpump.dll) in theReadaction to bind the PivotGridV2 to data over an OLAP cube. Also, define the desired initial rows, columns and measures.
Define the component into the PivotContainer declaration:
    @(Html.Kendo().PivotContainer()
        .Name("container")
        .ConfiguratorPosition("right")
        .Content(@<text>
            ... // PivotConfiguratorV2 declaration.

            @(Html.Kendo().PivotGridV2()
                .Name("pivotgrid")
                .ColumnWidth(200)
                .Height(580)
                .Configurator("#configurator")
                .DataSource(dataSource => dataSource.
                    Xmla()
                    .Columns(columns => {
                        columns.Add("[Product].[Category]").Expand(true);
                    })
                    .Rows(rows => rows.Add("[Geography].[City]").Expand(true))
                    .Measures(measures => measures.Values(new string[]{"[Measures].[Reseller Freight Cost]"}))
                    .Transport(transport => transport
                        .Connection(connection => connection
                            .Catalog("Adventure Works DW 2008R2")
                            .Cube("Adventure Works"))
                        .Read("https://demos.telerik.com/olap/msmdpump.dll")
                    )
                )
            )

            ... // PivotConfiguratorButton declaration.
        </text>)
    )
5. Handle the PivotGridV2 Events
The PivotGrid exposes events that you can handle and further customize the functionality of the component. In this tutorial, you will use the DataBound event to access the OLAP cube data.
     @(Html.Kendo().PivotGridV2()
        .Name("pivotgrid")
        .Events(ev => ev.DataBound("onDataBound"))
        ... // Other configuration.
    )

    <script>
        function onDataBound(e) {
            let receivedData = e.sender.dataSource.data();
            console.log(receivedData); // Log the received data in the browser console.
        }
    </script>
6. (Optional) Reference Existing PivotGridV2 Instances
You can reference the PivotGridV2 instances that you have created and build on top of their existing configuration:
-
Use the
idattribute of the component instance to get its reference.<script> $(document).ready(function() { var pivotGridV2Reference = $("#pivotgrid").data("kendoPivotGridV2"); // pivotGridV2Reference is a reference to the existing PivotGridV2 instance of the helper. }); </script> -
Use the PivotGridV2 client-side API to control the behavior of the component. In this example, you will use the
saveAsPDF()method to export the PivotGridV2 data to PDF (for example, when a button is clicked).@(Html.Kendo().Button() .Name("exportBtn") .Content("Export to PDF") .Events(ev => ev.Click("onBtnClick")) )<script> function onBtnClick() { var pivotGridV2Reference = $("#pivotgrid").data("kendoPivotGridV2"); pivotGridV2Reference.saveAsPDF(); } </script>
For more information on referencing specific helper instances, see the Methods and Events article.