Using External Providers (Google, Facebook, Yahoo, LiveID) in TeamPulse Feedback Portal
This KB explains how the authentication works and how you can configure it with external identity providers as Google, Facebook, Yahoo and LiveID.
How authentication works
TeamPulse authentication is based on claims. TeamPulse is coming with built in Security Token Service (STS) that issue security tokens
TeamPulse STS is built on the principals of claims-based identity. Claims-based identity provides a common way for applications and services to acquire the identity information they need about users inside their organization, in other organizations, and on the Internet.
You should understand the following concepts:
Security Token Service (STS) – This is the service that provide Tokens to the client and ensure trust between the Identity Providers (IP) and the user application (RP).
Client - In the context of this how-to guide, this is a browser that is attempting to gain access to your web application.
Relying party (RP) application - An RP application is a web site or service that outsources authentication to one external authority. In identity jargon, we say that the RP trusts that authority. (In our case TeamPulse and the Feedback Portal are at the same time RP and the STS).
Token - A token is a collection of security data that is usually issued upon successful authentication of a user. It contains a set of claims, attributes of the authenticated user.
Identity Provider (IP) - An IP is an authority that authenticates user identities and issues security tokens. The actual work of issuing tokens is implemented though a special service called Security Token Service (STS). Typical examples of IPs include Windows Live ID, Facebook, business user repositories (like Active Directory), and so on. When STS is configured to trust an IP, the system will accept and validate tokens issued by that IP. STS can trust multiple IPs at once, which means that when your application trusts STS, you can instantly offer your application to all the authenticated users from all the IPs that STS trusts on your behalf.
The following figure shows how STS authentication works with a web application:
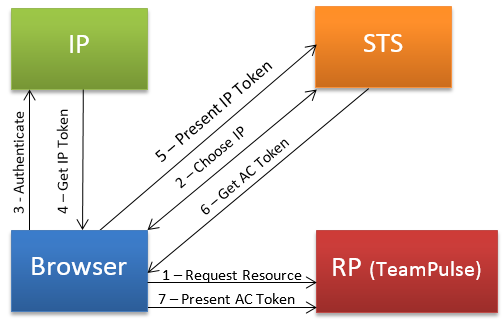
- The client (in this case a browser) requests a page from the TeamPulse.
- Since the request is not yet authenticated, the TeamPulse redirects the user to the authority that it trusts, which is Local STS. The STS presents the user with the choice of IPs that was specified for TeamPulse. The user selects the appropriate IP.
- The client browses to the IP's authentication page, and prompts the user to log on.
- After the client is authenticated (for example, the identity credentials are entered), the IP issues a security token.
- After issuing a security token, the IP redirects the client to STS and the client sends the security token issued by the IP to STS.
- STS validates the security token issued by the IP, inputs the identity claims in this token into the STS rules engine, calculates the output identity claims, and issues a new security token that contains these output claims.
- STS redirects the client to TeamPulse. The client sends the new security token issued by STS to the TeamPulse. TeamPulse validates the signature on the security token issued by STS, validates the claims in this token, and returns the page that was originally requested.
Authentication configuration of the Feedback Portal
The STS that comes with the Feedback portal is built in the application. For that reason the same configuration file is used for the RP and for the STS. First we’ll describe the relying party configuration and then will talk about the STS configuration that is required to add additional IP.
Note: The same thing is applied for the TeamPulse and its configuration files.
Relaying Party Configuration
RP configuration is on two places. The sample files shown below are the files on clean install.
First is in the \FeedbackPortal\web.config file.
<microsoft.identityModel>
<service>
<securityTokenHandlers>
<add type="Telerik.Security.Authentication.SimpleWebTokens.SimpleWebTokenHandler, Telerik.Security"/>
</securityTokenHandlers>
<federatedAuthentication>
<wsFederation authenticationType="WRAP" issuer="http://YDIMITROV:9896/Authenticate/WRAPv0.9" realm="." requireHttps="false"/>
<cookieHandler requireSsl="false"/>
</federatedAuthentication>
<audienceUris mode="Never"/>
<issuerTokenResolver type="Telerik.Security.Authentication.WrapIssuerTokenResolver, Telerik.Security"/>
<issuerNameRegistry type="Telerik.Security.Authentication.WrapIssuerNameRegistry, Telerik.Security">
<trustedIssuers>
</trustedIssuers>
</issuerNameRegistry>
</service>
</microsoft.identityModel>
The important part here is the issuer. This is the address of the STS.
The second place is the \FeedbackPortal\App_Data\Telerik\Configuration\SecurityConfig.config.
<?xml version="1.0" encoding="utf-8"?>
<securityConfig validationKey="CBF44B2690F1CB7C62EACD06B6289FF0F956D53B32925CF4532BB7860E71177F883F356A2BA2AFF6DFD2979167AA8F94223D9F280E43432D72E17FB6AB2A766D" decryptionKey="E4D57AFBAEB0FAEB71E8F0ED9A5BE082FF088B368C8DD9183447C34508936C98">
<identityProviders>
<add name="TeamPulse" clientId="" clientSecret="" scope="" identityProviderHandler="Telerik.Security.Authentication.IdentityProviders.LocalIdentityProviderHandler, Telerik.Security" loginUrl="" imageUrl="http://www.telerik.com/assets/img/sitenav/telerik-logo.gif"/>
<add name="Windows" clientId="" clientSecret="" scope="" identityProviderHandler="Telerik.Security.Authentication.IdentityProviders.LocalIdentityProviderHandler, Telerik.Security" loginUrl="" imageUrl="http://www.telerik.com/assets/img/sitenav/telerik-logo2.gif" signInFormUrl="../WinLogin/Login.aspx"/>
</identityProviders>
<securityTokenIssuers>
<add issuerUri="http://YDIMITROV:9896/Authenticate/WRAPv0.9" scheme="WRAPv0.9" clientId="uri:FeedbackPortal" clientSecret="C45D76DF431DE3D19FEE580EA" symmetricKey="80D93D5C800FFFBB4A286E21DDA85B62D6718F9A5890B1210AEBA4489690FCD5"/>
</securityTokenIssuers>
<relyingParties>
<add clientId="uri:FeedbackPortal" signInFormUrl="../Authentication" clientSecret="C45D76DF431DE3D19FEE580EA" symmetricKey="80D93D5C800FFFBB4A286E21DDA85B62D6718F9A5890B1210AEBA4489690FCD5">
<replyUris>
<add uri="http://YDIMITROV:9896"/>
<add uri="http://localhost:9896"/>
</replyUris>
<identityProviders>
<add name="TeamPulse"/>
<add name="Windows"/>
</identityProviders>
</add>
</relyingParties>
<serviceNames/>
</securityConfig>
Part of the configuration related to the RP is highlighted with yellow. This is the securityTokenIssuers element.
- “issuerUri” is the url to the STS.
- “scheme” is the authentication schema. At the moment the STS support only WRAPv0.9.
- “clientId” is the unique identifier of the relaying party on the STS.
- “clientSecret” is the secret that is shared between the RP and STS.
- “symetricKey” is used to encrypt the communication between the RP and STS. It should be same on the client and on the server.
STS configuration
STS configuration is located in \FeedbackPortal\App_Data\Telerik\Configuration\SecurityConfig.config. The following file is used from the STS and from the RP. The highlighted part in yellow is related only to the STS.
<?xml version="1.0" encoding="utf-8"?>
<securityConfig validationKey="CBF44B2690F1CB7C62EACD06B6289FF0F956D53B32925CF4532BB7860E71177F883F356A2BA2AFF6DFD2979167AA8F94223D9F280E43432D72E17FB6AB2A766D" decryptionKey="E4D57AFBAEB0FAEB71E8F0ED9A5BE082FF088B368C8DD9183447C34508936C98">
<identityProviders>
<add name="TeamPulse" clientId="" clientSecret="" scope="" identityProviderHandler="Telerik.Security.Authentication.IdentityProviders.LocalIdentityProviderHandler, Telerik.Security" loginUrl="" imageUrl="http://www.telerik.com/assets/img/sitenav/telerik-logo.gif"/>
<add name="Windows" clientId="" clientSecret="" scope="" identityProviderHandler="Telerik.Security.Authentication.IdentityProviders.LocalIdentityProviderHandler, Telerik.Security" loginUrl="" imageUrl="http://www.telerik.com/assets/img/sitenav/telerik-logo2.gif" signInFormUrl="../WinLogin/Login.aspx"/>
</identityProviders>
<securityTokenIssuers>
<add issuerUri="http://YDIMITROV:9896/Authenticate/WRAPv0.9" scheme="WRAPv0.9" clientId="uri:FeedbackPortal" clientSecret="C45D76DF431DE3D19FEE580EA" symmetricKey="80D93D5C800FFFBB4A286E21DDA85B62D6718F9A5890B1210AEBA4489690FCD5"/>
</securityTokenIssuers>
<relyingParties>
<add clientId="uri:FeedbackPortal" signInFormUrl="../Authentication" clientSecret="C45D76DF431DE3D19FEE580EA" symmetricKey="80D93D5C800FFFBB4A286E21DDA85B62D6718F9A5890B1210AEBA4489690FCD5">
<replyUris>
<add uri="http://YDIMITROV:9896"/>
<add uri="http://localhost:9896"/>
</replyUris>
<identityProviders>
<add name="TeamPulse"/>
<add name="Windows"/>
</identityProviders>
</add>
</relyingParties>
<serviceNames/>
</securityConfig>
There are two important sections “identityProviders” and “relyingParties”.
IdentityProviders section
In the indentityProviders section you add the list of the available providers. TeamPulse is coming with two providers TeamPulse and Windows. Additional providers are added here for example if you add the Google provider your idenityProviders should look like
<identityProviders>
<add name="TeamPulse" clientId="" clientSecret="" scope="" identityProviderHandler="Telerik.Security.Authentication.IdentityProviders.LocalIdentityProviderHandler, Telerik.Security" loginUrl="" imageUrl="http://www.telerik.com/assets/img/sitenav/telerik-logo.gif"/>
<add name="Windows" clientId="" clientSecret="" scope="" identityProviderHandler="Telerik.Security.Authentication.IdentityProviders.LocalIdentityProviderHandler, Telerik.Security" loginUrl="" imageUrl="http://www.telerik.com/assets/img/sitenav/telerik-logo2.gif" signInFormUrl="../WinLogin/Login.aspx"/>
<add name="Google"
clientId="976064887879.apps.googleusercontent.com"
clientSecret="7XwdWtCVPFNb9_jOpnv6yk5Q"
scope="https://www.googleapis.com/auth/userinfo.email https://www.googleapis.com/auth/userinfo.profile"
identityProviderHandler="Telerik.Security.Authentication.IdentityProviders.GoogleHandler, Telerik.Security"
oAuthDialogUrl="https://accounts.google.com/o/oauth2/auth"
accessTokenUrl="https://accounts.google.com/o/oauth2/token"
basicUserInfoUrl="https://www.googleapis.com/oauth2/v1/userinfo" />
</identityProviders>
At the moment the supported providers are following:
- Local (using standard asp.net membership provider);
- Google;
- Facebook;
- Yahoo;
- Microsoft LiveID.
Note: You can implement your own Identity Provider if you wish.
RelyingParties section
This section contains description of every RP that can authenticate with that STS.
- The “clientId”, “clientSecret” and “symetricKey” should be the same in the STS and RP configuration.
- “replyUris” - You can add multiple urls for one RP. If someone tries to connect from different url from listed for that client the STS will return error.
- “identityProviders” – This is a list of IPs that are listed in the IdentityProviders section. You can choose some or all of them to be available for that client.
Step by step guide to add Google, Facebook, Yahoo, Live ID authentication
- You have to have valid certificate for your site. This is required to be able to send and receive security information as user data between different pears (IP <-> STS and STS <-> RP)
- Your site should be visible for the IP as Google, Facebook, etc.
- Next step is to create applications in different identity providers. You have to set the url of the STS and then configure those providers in the STS configuration file. To be able to configure them you have to provide the Client ID and Client Secret that are provided from the IPs in the created applications. In that way the IP and STS can trust each other as only they should know those secrets.
In the next section you will understand how to create applications for popular identity providers that are supported by default: Google, Facebook, Yahoo, and LiveID. If you are interested how to create your own contact us.
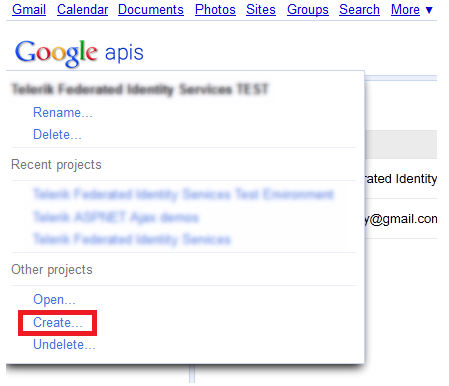
Create Google Application
Login to https://code.google.com/apis/console and from the dropdown on the left under Other projects select Create…:
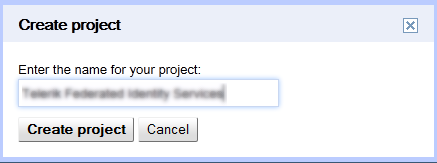
Enter a new name for your project and click Create project.
Under the Services and Team sections do not modify any of the default settings.
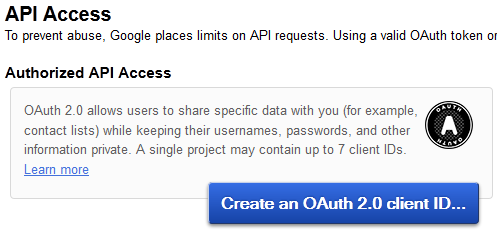
Navigate to the API Access tab and click the Create an OAuth 2.0 client ID… button:
In the new dialog window, enter the product name and the URL to the product logo (if any) and click Next.
In the Client ID Settings set the application type to Web application and enter the proper site hostname. Expand the more options hyperlink to get a chance to enter the Authorized Redirect URIs and Authorized JavaScript Origins. Please use the format [domain]/IdentityProviders/Google. Make sure you use the correct protocol (http or https) depending on your site.
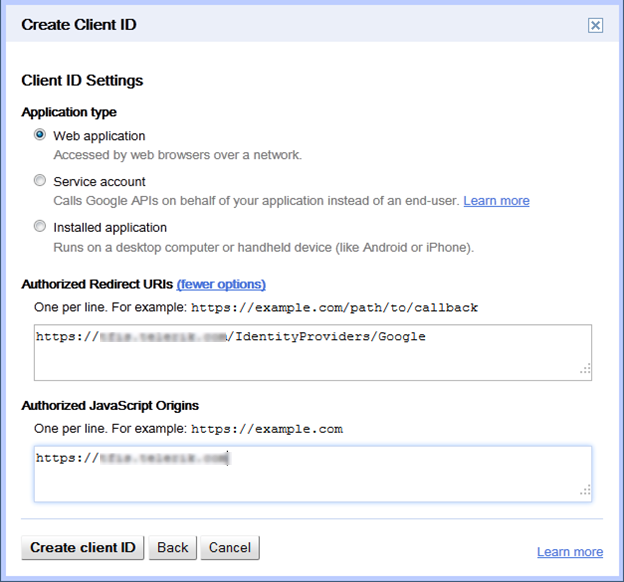
Finish the process by clicking Create client ID.
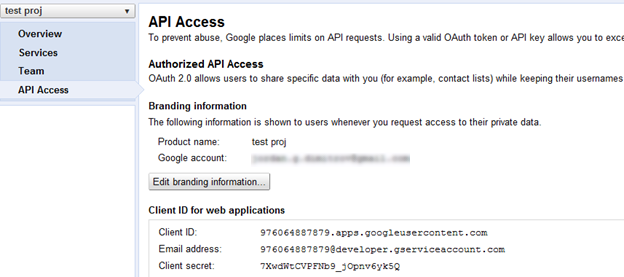
Configure STS
Under the API Access tab you should see your application Client ID and Client secret.
Add the provider in the file FeedbackPortal\App_Data\Telerik\Configuration\SecurityConfig.config.
Replace the highlighted text with the one applied to your account and leave the rest of the configurations as in this sample.
<identityProviders>
<add name="Google"
clientId="976064887879.apps.googleusercontent.com"
clientSecret="7XwdWtCVPFNb9_jOpnv6yk5Q"
scope="https://www.googleapis.com/auth/userinfo.email https://www.googleapis.com/auth/userinfo.profile"
identityProviderHandler="Telerik.Security.Authentication.IdentityProviders.GoogleHandler, Telerik.Security"
oAuthDialogUrl=https://accounts.google.com/o/oauth2/auth
accessTokenUrl="https://accounts.google.com/o/oauth2/token"
basicUserInfoUrl="https://www.googleapis.com/oauth2/v1/userinfo" />
</identityProviders>
Add that provider in the <relyingParties> for the clients that you want to be available.
Additional Links
https://developers.google.com/accounts/docs/OAuth2WebServer
https://developers.google.com/accounts/docs/OAuth2
https://developers.google.com/accounts/docs/OAuth2Login
https://code.google.com/oauthplayground/
Create Facebook Application
Login to https://developers.facebook.com/apps and create a new application named Telerik Federated Identity Services.

Enter the security check code and continue.
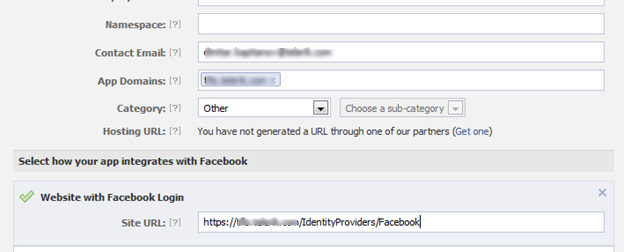
In the Basic info section fill in the App Domains and in the Website with Facebook Login enter the site URL:
Save the changes.
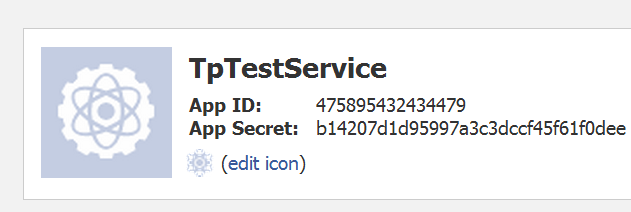
Configure STS
Under your app configuration you should see your application App ID and App secret.
Add the provider in the file FeedbackPortal\App_Data\Telerik\Configuration\SecurityConfig.config.
<identityProviders>
<add name="Facebook"
clientId="475895432434479"
clientSecret="b14207d1d95997a3c3dccf45f61f0dee"
scope="email"
identityProviderHandler="Telerik.Security.Authentication.IdentityProviders.FacebookHandler, Telerik.Security"
loginUrl="https://www.facebook.com/dialog/oauth"
imageUrl="http://aux.iconpedia.net/uploads/1751756290795472443.png"
oAuthDialogUrl="https://www.facebook.com/dialog/oauth"
accessTokenUrl="https://graph.facebook.com/oauth/access_token"
basicUserInfoUrl="https://graph.facebook.com/me" />
</identityProviders>
Add that provider in the <relyingParties> for the clients that you want to be available.
Additional Links
http://developers.facebook.com/docs/authentication/
http://developers.facebook.com/docs/authentication/server-side/
Live ID
Create Live ID Application
Login to http://msdn.microsoft.com/en-us/live/default.aspx and from the menu go to My Apps.
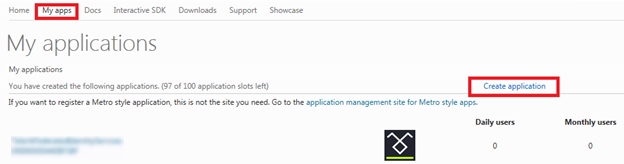
Enter the application name and accept the terms and conditions.
Navigate to the application settings page from the provided URL.
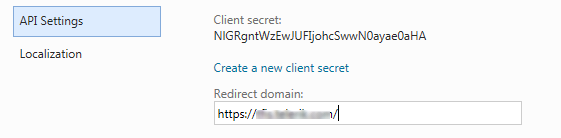
On the API Settings section set the Redirect Domain:
Configure STS
After you create you app you should see your application Client ID and Client secret.

Add the provider in the file FeedbackPortal\App_Data\Telerik\Configuration\SecurityConfig.config.
<identityProviders>
<add name="LiveId"
displayName="Live ID"
clientId="00000000440D1140"
clientSecret="97O49og2z18oVVkvdABVgDzpQxF92jm6"
scope="wl.basic wl.emails"
identityProviderHandler="Telerik.Security.Authentication.IdentityProviders.LiveIdHandler, Telerik.Security"
oAuthDialogUrl="https://login.live.com/oauth20_authorize.srf"
accessTokenUrl="https://login.live.com/oauth20_token.srf"
basicUserInfoUrl="https://apis.live.net/v5.0/me" />
</identityProviders>
Add that provider in the <relyingParties> for the clients that you want to be available.
Yahoo
Create Yahoo Application
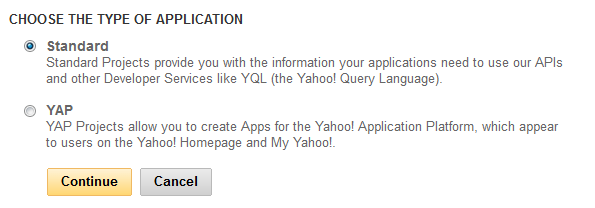
Login to https://developer.apps.yahoo.com/projects and create a new project:

- Type: Standard
- Application name: {Your name}
- Kind of Application: Web-based
- Description: Optional
- Application URL: https://{TeamPulseUrl}/IdentityProviders/Yahoo
- Favicon URL
- Application Domain: https://{TeamPulseUrl}/
- Accept terms of use and click Get API Key button

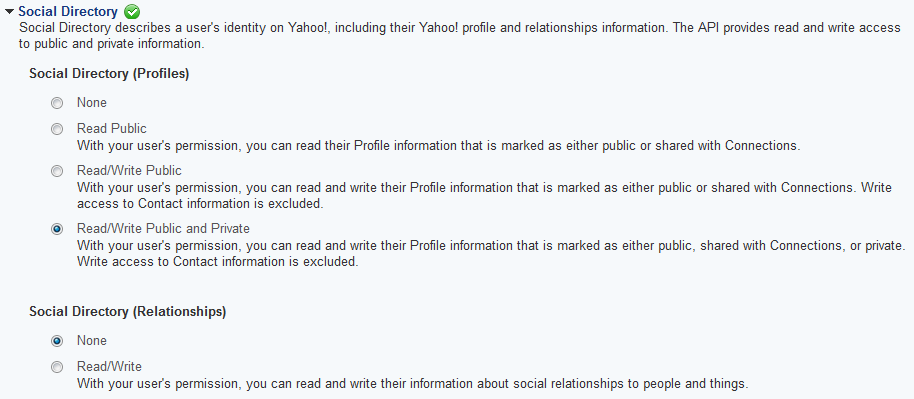
On the next page scroll down to Social Directory and set the Social Directory (Profiles) radio button to Read/Write Public and Private.
Scroll down and save changes to change the consumer key.
The details are provided in the upper panel – copy them for reference and to set them in the application security configuration file.
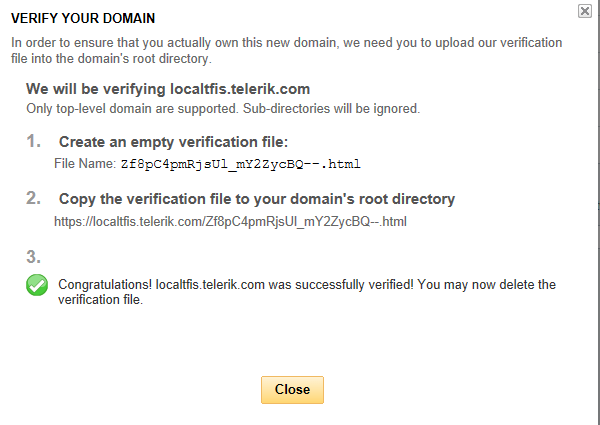
Return to the main projects page and locate the Manage domains link in the right-hand panel. If the application domain has already been verified, there will be listed only the number of verified domains. If not, follow the link and for the non-verified domain click the verify button.
-png.png)
You will get an instruction list to follow on how to complete the verification process. You will need to create a blank html page with a specific name in the application root directory so that it returns a 200 OK code upon check from Yahoo.
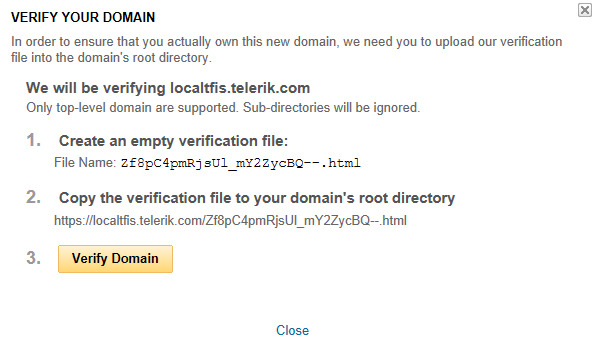
Create this page and verify the URL from step 2 is accessible to Internet users. Once done, click the Verify Domain button and after a short wait, you should receive a success message. If not, check if all the website and network settings are configured correctly and try again.
Configure STS
At the end you should be able to open your app and get the Consumer Key and Consumer Secret from it to configure your STS.

Add the yahoo provider in the file FeedbackPortal\App_Data\Telerik\Configuration\SecurityConfig.config.
<identityProviders>
<add name="Yahoo"
clientId="dj0yJmk9TmVSdUlZVWEzbHR3JmQ9WVdrOVIybFFXR0ZqTnpRbWNHbzlOams1TkRBNU56WXkmcz1jb25zdW1lcnNlY3JldCZ4PTdm"
clientSecret="396ef40923748adf4b6851aaa5d0508e8f404d12"
scope=""
identityProviderHandler="Telerik.Security.Authentication.IdentityProviders.YahooHandler, Telerik.Security"
loginUrl=""
imageUrl="" />
</identityProviders>
Add that provider in the <relyingParties> for the clients that you want to be available.
Additional Links
http://developer.yahoo.com/oauth/guide/oauth-auth-flow.html
https://developer.apps.yahoo.com/projects
Sample configuration file
<?xml version="1.0" encoding="utf-8"?>
<securityConfig validationKey="CBF44B2690F1CB7C62EACD06B6289FF0F956D53B32925CF4532BB7860E71177F883F356A2BA2AFF6DFD2979167AA8F94223D9F280E43432D72E17FB6AB2A766D" decryptionKey="E4D57AFBAEB0FAEB71E8F0ED9A5BE082FF088B368C8DD9183447C34508936C98">
<identityProviders>
<add name="Facebook"
clientId="475895432434479"
clientSecret="b14207d1d95997a3c3dccf45f61f0dee"
scope="email"
identityProviderHandler="Telerik.Security.Authentication.IdentityProviders.FacebookHandler, Telerik.Security"
loginUrl="https://www.facebook.com/dialog/oauth"
imageUrl="http://aux.iconpedia.net/uploads/1751756290795472443.png"
oAuthDialogUrl="https://www.facebook.com/dialog/oauth"
accessTokenUrl="https://graph.facebook.com/oauth/access_token"
basicUserInfoUrl="https://graph.facebook.com/me" />
<add name="Google"
clientId="976064887879.apps.googleusercontent.com"
clientSecret="7XwdWtCVPFNb9_jOpnv6yk5Q"
scope="https://www.googleapis.com/auth/userinfo.email https://www.googleapis.com/auth/userinfo.profile"
identityProviderHandler="Telerik.Security.Authentication.IdentityProviders.GoogleHandler, Telerik.Security"
oAuthDialogUrl="https://accounts.google.com/o/oauth2/auth"
accessTokenUrl="https://accounts.google.com/o/oauth2/token"
basicUserInfoUrl="https://www.googleapis.com/oauth2/v1/userinfo" />
<add name="LiveId"
displayName="Live ID"
clientId="00000000440D1140"
clientSecret="97O49og2z18oVVkvdABVgDzpQxF92jm6"
scope="wl.basic wl.emails"
identityProviderHandler="Telerik.Security.Authentication.IdentityProviders.LiveIdHandler, Telerik.Security"
oAuthDialogUrl="https://login.live.com/oauth20_authorize.srf"
accessTokenUrl="https://login.live.com/oauth20_token.srf"
basicUserInfoUrl="https://apis.live.net/v5.0/me"
stsCallbackUrl="https://tfis.telerik.com/AuthenticateProviders/LiveId" />
<add name="Yahoo"
displayName="Yahoo!"
clientId="dj0yJmk9TmVSdUlZVWEzbHR3JmQ9WVdrOVIybFFXR0ZqTnpRbWNHbzlOams1TkRBNU56WXkmcz1jb25zdW1lcnNlY3JldCZ4PTdm"
clientSecret="396ef40923748adf4b6851aaa5d0508e8f404d12"
scope=""
identityProviderHandler="Telerik.Security.Authentication.IdentityProviders.YahooHandler, Telerik.Security"
loginUrl="" imageUrl="" />
</identityProviders>
<securityTokenIssuers>
<add issuerUri="http://YDIMITROV:9898/Authenticate/WRAPv0.9" scheme="WRAPv0.9" clientId="http://localhost/TeamPulse" clientSecret="C45D76DF431DE3D19FEE580EA" symmetricKey="80D93D5C800FFFBB4A286E21DDA85B62D6718F9A5890B1210AEBA4489690FCD5"/>
</securityTokenIssuers>
<relyingParties>
<add clientId="http://localhost/TeamPulse" signInFormUrl="../Authentication" clientSecret="C45D76DF431DE3D19FEE580EA" symmetricKey="80D93D5C800FFFBB4A286E21DDA85B62D6718F9A5890B1210AEBA4489690FCD5">
<replyUris>
<add uri="http://YDIMITROV:9898"/>
<add uri="http://localhost:9898"/>
</replyUris>
<identityProviders>
<add name="Facebook" />
<add name="Google" />
<add name="Yahoo" />
<add name="LiveID" />
</identityProviders>
</add>
</relyingParties>
<serviceNames/>
</securityConfig>