Integrating the WPF Report Viewer With REST Service
This topic explains how to setup the WPF Report Viewer to work with Telerik Reporting REST Service
Prerequisites
- Running Telerik Reporting REST Service instance.
- In case you are not using the Item Templates, add references to all the assemblies listed in the article Requirements For Desktop Viewers Using Remote Report Sources.
Configuring the WPF Report Viewer to work with REST Service
To create a form and host the report viewer in it, you can either use the item template, as explainedin the article How to Add report viewer to a Windows Forms' .NET Framework project, or place it yourself through drag-and-drop from the toolbox.
-
As soon as the report viewer is on your form, select it and locate the
ReportEngineConnectionproperty. Invoke the UI editor by pressing the ellipsis button. TheReport Engine Connectiondialog should appear: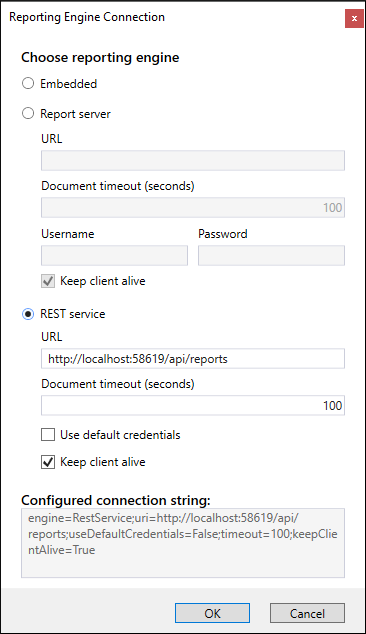
-
The Reporting engine combobox provides the following options:
- Embedded - the reports will be processed and rendered at the local machine that hosts the viewer. This is the default mode in order to preserve backwards compatibility.
- REST Service - the reports will be processed at the machine that hosts configured and running REST Service instance.
- Report Server - the reports will be processed and rendered at the machine that hosts configured and running Telerik Report Server instance.
Select
REST Service. In URL textbox enter the address and port (if needed) of the machine that hosts the REST Service instance.Note that the /api/reports part is already added so you need to prefix it with the service address.
- Check the Use default credentials checkbox if you need the default credentials to be sent with the requests by the HTTP client handler that is used internally to communicate with the REST service.
- In the Document timeout textbox you can change the timeout for rendering a document, the default is
100seconds. - Uncheck the Keep client alive checkbox if you want the client session to expire.
- Click OK when ready. The dialog will close and the resulting connection string will be populated as a value of the ReportEngineConnection property.
-
Locate the ReportSource property. Invoke the UI editor by pressing the ellipsis button. The
Report Source Editordialog should appear: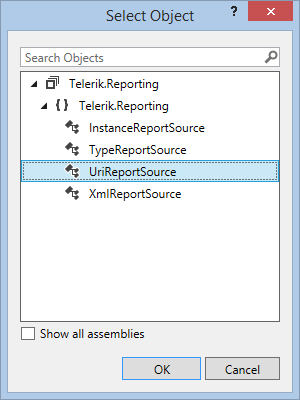
When the ReportEngineConnection property has
Engineset toRestService, the viewer will serialize the report source identifier property (URIfor UriReportSource,TypeNamefor TypeReportSource,ReportDocumentfor InstanceReportSource andXMLfor XmlReportSource) and send it to the service resolver. The REST service will use theReportSourceResolverinstances included in its ReportServiceConfiguration to resolve the report by the provided identifier. However, the REST service's default implementation includes only UriReportSourceResolver and TypeReportSourceResolver, so you need to provide a Custom Report Source Resolver if you use another type of ReportSource. In this scenario we will use a UriReportSource. Select the UriReportSource entry. Confirm by clicking OK.
-
Expand the ReportSource node in Properties window. In the provided Uri textbox enter the category and the name of the report you want to display using the following format:
{Category}/{ReportName}, as shown below: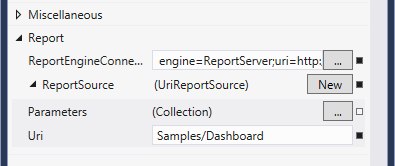
Click OK when ready. The dialog will close and the resulting report source will be populated as a value of the ReportSource property.
- Build and run your application. If your settings are configured correctly, you should see the report displayed in the report viewer of your WPF application. If not, check the Troubleshooting section below.
When setting ReportEngineConnection with code, make sure you call the RefreshReport() method or set the ReportSource property afterwards, so the connection's new value will be respected.
Troubleshooting
The following table shows the most common reasons for failure when using the Telerik Reporting REST Service. It is strongly recommended to use a tool like Fiddler or any other web debugger when investigating such a problem.
| Problem | Cause |
|---|---|
The viewer displays the message:A problem occurred while registering client.
|
Check if the REST service is active and running - the easiest way is to make a request for the available document formats, as explained in How to Add Telerik Reporting REST Web API to Web Application. |
The viewer displays the message:System.OperationCanceledException: *{ReportName}* report cannot be resolved.
|
Make sure the URL or type name specified in the report source property is valid and can be resolved by the REST service. |
The viewer displays the message:System.Net.WebException: The remote name could not be resolved: {name}
|
Make sure that the address specified in the connection string exists and represents a valid and running REST service instance. |