DataSource for Xamarin.iOS: Binding with UI Controls
TLKDataSource works well with data enabled controls and provides an easy way to shape and present your data. The currently supported UI controls are:
- UITableView
- UICollectionView
- TKListView
- TKChart
- TKCalendar
This article describes how to bind TLKDataSource and customize those controls.
UITableView

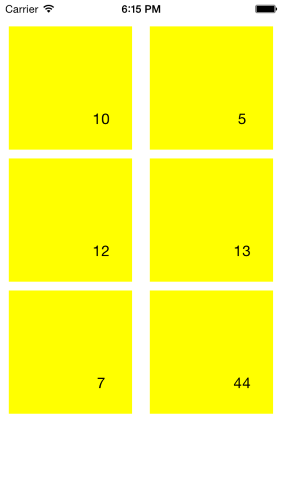
Setting the DataSource property is enough in order to present data in UITableView. TLKDataSource will take care of the implementation of all methods in UITableViewDataSource protocol:
NSObject[] array = new NSObject[] {
    NSObject.FromObject (10),
    NSObject.FromObject (5),
    NSObject.FromObject (12),
    NSObject.FromObject (13),
    NSObject.FromObject (7),
    NSObject.FromObject (44)
};

this.dataSource = new TLKDataSource (array);

CGRect rect = this.View.Bounds;
rect.Inflate (0, -30);
UITableView table = new UITableView (rect);
table.AutoresizingMask = UIViewAutoresizing.FlexibleWidth | UIViewAutoresizing.FlexibleHeight;
table.DataSource = this.dataSource;
this.View.AddSubview (table);
You can set DisplayKey and ValueKey properties to specify what to display in table view cells:
NSMutableArray items = new NSMutableArray();
items.Add (new DSItem () { Name = "John", Value = 50, Group = "A" });
items.Add (new DSItem () { Name = "Abby", Value = 33, Group = "A" });
items.Add (new DSItem () { Name = "Smith", Value = 42, Group = "B" });
items.Add (new DSItem () { Name = "Peter", Value = 28, Group = "B" });
items.Add (new DSItem () { Name = "Paula", Value = 25, Group = "B" });

this.dataSource = new TLKDataSource ();
this.dataSource.ItemSource = items;
this.dataSource.DisplayKey = "Name";
In the majority of the scenarios you will also need to customize the cells. In this case you can implement the InitCell block from TKDataSourceTableViewSettings class:
this.dataSource.Settings.TableView.InitCell ((UITableView tableView, NSIndexPath indexPath, UITableViewCell cell, NSObject item) => {
    cell.TextLabel.Text = "Item:";
    cell.DetailTextLabel.Text = this.dataSource.TextFromItem(item, null);
});
If this is not enough to achieve to look you want, you can create your custom cells by using the CreateCell block function:
this.dataSource.Settings.TableView.CreateCell ((UITableView tableView, NSIndexPath indexPath, NSObject item) => {
    UITableViewCell cell = tableView.DequeueReusableCell("cell");
    if (cell == null) {
        cell = new UITableViewCell(UITableViewCellStyle.Value1, "cell");
    }
    return cell;
});
TLKDataSource will take care of everything and no code is necessary even when your data is grouped:
this.dataSource.Group ((NSObject item) => {
    return NSObject.FromObject(((NSNumber)item).Int32Value % 2 == 0);
});
UICollectionView
TLKDataSource integrates well with UICollectionView. Just set the DataSource property and prepare the collection view:
var layout = new UICollectionViewFlowLayout();
layout.ItemSize = new CGSize (140, 140);

CGRect rect = this.View.Bounds;
rect.Inflate (0, -30);
var collectionView = new UICollectionView (rect, layout);
collectionView.AutoresizingMask = UIViewAutoresizing.FlexibleWidth | UIViewAutoresizing.FlexibleHeight;
collectionView.DataSource = this.dataSource;
collectionView.BackgroundColor = UIColor.White;
this.View.AddSubview(collectionView);
Use the collection view settings class and its InitCell in case you want to customize the cell appearance:
this.dataSource.Settings.CollectionView.InitCell ((UICollectionView collection, NSIndexPath indexPath, UICollectionViewCell cell, NSObject item) => {
    var tkCell = cell as TKCollectionViewCell;
    tkCell.Label.Text = this.dataSource.TextFromItem(item, null);
    tkCell.BackgroundColor = UIColor.Yellow;
});
TKListView

You can also easily use TKListView with TLKDataSource:
CGRect rect = this.View.Bounds;
rect.Inflate (0, -30);
var listView = new TKListView (rect);
listView.AutoresizingMask = UIViewAutoresizing.FlexibleWidth | UIViewAutoresizing.FlexibleHeight;
this.dataSource.SetDataSourceFor (listView);
this.View.AddSubview (listView);
The InitCell and CreateCell methods can be used to customize the cell appearance:
this.dataSource.Settings.ListView.CreateCell ((TKListView list1, NSIndexPath indexPath, NSObject item) => {
    return list1.DequeueReusableCell("myCustomCell", indexPath) as TKListViewCell;
});

this.dataSource.Settings.ListView.InitCell ((TKListView list2, NSIndexPath indexPath, TKListViewCell cell, NSObject item) => {
    cell.TextLabel.Text = this.dataSource.TextFromItem(item, null);
    (cell.BackgroundView as TKView).Fill = new TKSolidFill(new UIColor(0.1f, 0.1f, 0.1f, 0.1f));
});
TKChart
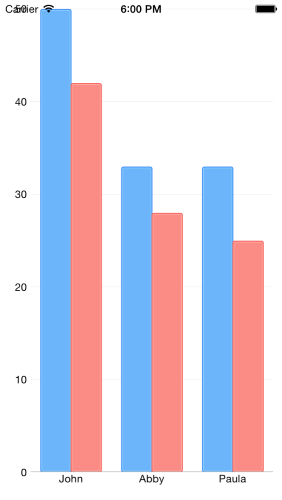
In order to present data in TKChart, you need to set the DisplayKey and ValueKey properties. The DisplayKey defines the x-axis values, and the ValueKey defines the y-axis values:
NSMutableArray items = new NSMutableArray ();
items.Add (new DSItem () { Name = "John", Value = 50, Group = "A" });
items.Add (new DSItem () { Name = "Abby", Value = 33, Group = "A" });
items.Add (new DSItem () { Name = "Paula", Value = 33, Group = "A" });

items.Add (new DSItem () { Name = "John", Value = 42, Group = "B" });
items.Add (new DSItem () { Name = "Abby", Value = 28, Group = "B" });
items.Add (new DSItem () { Name = "Paula", Value = 25, Group = "B" });

this.dataSource.DisplayKey = "Name";
this.dataSource.ValueKey = "Value";
this.dataSource.ItemSource = items;

var chart = new TKChart(this.View.Bounds);
chart.AutoresizingMask = UIViewAutoresizing.FlexibleWidth | UIViewAutoresizing.FlexibleHeight;
chart.DataSource = this.dataSource;
this.View.AddSubview(chart);
In order to present different series the data should be grouped. When this is done the CreateSeries method can be used to customize the series that should be created:
this.dataSource.GroupWithKey ("Group");

this.dataSource.Settings.Chart.CreateSeries ((TKDataSourceGroup group) => {
    var series = new TKChartColumnSeries();
    return series;
});
TKCalendar

TLKDataSource is able to represent your data as calendar events. In this scenario you should set the StartDateKey and EndDateKey properties:
this.dataSource.DisplayKey = "Name";
this.dataSource.Settings.Calendar.StartDateKey = "StartDate";
this.dataSource.Settings.Calendar.EndDateKey = "EndDate";
this.dataSource.Settings.Calendar.DefaultEventColor = UIColor.Red;
this.dataSource.ItemSource = items;

var calendar = new TKCalendar (this.View.Bounds);
calendar.AutoresizingMask = UIViewAutoresizing.FlexibleWidth | UIViewAutoresizing.FlexibleHeight;
this.dataSource.SetDataSourceFor (calendar);
this.View.AddSubview (calendar);