How to use complex types in DataForm editors
Environment
| Product Version | 2018.3.1122 |
| Product | DataForm for Xamarin |
Description
In general, RadDataForm works with simple property types (string, int, long) and when you are using a custom type - the native Data Form is not sure what native type corresponds to the one you are using so it disregards the property. With this in mind, we have introduced a mechanism that maps the property declared in Xamarin.Forms to a native one. Below are the needed steps to enable this on Android and iOS.
Solution
First, create the custom property you will use inside the DataForm PickerEditor:
public class City : NotifyPropertyChangedBase
{
    private string name;
    public string Name
    {
        get
        {
            return this.name;
        }
        set
        {
            UpdateValue(ref name, value);

        }
    }
    public override bool Equals(object obj)
    {
        return this.Name.Equals((obj as City)?.Name);
    }
}
Create a sample SourceItem class which will be the Source of RadDataForm, it has a property of type City:
public class SourceItem  : NotifyPropertyChangedBase
{
    private string name;

    private City city;

    [DisplayOptions(Header = "Name")]
    public string Name
    {
        get
        {
            return this.name;
        }
        set
        {
            UpdateValue(ref name, value);

        }
    }

    [DisplayOptions(Header = "City")]
    public City City
    {
        get
        {
            return this.city;
        }
        set
        {
            UpdateValue(ref city, value);
        }
    }
}
Here is the provider:
public class CityDataSourceProvider : PropertyDataSourceProvider
{
    public override IList GetSourceForKey(object key)
    {
        if (key.Equals(nameof(SourceItem.City)))
        {
            return new ObservableCollection<City>
            {
                new City("Tokyo"),
                new City("London"),
                new City("Paris"),
                new City("New York City"),
                new City("Brussels"),
                new City("Berlin"),
                new City("Sofia")
            };
        }
        return null;
    }
}
Setting DataForm Source directly
Add a simple RadDataForm definition to your page:
<telerikInput:RadDataForm x:Name="dataForm" />
Add some code for setting its Source and registering the PickerEditor in code-behind. In addition, you would need to supply a PropertyDataSourceProvider for the Picker ItemsSource:
this.dataForm.Source = new SourceItem();
this.dataForm.RegisterEditor(nameof(SourceItem.City), EditorType.PickerEditor);
this.dataForm.PropertyDataSourceProvider = new CityDataSourceProvider();
Setting Source using Mvvm approach
RadDataForm definition with Source property binded to the Item proeprty formt he ViewModel:
<telerikInput:RadDataForm x:Name="dataForm"
                                  Source="{Binding Item}"
                                  BackgroundColor="LightBlue">
And in page's code behind:
// set the binding context
this.vm = new ViewModel();
this.BindingContext = vm;
// set the source provided
this.dataForm.PropertyDataSourceProvider = new CitySourceProvider();
// register the editor
this.dataForm.RegisterEditor(nameof(SourceItem.City), EditorType.PickerEditor);
The ViewModel used:
public class ViewModel : NotifyPropertyChangedBase
{
    private SourceItem _item;

    public ViewModel()
    {
        // initialize the item, otherwize the dataform source returns null.
        _item = new SourceItem();
    }
    public SourceItem Item
    {
        get
        {
            return this._item;
        }
        set
        {
            if (this._item != value)
            {
                this._item = value;
                this.OnPropertyChanged();
            }
        }
    }
}
That's all on the shared project.
Native Implementation inside the Android project
Now, let's continue the implementation with the Android project. The City type should be converted to a Java type through a Telerik.XamarinForms.Common.Android.TypeRegister inside the MainActivity.cs file of the Android project (call it before LoadApplication):
public class MainActivity : global::Xamarin.Forms.Platform.Android.FormsAppCompatActivity
{
    protected override void OnCreate(Bundle savedInstanceState)
    {
        ...
        TypeRegister.Register(typeof(City), typeof(JavaCity), new MyTypeConverter());
        LoadApplication(new App());
    }
    ...
}
Add the needed MyTypeConverter and JavaCity classes:
public class JavaCity : ConvertibleObject<City>
{
    public JavaCity(City instance) : base(instance)
    {
    }
    // the display value in editor
    public override string ToString()
    {
        return Instance.Name;
    }
}

public class MyTypeConverter : ITypeConverter
{
    public Java.Lang.Object Convert(object sourceObject)
    {
        return new JavaCity((City)sourceObject);
    }
    public object ConvertBack(Java.Lang.Object nativeObject)
    {
        return (nativeObject as JavaCity).Instance;
    }
}
Lastly, let's go to the iOS project. Again, go to AppDelegate.cs and add the needed code to convert the City type through Telerik.XamarinForms.Common.iOS.TypeRegister method:
public override bool FinishedLaunching(UIApplication app, NSDictionary options)
{
    global::Xamarin.Forms.Forms.Init();
    LoadApplication(new App());

    TypeRegister.Register(typeof(City), typeof(NSCity), new MyTypeConverter());
    return base.FinishedLaunching(app, options);
}
And here are the final bits:
public class NSCity : ConvertibleObject<City>
{
    public NSCity(City instance) : base(instance)
    {
    }
    // the display value in editor
    public override string Description
    {
        get
        {
            return Instance.Name;
        }
    }
}
public class MyTypeConverter : ITypeConverter
{
    public NSObject Convert(object sourceObject)
    {
        return new NSCity((City)sourceObject);
    }

    public object ConvertBack(NSObject nativeObject)
    {
        return (nativeObject as NSCity).Instance;
    }
}
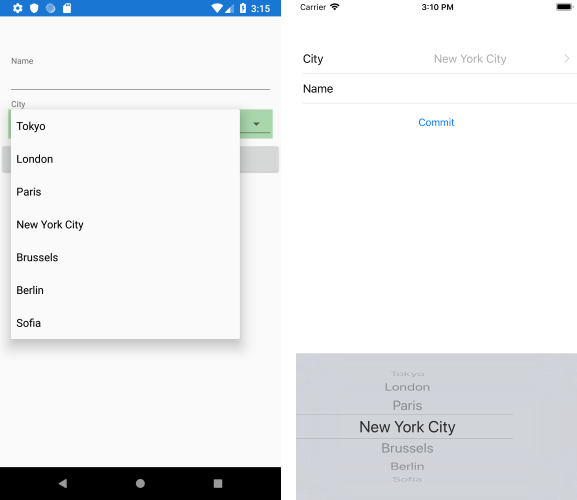
Here is the DataForm while setting City property: