ItemStyle Selector
The RadListView component exposes conditional styling feature. It allows users to apply a different Style to each item depending on a specific condition.
Example
The following example will demonstrate how to apply the Conditional Styling in the RadlistView control.
Lets add the RadlistView component and create a simple data.
Here is an example how to setup the ListView control:
<telerikDataControls:RadListView x:Name="listView" ItemsSource="{Binding Source}">
    <telerikDataControls:RadListView.BindingContext>
        <local:ViewModel />
    </telerikDataControls:RadListView.BindingContext>
    <telerikDataControls:RadListView.ItemTemplate>
        <DataTemplate>
            <telerikListView:ListViewTemplateCell>
                <telerikListView:ListViewTemplateCell.View>
                    <Grid>
                        <Label Margin="10" Text="{Binding Name}" />
                    </Grid>
                </telerikListView:ListViewTemplateCell.View>
            </telerikListView:ListViewTemplateCell>
        </DataTemplate>
    </telerikDataControls:RadListView.ItemTemplate>
</telerikDataControls:RadListView>
var listView = new RadListView
{
    ItemsSource = new ViewModel().Source,
    ItemTemplate = new DataTemplate(() =>
    {
        var label = new Label { Margin = new Thickness(10) };
        var content = new Grid();
        content.Children.Add(label);
        label.SetBinding(Label.TextProperty, new Binding(nameof(SourceItem.Name)));

        return new ListViewTemplateCell
        {
            View = content
        };
    })
};
and lets create a simple data for the ListView component:
public class SourceItem
{
    public SourceItem(string name, int age)
    {
        this.Name = name;
        this.Age = age;
    }

    public string Name { get; set; }

    public int Age { get; set; }
}

public class ViewModel
{
    public ViewModel()
    {
        this.Source = new List<SourceItem> {
            new SourceItem("Tom", 25),
            new SourceItem("Anna",18),
            new SourceItem("Peter",43),
            new SourceItem("Teodor",29),
            new SourceItem("Lorenzo",65),
            new SourceItem("Andrea",79),
            new SourceItem("Martin",5) };
    }

    public List<SourceItem> Source { get; set; }
}
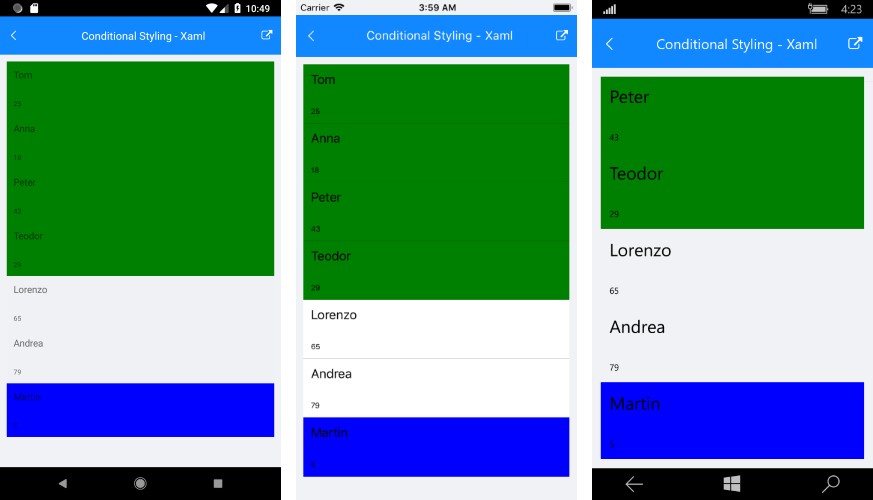
We can set a different style for a specific item using the ListViewStyleSelector class. We can use the OnSelectStyle method to change the styles of the items in the RadListView control. A sample implementation of a custom class that derives from ListViewStyleSelector and overrides its OnSelectStyle method is shown below:
public class ExampleListViewStyleSelector : ListViewStyleSelector
{
    protected override void OnSelectStyle(object item, ListViewStyleContext styleContext)
    {
        var style = new ListViewItemStyle();
        styleContext.ItemStyle = style;
        styleContext.SelectedItemStyle = new ListViewItemStyle
        {
            BackgroundColor = Color.Gray,
            BorderColor = Color.Red,
            BorderWidth = 2
        };

        var sourceItem = item as SourceItem;
        if (sourceItem.Age < 18)
        {
            styleContext.ItemStyle.BackgroundColor = Color.Blue;
        }
        else if (sourceItem.Age < 65)
        {
            styleContext.ItemStyle.BackgroundColor = Color.Green;
        }
    }
}
All that is left is to set this custom style selector to the ItemStyleSelector property of the RadListView control:
listView.ItemStyleSelector = new ExampleListViewStyleSelector();
Conditional Styling
This is how the RadListView control will look like when conditional styling is used.

SDK Browser application contains an example that shows StyleSelector feature in RadListView cotrol. You can find the application in the Examples folder of your local Telerik UI for Xamarin installation.