Resources
The RadScheduler allows you to define custom resources that can be assigned to the appointments. Custom resources let you associate additional information with your appointments, where the information for each field can be selected from a limited number of possibilities. For example, you can load the appointments of different users on a single scheduler by simply choosing the name of the user from a drop down. The same applies for various resources such as meeting rooms, team events, etc.
Because custom resources have a limited number of values, RadScheduler can group appointments based on the resources associated with them. For example, you can book different facilities for a variety of events. Also, the appointments can be grouped by multiple groups.
Creating ResourceTypesCollection and Populating it with ResourceType
First of all, let's set a ResourceTypesSource. Then we need to create a ResourceTypeCollection, where we can assign the ResourceType.
Example 1
<telerik:RadScheduler x:Name="scheduler">
    ...
    <telerik:RadScheduler.ResourceTypesSource>
        <telerik:ResourceTypeCollection>
          ...
        <telerik:ResourceTypeCollection>
    </telerik:RadScheduler.ResourceTypesSource>
</telerik:RadScheduler>
Example 2
<telerik:RadScheduler x:Name="scheduler">
    ...
    <telerik:RadScheduler.ResourceTypesSource>
        <telerik:ResourceTypeCollection>
            <telerik:ResourceType Name="Location">
             ...
            </telerik:ResourceType>
        </telerik:ResourceTypeCollection>
    </telerik:RadScheduler.ResourceTypesSource>
</telerik:RadScheduler>
Example 3
<telerik:RadScheduler x:Name="scheduler">
    ...
    <telerik:RadScheduler.ResourceTypesSource>
        <telerik:ResourceTypeCollection>
            <telerik:ResourceType Name="Room">
                <telerik:Resource ResourceName="Room 102" />
                <telerik:Resource ResourceName="Room 203" />
                <telerik:Resource ResourceName="Room 406" />
            </telerik:ResourceType>
        </telerik:ResourceTypeCollection>
    </telerik:RadScheduler.ResourceTypesSource>
</telerik:RadScheduler>
If you want to be able to set an appointment to multiple resources you need to set the AllowMultipleSelection property of the ResourceType to true.
The order in which the Resource objects are added to the ResourceType determines the order in which the groups will be generated in the view.
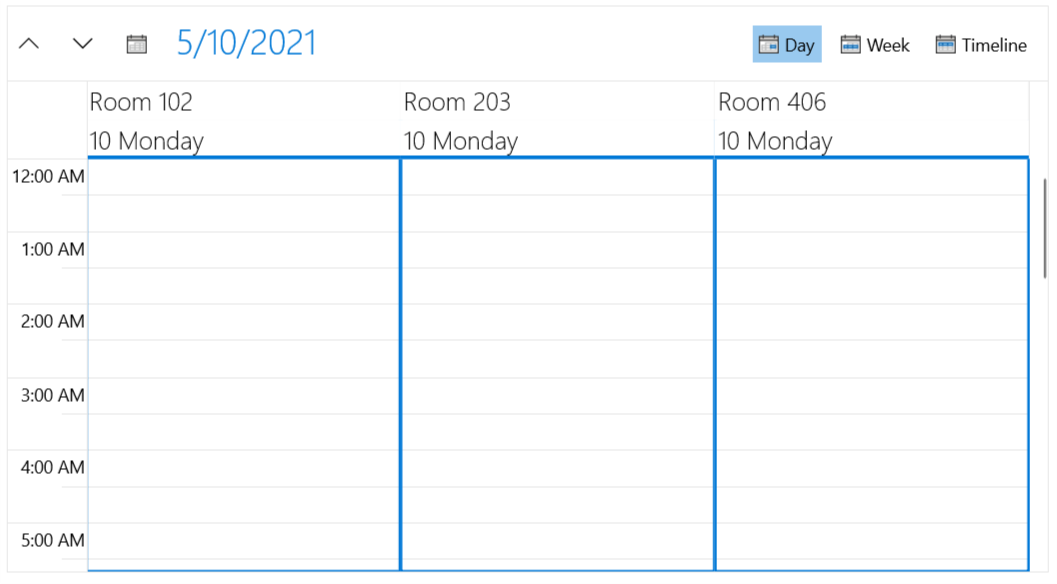
Grouping appointments by Resources
Now if you want to group the appointments by Room, you can use GroupDescriptionsSource property:
Example 4
<telerik:RadScheduler x:Name="scheduler">
    ...
    <telerik:RadScheduler.GroupDescriptionsSource>
        <telerik:GroupDescriptionCollection>
            <telerik:ResourceGroupDescription ResourceType="Room" />
        </telerik:GroupDescriptionCollection>
    </telerik:RadScheduler.GroupDescriptionsSource>
</telerik:RadScheduler>
If you want to change the group order you could use the following syntax:
Example 5
<telerik:RadScheduler x:Name="scheduler">
    ...
    <telerik:RadScheduler.GroupDescriptionsSource>
        <telerik:GroupDescriptionCollection>
            <telerik:DateGroupDescription />
            <telerik:ResourceGroupDescription ResourceType="Room" />
        </telerik:GroupDescriptionCollection>
    </telerik:RadScheduler.GroupDescriptionsSource>
</telerik:RadScheduler>

Adding Resources in code behind
The whole example above can be also set up in the code behind:
Example 6
ResourceType locationResource = new ResourceType("Room");
locationResource.Resources.Add(new Resource("Room 102"));
locationResource.Resources.Add(new Resource("Room 203"));
locationResource.Resources.Add(new Resource("Room 406"));

this.scheduler.ResourceTypesSource = new ResourceTypeCollection
{
    locationResource
};

GroupDescriptionCollection groupDescription = new GroupDescriptionCollection
{
    new DateGroupDescription(),
    new ResourceGroupDescription{ ResourceType = "Room" }
};

this.scheduler.GroupDescriptionsSource = groupDescription;