Cloud Storage
Google Cloud Storage allows world-wide storage and retrieval of any amount of data at any time. It can be used for a range of scenarios including serving website content, storing data for archival and disaster recovery, or distributing large data objects to users via direct download.
Enable APIs
For the purposes of this article, you will have to enable the Google Cloud Storage API and Google Cloud Storage JSON API. Please read the Getting Started for more information on how you can achieve that.
Step 1: Create the Universal Windows Platform Application
Create a standard Universal Windows Platform application and add 3 Buttons and a RadListView control to it. The first button will list all of the files uploaded in our storage. The second button will upload a file and the third one will delete the selected file in the RadListView.
[XAML] Example 1: Defining the view
<Grid>
    <Grid.ColumnDefinitions>
        <ColumnDefinition Width="*" />
        <ColumnDefinition Width="200"/>
    </Grid.ColumnDefinitions>

    <data:RadListView x:Name="radListView"
                      Grid.Column="0"
                      ItemsSource="{Binding FileNames}"
                      SelectedItem="{Binding SelectedItem, Mode=TwoWay}" />
    <Grid Grid.Column="1">
        <Grid.RowDefinitions>
            <RowDefinition Height="Auto" />
            <RowDefinition Height="Auto"/>
            <RowDefinition Height="Auto"/>
        </Grid.RowDefinitions>

        <Button HorizontalAlignment="Stretch"
                BorderBrush="Orange"
                Content="List Items"
                Command="{Binding ListItemsCommand}"/>

        <Button Content="Upload Item"
                BorderBrush="Orange"
                HorizontalAlignment="Stretch"
                Command="{Binding UploadItemCommand}"
                Grid.Row="1"/>

        <Button Content="Delete item"
                BorderBrush="Orange"
                HorizontalAlignment="Stretch"
                Command="{Binding DeleteItemCommand}"
                Grid.Row="2"/>
    </Grid>
</Grid>
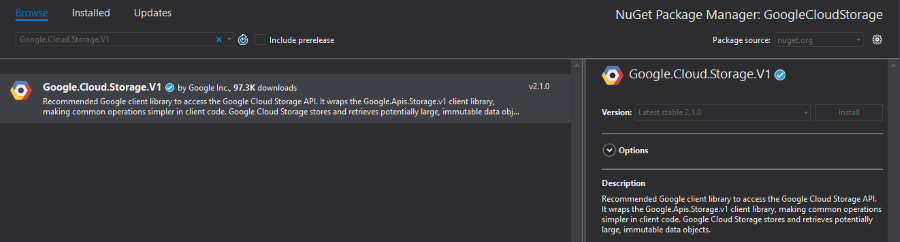
Step 2: Install the NuGet package
Open the NuGet Package Manager and install the Google.Cloud.Storage.V1 package.
Step 3: Define the ViewModel
The next step is to create the ViewModel. It will need a StorageClient object which will be used for uploading, deleting and listing files. We also need to implement all of the commands that the Buttons are bound to.
In order to locate your project id, please read the Locate the project ID help article.
[C#] Example 2: Defining the ViewModel
public class ViewModel
{
    public StorageClient StorageClient { get; set; }
    private string jsonPath = @"json used for validation";

    private const string ProjectId = "your-project-id";
    private const string BucketName = ProjectId + "_test_bucket";

    private object selectedItem;
    private ObservableCollection<string> fileNames;


    public object SelectedItem
    {
        get { return this.selectedItem; }
        set { this.selectedItem = value; }
    }

    public ObservableCollection<string> FileNames
    {
        get { return this.fileNames; }
        set { this.fileNames = value; }
    }

    public ViewModel()
    {
        this.ListItemsCommand = new Command(() => ListItems());
        this.DeleteItemCommand = new Command(() => DeleteItem());
        this.UploadItemCommand = new Command(() => UploadItem());

        GoogleCredential credentials = GoogleCredential.FromJson(jsonPath);
        this.StorageClient = StorageClient.Create(credentials);
        if (StorageClient.GetBucket(BucketName) == null)
        {
            StorageClient.CreateBucket(ProjectId, BucketName);
        }
        this.fileNames = new ObservableCollection<string>();
    }

    private void ListItems()
    {
        var items = StorageClient.ListObjects(BucketName);

        this.FileNames.Clear();

        foreach (Google.Apis.Storage.v1.Data.Object item in items)
        {
            this.FileNames.Add(item.Name);
        }
    }

    private async void UploadItem()
    {
        FileOpenPicker openPicker = new FileOpenPicker();
        openPicker.ViewMode = PickerViewMode.Thumbnail;
        openPicker.SuggestedStartLocation = PickerLocationId.PicturesLibrary;
        openPicker.FileTypeFilter.Add(".png");

        var inputFile = await openPicker.PickSingleFileAsync();
        if (inputFile == null)
        {
            return;
        }

        try
        {
            var streamToUpload = await inputFile.OpenStreamForReadAsync();

            await StorageClient.UploadObjectAsync(
                    BucketName,
                    inputFile.DisplayName,
                    null,
                    streamToUpload);
        }
        catch (Exception)
        {
            throw;
        }
    }

    private async void DeleteItem()
    {
        if (this.SelectedItem == null)
        {
            var dialog = new MessageDialog("Please select an Item");
            dialog.ShowAsync();
            return;
        }

        StorageClient.DeleteObject(BucketName, this.SelectedItem.ToString());
        this.FileNames.Remove(this.SelectedItem.ToString());
    }

    public Command ListItemsCommand { get; set; }
    public Command UploadItemCommand { get; set; }
    public Command DeleteItemCommand { get; set; }
}
The example uses verification through a JSON string, however, there are different options. Please read the Setting Up Authentication for Server to Server Production Applications article.
All that is left now is to set the DataContext of the MainPage and run the application.
[C#] Example 3: Set the DataContext
public MainPage()
    {
        this.InitializeComponent();
        this.DataContext = new ViewModel();
    }
Figure 1: Example after uploading a couple of files and listing them within the RadListView control
