Creating a Custom Theme Project
The second option to create a custom theme is to create your own custom theme project, which doesn't follow the approach from the Telerik built-in themes. Basically, what you need to do is to create XAML files for the controls that you want to style and then to combine them in one file (like Generic.xaml) using ResourceDictionary.MergedDictionaries. Then create a new class, which derives from Telerik.Windows.Controls.Theme. In the constructor you should set the source to point to the Generic.xaml file (that merges all your XAML files from the theme project). The tricky part here is that you should have references to all assemblies that you are styling. Which means that if you have Style for RadMenu in your theme project, you should have a reference to the Telerik.Windows.Controls.Navigation.dll assembly in your application or you will get an exception.
The purpose of this topic is to show you how to do that.
-
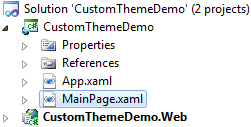
Open Visual Studio and create a new Silverlight Application. Name the project CustomThemeDemo.

Add a new Silverlight class library project to your solution, named MyTheme.
In the MyTheme project add references to the Telerik assemblies containing the controls you want to style. For example, if you have Style for RadMenu, you should have a reference to the Telerik.Windows.Controls.Navigation.dll assembly. In this demo the RadSlider control will be styled for simplicity. That's why you need to add a reference only to the Telerik.Windows.Controls.dll assembly.
In the MyTheme project, add a new folder named Themes. All XAML files, describing the styles for the target controls, should be placed in the Themes folder. In the following example, the original Vista theme of the RadSlider control is copied from the UI for Silverlight installation folder (~UI for Silverlight Installation Folder\Themes\Vista\Themes\Vista\Slider.xaml) and pasted in the Themes folder of the MyTheme project.
-
Add a new ResourceDictionary to the Themes folder. Name it Generic.xaml. Use Generic.xaml as a Resource Dictionary which contains Merged Resource Dictionaries only.
<ResourceDictionary xmlns="http://schemas.microsoft.com/winfx/2006/xaml/presentation" xmlns:x="http://schemas.microsoft.com/winfx/2006/xaml"> <ResourceDictionary.MergedDictionaries> <ResourceDictionary Source="/MyTheme;component/Themes/Slider.xaml" /> </ResourceDictionary.MergedDictionaries> </ResourceDictionary> -
Just for the demonstration, open the Slider.xaml file and modify the SliderBackgroundTrack brush to Red.
<SolidColorBrush x:Key="SliderBackgroundTrack" Color="Red" /> -
Add a new class named MyTheme to the MyTheme project. That class should derive from the Telerik.Windows.Controls.Theme base class. In the constructor you should set the source to point to the Generic.xaml file (that merges all your XAML files from the theme project).
    using System;
    namespace MyTheme
    {
        public class MyTheme : Telerik.Windows.Controls.Theme
        {
            public MyTheme()
            {
                this.Source = new Uri( "/MyTheme;component/Themes/Generic.xaml", UriKind.Relative );
            }
        }
    }
Imports System Namespace MyTheme Public Class MyTheme Inherits Telerik.Windows.Controls.Theme Public Sub New() Me.Source = New Uri("/MyTheme;component/Themes/Generic.xaml", UriKind.Relative) End Sub End Class End Namespace -
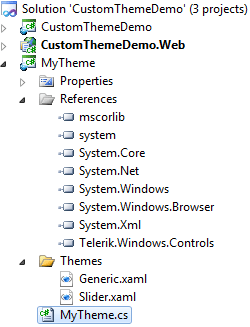
Finally, the MyTheme project should have the following structure.

-
The next step is to apply the custom theme. In the Silverlight client project, add a reference to the project containing your custom theme (in this case this is the MyTheme project).
You should have references to all assemblies that you are styling. Which means that if you have Style for RadMenu in your theme project, you should have a reference to the Telerik.Windows.Controls.Navigation.dll assembly in your application or you will get an exception.
-
Open the App.xaml.cs file and add the following code in the constructor. This will be enough to apply the theme globally to all Telerik Silverlight controls.
Telerik.Windows.Controls.StyleManager.ApplicationTheme = new MyTheme.MyTheme();Telerik.Windows.Controls.StyleManager.ApplicationTheme = New MyTheme.MyTheme() -
If you want to apply the theme only for a specific control, then you should stick to the following approach:
    <UserControl.Resources>
        <myThemeProject:MyTheme x:Name="MyTheme" />
    </UserControl.Resources>
    <Grid x:Name="LayoutRoot"
            Background="White" Margin="50">
        <telerik:RadSlider x:Name="radSlider"
                            telerik:StyleManager.Theme="{StaticResource MyTheme}"/>
    </Grid>