Getting Started with Silverlight TimeBar
This tutorial will walk you through the creation of a sample application that contains RadTimeBar.
Assembly References
In order to use RadTimeBar, you will need to add references to the following assemblies:
- Telerik.Windows.Controls
- Telerik.Windows.Controls.DataVisualization
- Telerik.Windows.Data
You can find the required assemblies for each control from the suite in the Controls Dependencies help article.
Defining the Control
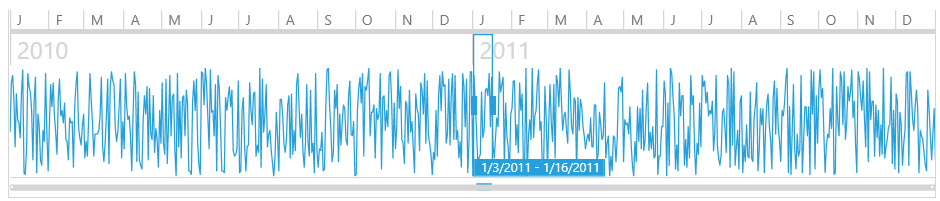
Defining the control requires setting several vital properties. Those are PeriodStart, PeriodEnd and Intervals.
Example 1: Adding RadTimeBar in XAML
<telerik:RadTimeBar PeriodStart="1-Jan-2019 12:00:00 AM"
                    PeriodEnd="31-Dec-2019 11:59:59 PM">
    <telerik:RadTimeBar.Intervals>
        <telerik:YearInterval />
        <telerik:MonthInterval />
        <telerik:WeekInterval />
        <telerik:DayInterval />
    </telerik:RadTimeBar.Intervals>
</telerik:RadTimeBar>
Example 2: Adding RadTimeBar in code
RadTimeBar timeBar = new RadTimeBar();
timeBar.BeginInit();
timeBar.PeriodStart =  new DateTime(2019, 1, 1, 12, 0, 0);
timeBar.PeriodEnd = new DateTime(2019, 12, 31, 23, 59, 59);
timeBar.Intervals.Add(new YearInterval());
timeBar.Intervals.Add(new MonthInterval());
timeBar.Intervals.Add(new WeekInterval());
timeBar.Intervals.Add(new DayInterval());
timeBar.EndInit();
Dim timeBar As RadTimeBar = New RadTimeBar()
timeBar.BeginInit()
timeBar.PeriodStart = New DateTime(2019, 1, 1, 12, 0, 0)
timeBar.PeriodEnd = New DateTime(2019, 12, 31, 23, 59, 59)
timeBar.Intervals.Add(New YearInterval())
timeBar.Intervals.Add(New MonthInterval())
timeBar.Intervals.Add(New WeekInterval())
timeBar.Intervals.Add(New DayInterval())
timeBar.EndInit()
Figure 1: RadTimeBar
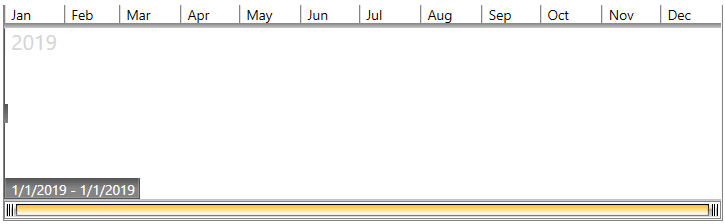
Setting the Visible Period
The visible period defines what portion of the period to be brought into the viewport. This can be also looked as zooming. The visible period is defined via the VisiblePeriodStart and VisiblePeriodEnd properties.
Example 3: Setting the visible period in XAML
<telerik:RadTimeBar PeriodStart="1-Jan-2019 12:00:00 AM"
                    PeriodEnd="31-Dec-2019 11:59:59 PM"

                    VisiblePeriodStart="14-March-2019 12:00:00 AM"
                    VisiblePeriodEnd="11-Nov-2019 11:59:59 PM">
    <telerik:RadTimeBar.Intervals>
        <telerik:YearInterval />
        <telerik:MonthInterval />
        <telerik:WeekInterval />
        <telerik:DayInterval />
    </telerik:RadTimeBar.Intervals>
</telerik:RadTimeBar>
Example 4: Setting the visible period in code
RadTimeBar timeBar = new RadTimeBar();
timeBar.BeginInit();
timeBar.PeriodStart = new DateTime(2019, 1, 1, 12, 0, 0);
timeBar.PeriodEnd = new DateTime(2019, 12, 31, 23, 59, 59);
timeBar.VisiblePeriodStart = new DateTime(2019, 3, 14, 23, 59, 59);
timeBar.VisiblePeriodEnd = new DateTime(2019, 11, 11, 12, 0, 0);
timeBar.Intervals.Add(new YearInterval());
timeBar.Intervals.Add(new MonthInterval());
timeBar.Intervals.Add(new WeekInterval());
timeBar.Intervals.Add(new DayInterval());
timeBar.EndInit();
Dim timeBar As RadTimeBar = New RadTimeBar()
timeBar.BeginInit()
timeBar.PeriodStart = New DateTime(2019, 1, 1, 12, 0, 0)
timeBar.PeriodEnd = New DateTime(2019, 12, 31, 23, 59, 59)
timeBar.VisiblePeriodStart = New DateTime(2019, 3, 14, 23, 59, 59)
timeBar.VisiblePeriodEnd = New DateTime(2019, 11, 11, 12, 0, 0)
timeBar.Intervals.Add(New YearInterval())
timeBar.Intervals.Add(New MonthInterval())
timeBar.Intervals.Add(New WeekInterval())
timeBar.Intervals.Add(New DayInterval())
timeBar.EndInit()
Figure 2: RadTimeBar with visible period set
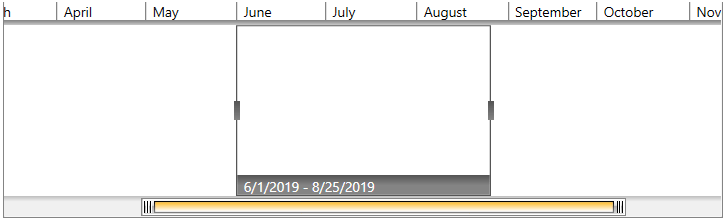
Selecting an Interval
To select an interval you can set the RadTimeBar's SelectionStart and SelectionEnd properties.
Example 5: Setting the selection in XAML
<telerik:RadTimeBar PeriodStart="1-Jan-2019 12:00:00 AM"
                    PeriodEnd="31-Dec-2019 11:59:59 PM"
                    VisiblePeriodStart="14-March-2019 12:00:00 AM"
                    VisiblePeriodEnd="11-Nov-2019 11:59:59 PM"
                    SelectionStart="1-Jun-2019 12:00:00 AM"
                    SelectionEnd="25-Aug-2019 11:59:59 PM">
    <telerik:RadTimeBar.Intervals>
        <telerik:YearInterval />
        <telerik:MonthInterval />
        <telerik:WeekInterval />
        <telerik:DayInterval />
    </telerik:RadTimeBar.Intervals>
</telerik:RadTimeBar>
Example 6: Setting the selection in code
RadTimeBar timeBar = new RadTimeBar();
timeBar.BeginInit();
timeBar.PeriodStart = new DateTime(2019, 1, 1, 12, 0, 0);
timeBar.PeriodEnd = new DateTime(2019, 12, 31, 23, 59, 59);
timeBar.VisiblePeriodStart = new DateTime(2019, 3, 14, 12, 0, 0);
timeBar.VisiblePeriodEnd = new DateTime(2019, 11, 11, 23, 59, 59);
timeBar.SelectionStart = new DateTime(2019, 6, 1, 12, 0, 0);
timeBar.SelectionEnd = new DateTime(2019, 8, 25, 23, 59, 59);
timeBar.Intervals.Add(new YearInterval());
timeBar.Intervals.Add(new MonthInterval());
timeBar.Intervals.Add(new WeekInterval());
timeBar.Intervals.Add(new DayInterval());
timeBar.EndInit();
Dim timeBar As RadTimeBar = New RadTimeBar()
timeBar.BeginInit()
timeBar.PeriodStart = New DateTime(2019, 1, 1, 12, 0, 0)
timeBar.PeriodEnd = New DateTime(2019, 12, 31, 23, 59, 59)
timeBar.VisiblePeriodStart = New DateTime(2019, 3, 14, 12, 0, 0)
timeBar.VisiblePeriodEnd = New DateTime(2019, 11, 11, 23, 59, 59)
timeBar.SelectionStart = New DateTime(2019, 6, 1, 12, 0, 0)
timeBar.SelectionEnd = New DateTime(2019, 8, 25, 23, 59, 59)
timeBar.Intervals.Add(New YearInterval())
timeBar.Intervals.Add(New MonthInterval())
timeBar.Intervals.Add(New WeekInterval())
timeBar.Intervals.Add(New DayInterval())
timeBar.EndInit()
Figure 3: RadTimeBar with selection defined
Hosting Another Control
The RadTimeBar component allows you to host another control in it, thus enchancing the visualization. The most common scenario is hosting a RadSparkline control.
The following example demonstrates how to populate a simple RadLinearSparkline with data and host it in RadTimeBar. Read more about the RadSparkline controls in its help documentation.
Example 7: Hosting RadSparkline in RadTimeBar in XAML
<telerik:RadTimeBar PeriodStart="1-Jan-2019 12:00:00 AM"
                    PeriodEnd="31-Dec-2019 11:59:59 PM"
                    VisiblePeriodStart="14-March-2019 12:00:00 AM"
                    VisiblePeriodEnd="11-Nov-2019 11:59:59 PM"
                    SelectionStart="1-Jun-2019 12:00:00 AM"
                    SelectionEnd="25-Aug-2019 11:59:59 PM">
    <telerik:RadTimeBar.Intervals>
        <telerik:YearInterval />
        <telerik:MonthInterval />
        <telerik:WeekInterval />
        <telerik:DayInterval />
    </telerik:RadTimeBar.Intervals>
    <telerik:RadTimeBar.Content>
        <telerik:RadLinearSparkline x:Name="sparkline"/>
    </telerik:RadTimeBar.Content>
</telerik:RadTimeBar>
Example 8: Hosting RadSparkline in RadTimeBar in code
this.timeBar = new RadTimeBar();
timeBar.BeginInit();
timeBar.PeriodStart = new DateTime(2019, 1, 1, 12, 0, 0);
timeBar.PeriodEnd = new DateTime(2019, 12, 31, 23, 59, 59);
timeBar.VisiblePeriodStart = new DateTime(2019, 3, 14, 12, 0, 0);
timeBar.VisiblePeriodEnd = new DateTime(2019, 11, 11, 23, 59, 59);
timeBar.SelectionStart = new DateTime(2019, 6, 1, 12, 0, 0);
timeBar.SelectionEnd = new DateTime(2019, 8, 25, 23, 59, 59);
timeBar.Intervals.Add(new YearInterval());
timeBar.Intervals.Add(new MonthInterval());
timeBar.Intervals.Add(new WeekInterval());
timeBar.Intervals.Add(new DayInterval());
timeBar.EndInit();
timeBar.Content = new RadLinearSparkline();
Dim timeBar As RadTimeBar = New RadTimeBar()
timeBar.BeginInit()
timeBar.PeriodStart = New DateTime(2019, 1, 1, 12, 0, 0)
timeBar.PeriodEnd = New DateTime(2019, 12, 31, 23, 59, 59)
timeBar.VisiblePeriodStart = New DateTime(2019, 3, 14, 12, 0, 0)
timeBar.VisiblePeriodEnd = New DateTime(2019, 11, 11, 23, 59, 59)
timeBar.SelectionStart = New DateTime(2019, 6, 1, 12, 0, 0)
timeBar.SelectionEnd = New DateTime(2019, 8, 25, 23, 59, 59)
timeBar.Intervals.Add(New YearInterval())
timeBar.Intervals.Add(New MonthInterval())
timeBar.Intervals.Add(New WeekInterval())
timeBar.Intervals.Add(New DayInterval())
timeBar.EndInit()
timeBar.Content = New RadLinearSparkline()
Example 9: Setting up the ItemsSource of the sparkline control
private static Random r = new Random();

// You can decide where to use this method.
// For example, you can call it after the InitializeComponent() call of the view where the control is used (ex: MainWindow.xaml.cs).
private void SetupSparkLineSource()
{
    List<int> data = new List<int>();
    DateTime startDate = new DateTime(2019, 1, 1, 12, 0, 0);
    DateTime endDate = new DateTime(2019, 12, 31, 23, 59, 59);
    for (DateTime currentDate = startDate; currentDate <= endDate; currentDate = currentDate.AddDays(15))
    {
        data.Add(r.Next(0, 60));
    }
    this.sparkline.ItemsSource = data;
}
Private Shared r As Random = New Random()
' You can decide where to use this method.
' For example, you can call it after the InitializeComponent() call of the view where the control is used (ex: MainWindow.xaml.cs).
Private Sub SetupSparkLineSource()
    Dim data As List(Of Integer) = New List(Of Integer)()
    Dim startDate As DateTime = New DateTime(2019, 1, 1, 12, 0, 0)
    Dim endDate As DateTime = New DateTime(2019, 12, 31, 23, 59, 59)
    Dim currentDate As DateTime = startDate

    While currentDate <= endDate
        data.Add(r.Next)
        currentDate = currentDate.AddDays(15)
    End While

    Me.sparkline.ItemsSource = data
End Sub
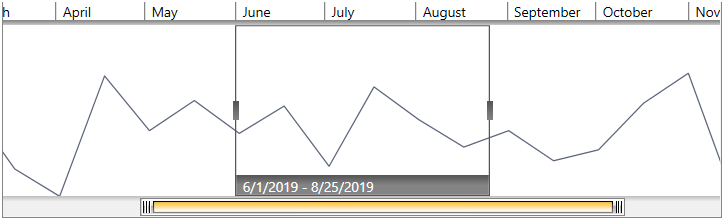
Figure 4: RadTimeBar and RadSparkline
DataBinding the RadSparkLine
In order to learn how you can bind the ItemsSource of a RadSparkLine component in general, you can read the DataBinding article in the RadSparkLine section.
In case the ItemsSource of the sparkline is a collection of business objects, where the property bound to the XValue of the sparkline is of type DateTime, you need to make sure that the collection is ordered (ascending) by that property. This is needed for the virtualization of the RadSparkLine, which is enabled by the EnableSparklineVirtualization property of the RadTimeBar(True by default).
Setting a Theme
The controls from our suite support different themes. You can see how to apply a theme different than the default one in the Setting a Theme help article.
Changing the theme using implicit styles will affect all controls that have styles defined in the merged resource dictionaries. This is applicable only for the controls in the scope in which the resources are merged.
To change the theme, you can follow the steps below:
Choose between the themes and add reference to the corresponding theme assembly (ex: Telerik.Windows.Themes.Windows8.dll). You can see the different themes applied in the Theming examples from our Silverlight Controls Examples application.
-
Merge the ResourceDictionaries with the namespace required for the controls that you are using from the theme assembly. For the RadTimeBar, you will need to merge the following resources:
- Telerik.Windows.Controls
- Telerik.Windows.Controls.DataVisualization
Example 10 demonstrates how to merge the ResourceDictionaries so that they are applied globally for the entire application.
Example 10: Merge the ResourceDictionaries
<Application.Resources>
    <ResourceDictionary>
        <ResourceDictionary.MergedDictionaries>
            <ResourceDictionary Source="/Telerik.Windows.Themes.Windows8;component/Themes/System.Windows.xaml"/>
            <ResourceDictionary Source="/Telerik.Windows.Themes.Windows8;component/Themes/Telerik.Windows.Controls.xaml"/>
            <ResourceDictionary Source="/Telerik.Windows.Themes.Windows8;component/Themes/Telerik.Windows.Controls.DataVisualization.xaml"/>
        </ResourceDictionary.MergedDictionaries>
    </ResourceDictionary>
</Application.Resources>
Alternatively, you can use the theme of the control via the StyleManager.
Figure 5 shows a RadTimeBar with the Windows8 theme applied.
Figure 5: RadTimeBar with the Windows8 theme