CurrentTimeIndicator
RadScheduleView provides the option to visually mark the current time in the TimeRuler and across the Appointments area through its ShowCurrentTimeIndicator property.
This article covers the following topics:
- Enabling the CurrentTimeIndicator
- Setting CurrentTimeIndicator Location
- Styling CurrentTimeIndicator
Enabling the CurrentTimeIndicator
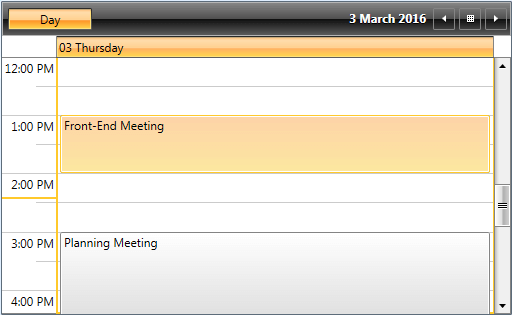
In order to display the current time indicator, you must set the ShowCurrentTimeIndicator property of the RadScheduleView as in Example 1.
Example 1: Enable CurrentTimeIndicator
<telerik:RadScheduleView AppointmentsSource="{Binding Appointments}" ShowCurrentTimeIndicator="True">
    <telerik:RadScheduleView.ViewDefinitions>
        <telerik:DayViewDefinition />
    </telerik:RadScheduleView.ViewDefinitions>
</telerik:RadScheduleView>
Figure 1: Enable CurrentTimeIndicator
Setting CurrentTimeIndicator Location
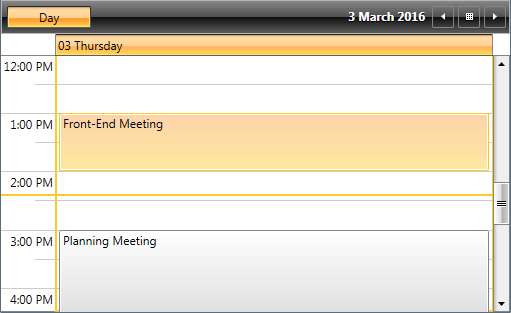
As of R2 2016, you can show the CurrentTimeIndicator not only in the TimeRuler of the ScheduleView, but also across the Appointments area through the CurrentTimeIndicatorLocation property as shown in Example 2. CurrentTimeIndicatorLocation property is of type enum and can receive the following values:
- TimeRulerArea – the default value, the indicator is shown inside the TimeRuler.
- AppointmentsArea – the indicator is shown only through the Appointments panel.
- WholeArea – the indicator is shown on both the TimeRuler and Appointments panel.
Example 2: Set CurrentTimeIndicatorLocation
<telerik:RadScheduleView AppointmentsSource="{Binding Appointments}"
    ShowCurrentTimeIndicator="True"
    CurrentTimeIndicatorLocation="WholeArea">
    <telerik:RadScheduleView.ViewDefinitions>
        <telerik:DayViewDefinition />
    </telerik:RadScheduleView.ViewDefinitions>
</telerik:RadScheduleView>
Figure 2: Set CurrentTimeIndicatorLocation
Styling CurrentTimeIndicator
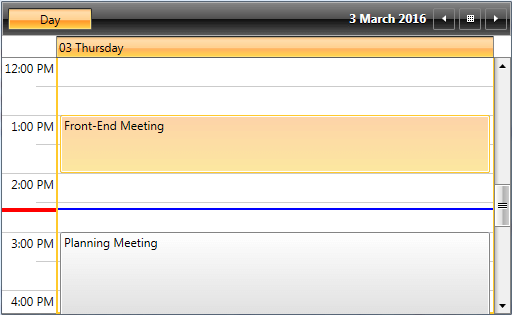
You could change the look of CurrentTimeIndicator by setting the CurrentTimeIndicatorStyle and CurrentTimeIndicatorAppointmentsAreaStyle properties of the ScheduleView.
CurrentTimeIndicatorStyle is applied to the part of the CurrentTimeIndicator in the TimeRuler, while CurrentTimeIndicatorAppointmentsAreaStyle is applied to the part in the Appointments area.
Example 3 demonstrates how both Styles are defined and Example 4 shows how the Style properties should be set to the ScheduleView.
Example 3: Define CurrentTimeIndicator Styles
<Style x:Key="CurrentTimeIndicatorStyle" TargetType="telerik:CurrentTimeIndicator">
    <Setter Property="Canvas.ZIndex" Value="2"/>
    <Setter Property="Template">
        <Setter.Value>
            <ControlTemplate>
                <Rectangle Margin="0 0 -1 -1" MinWidth="2" MinHeight="2" Fill="Red"/>
            </ControlTemplate>
        </Setter.Value>
    </Setter>
</Style>
<Style x:Key="CurrentTimeIndicatorAppointmentsAreaStyle" TargetType="telerik:CurrentTimeIndicator">
    <Setter Property="Canvas.ZIndex" Value="2"/>
    <Setter Property="Template">
        <Setter.Value>
            <ControlTemplate>
                <Rectangle Margin="0 0 -1 -1" MinWidth="2" MinHeight="2" Fill="Blue"/>
            </ControlTemplate>
        </Setter.Value>
    </Setter>
</Style>
Example 4: Set CurrentTimeIndicator Style Properties
<telerik:RadScheduleView AppointmentsSource="{Binding Appointments}"
    ShowCurrentTimeIndicator="True"
    CurrentTimeIndicatorLocation="WholeArea"
    CurrentTimeIndicatorStyle="{StaticResource CurrentTimeIndicatorStyle}"
    CurrentTimeIndicatorAppointmentsAreaStyle="{StaticResource CurrentTimeIndicatorAppointmentsAreaStyle}">
    <telerik:RadScheduleView.ViewDefinitions>
        <telerik:DayViewDefinition />
    </telerik:RadScheduleView.ViewDefinitions>
</telerik:RadScheduleView>
Figure 3: Custom CurrentTimeIndicator Styles

Additionally, you could set the AllowCustomSize property of the CurrentTimeIndicator in order to allow rendering elements with bigger size. For example, if you need the part in the TimeRuler area to be thicker, you can customize the CurrentTimeIndicatorStyle as shown in Example 5.
Example 5: Set AllowCustomSize
<Style x:Key="CurrentTimeIndicatorStyle" TargetType="telerik:CurrentTimeIndicator">
    <Setter Property="Canvas.ZIndex" Value="2"/>
    <Setter Property="AllowCustomSize" Value="True" />
    <Setter Property="Template">
        <Setter.Value>
            <ControlTemplate>
                <Rectangle Margin="0 0 -1 -1" MinWidth="2" MinHeight="4" Fill="Red"/>
            </ControlTemplate>
        </Setter.Value>
    </Setter>
</Style>
Figure 4: CurrentTimeIndicator with AllowCustomSize set
For more advanced customizations, see the ScheduleView Custom CurrentTimeIndicator Style example in our XAML SDK Repository.