Column Groups
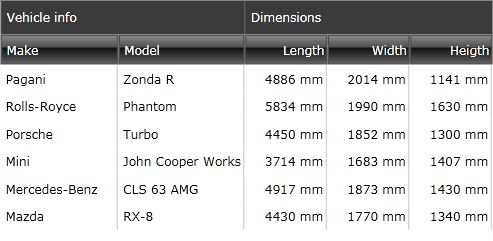
Columns in RadGridView may be grouped in column groups visually represented by common column headers.
Define Column Groups
To enable column grouping you need to add GridViewColumnGroup instances to RadGridView's ColumnGroups collection as illustrated in Example 1.
Example 1: Define column groups
<telerik:RadGridView x:Name="RadGridView1" GridLinesVisibility="Vertical" Width="450" CanUserFreezeColumns="False" AutoGenerateColumns="False" IsFilteringAllowed="False" ShowGroupPanel="False" RowIndicatorVisibility="Collapsed">
    <telerik:RadGridView.ColumnGroups>
        <telerik:GridViewColumnGroup Name="VehicleInfo" Header="Vehicle info" />
        <telerik:GridViewColumnGroup Name="Dimensions" Header="Dimensions" />
    </telerik:RadGridView.ColumnGroups>
    <telerik:RadGridView.Columns>
        <telerik:GridViewDataColumn DataMemberBinding="{Binding Make}" ColumnGroupName="VehicleInfo" />
        <telerik:GridViewDataColumn DataMemberBinding="{Binding Model}" ColumnGroupName="VehicleInfo" />
        <telerik:GridViewDataColumn DataMemberBinding="{Binding Length}" ColumnGroupName="Dimensions" />
        <telerik:GridViewDataColumn DataMemberBinding="{Binding Width}" ColumnGroupName="Dimensions" />
        <telerik:GridViewDataColumn DataMemberBinding="{Binding Height}" ColumnGroupName="Dimensions" />
    </telerik:RadGridView.Columns>
</telerik:RadGridView>
Figure 1: RadGridView with Column Groups

Please observe that to add a specific column to a certain column group, you need to set the ColumnGroupName property of the column to match the value of the Name property of the relevant GridViewColumnGroup.
Note also that the GridViewColumnGroup class has a Header property which defines the content to be shown inside the common header. It may be a simple string or a visual element.
In case that no header is specified the Name of the GridViewColumnGroup will be displayed.
Nested Column Groups
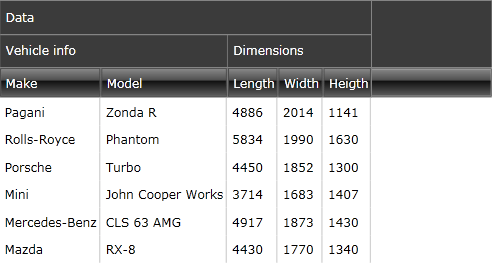
Column groups can also be nested. Example 2 shows how this is achieved.
Example 2: Nested column groups
<telerik:RadGridView.ColumnGroups>
    <telerik:GridViewColumnGroup Name="Data" Header="Data">
        <telerik:GridViewColumnGroup Name="VehicleInfo" Header="Vehicle info" />
        <telerik:GridViewColumnGroup Name="Dimensions" Header="Dimensions" />
    </telerik:GridViewColumnGroup>
</telerik:RadGridView.ColumnGroups>
Figure 2: Nested column groups

Define Custom Header
You can define a custom header for the GridViewColumnGroup through its HeaderTemplate.
Example 3: Define GridViewColumnGroup.HeaderTemplate
<telerik:GridViewColumnGroup Name="Data">
    <telerik:GridViewColumnGroup.HeaderTemplate>
        <DataTemplate>
            <TextBlock Text="Data"/>
        </DataTemplate>
    </telerik:GridViewColumnGroup.HeaderTemplate>
</telerik:GridViewColumnGroup>
In addition, you can style the headers by defining a style targeting the CommonColumnHeader element and setting it as the HeaderStyle for the GridViewColumnGroup. For information on how to apply an implicit style, have a look at the Styling Column Groups article.
Virtualization Modes
Column groups also support UI virtualization meaning that only the visual elements that are loaded in the viewable area are processed. This way, the performance of the control can be significantly enhanced.
This functionality can be configured through the EnableColumnGroupsVirtualization boolean property. Its default value is True in which case UI virtualization is enabled.
This mode is especially useful in more complicated scenarios where additional features such as frozen columns, reordering of columns, etc. are used.
When the column group virtualization feature is enabled, column group names should be unique.
Add or Remove Multiple Column Groups at Once
As of R3 2020 SP the ColumnGroups property is of type RadObservableCollection which exposes the AddRange and RemoveRange methods that can be used when adding or removing multiple groups at once in order to improve performance.
Example 4: Add or remove multiple column groups at once
this.GridView.ColumnGroups.AddRange(groupsToAdd);

this.GridView.ColumnGroups.RemoveRange(groupsToRemove);
Me.GridView.ColumnGroups.AddRange(groupsToAdd)

Me.GridView.ColumnGroups.RemoveRange(groupsToRemove)
An alternative is to use the SuspendNotifications and ResumeNotifications methods prior and after adding or removing the groups.
Example 5: Suspend and resume notifications
this.GridView.ColumnGroups.SuspendNotifications();
foreach (var group in groupsToAdd)
{
    this.GridView.ColumnGroups.Add(group);
}

foreach (var group in groupsToRemove)
{
    this.GridView.ColumnGroups.Remove(group);
}

this.GridView.ColumnGroups.ResumeNotifications();
Me.GridView.ColumnGroups.SuspendNotifications()
For Each group In groupsToAdd
    Me.GridView.ColumnGroups.Add(group)
Next group

For Each group In groupsToRemove
    Me.GridView.ColumnGroups.Remove(group)
Next group

Me.GridView.ColumnGroups.ResumeNotifications()
Specific Scenarios
This section will cover some specific scenarios when using column groups.
For the purpose of this demonstration we will define the following groups.
Example 6: Sample column groups setup
<telerik:RadGridView.ColumnGroups>
    <telerik:GridViewColumnGroup Name="Level2group1">
        <telerik:GridViewColumnGroup Name="Level1group11"/>
        <telerik:GridViewColumnGroup Name="Level1group12"/>
    </telerik:GridViewColumnGroup>
    <telerik:GridViewColumnGroup Name="Level2group2">
        <telerik:GridViewColumnGroup Name="Level1group21"/>
        <telerik:GridViewColumnGroup Name="Level1group22"/>
    </telerik:GridViewColumnGroup>
</telerik:RadGridView.ColumnGroups>
In case the user moves the frozen column splitter in the middle of an existing column group, then it will be divided into two separate groups. Figures 3 to 5 demonstrate this scenario.
Figure 3: Initial setup with FrozenColumnSplitter at default position

Figure 4: A duplicate column group is created when FrozenColumnSplitter moved after the first column

Figure 5: ColumnGroup's Header is still visible after scrolling to the right

When scrolling horizontally, the column group header remains visible until there are still visible sub-columns under the specific group.
Defined column groups are now drawn only if they are specified for at least one visible column.
When some GridViewColumns do not have a ColumnGroupName specified, they are placed under an empty ColumnGroup. This is illustrated in Figure 6.
Figure 6: Various setups illustrating the default space fill


