Basics
The GraphicScale class is used as a base class for the LinearScale and the RadialScale classes. It provides common functionality for both scales. This topic will explain the major features of the GraphicScale class.
The ScaleBase class cannot be used on its own as a scale. You should use either the Radial or Linear Scales.
Scale Offsets
The scales display values depending on their Min and Max properties. However there are cases, in which you might want to modify the value of the first or the last tick of the scale. For example, if you have a scale with a minimum value of 0.95 and a maximum value of 20.8, but you want to show the ticks for integer values only (from 1 to 20 only), you can use the StartTickOffset and the EndTickOffset properties of the scale to adjust the fist and the last tick's values. Example 1 demonstrates this approach.
Example 1: Set StartTickOffset and EndTickOffset
<telerik:RadVerticalLinearGauge Width="102" Height="210" telerik:StyleManager.Theme="Windows8">
    <telerik:VerticalLinearScale Min="0.95" Max="20.8"
                         EndTickOffset="-0.8"
                         StartTickOffset="0.05"
                         RelativeY="0"
                         RelativeHeight="1"
                         Fill="#FFD6D4D4"
                         StartWidth="0.06"
                         EndWidth="0.06"
                         MajorTickOffset="0.03" MinorTickOffset="0.03"
                         LabelOffset="0.13"
                         MajorTickRelativeHeight="0.003" MinorTickRelativeHeight="0.003*"
                         MiddleTicks="1" MinorTicks="3"/>
</telerik:RadVerticalLinearGauge>
Figure 1: Result from Example 1

Scale Width
You are allowed to specify the width of the scale at its beginning and at its end. For this purpose the GraphicScale class exposes the StartWidth and EndWidth properties. Their value is relative to the cell size of the scale. In the case of the linear scale, this means to the width of the scale's container. Example 2 demonstrates how you can set those properties.
To learn more about the cell size term, read the Relative Measurements topic.
Example 2: Set StartWidth and EndWidth properties
<telerik:RadVerticalLinearGauge Width="102" Height="210" telerik:StyleManager.Theme="Windows8">
    <telerik:VerticalLinearScale Min="0" Max="20"
                         RelativeY="0"
                         RelativeHeight="1"
                         StartWidth="0.02" EndWidth="0.08"
                         Fill="#FFD6D4D4"
                         Stroke="#FFD6D4D4"
                         MajorTickOffset="0.03" MinorTickOffset="0.03"
                         LabelOffset="0.13"
                         MajorTickRelativeHeight="0.003" MinorTickRelativeHeight="0.003*"
                         MiddleTicks="1" MinorTicks="3"/>
</telerik:RadVerticalLinearGauge>
Figure 2: Result from Example 2

Interactivity
The Interactivity feature allows the user to interact with the scale. Enabling the feature will allow one to drag the marker along the scale. By default this feature is turned off. In order to toggle it use the IsInteractive property of the scale. This is demonstrated in Example 3.
Example 3: Enablе the interactivity of a scale
<telerik:RadVerticalLinearGauge x:Name="linearGauge" telerik:StyleManager.Theme="Windows8"
                        Width="102" Height="210">
    <telerik:VerticalLinearScale x:Name="linearScale"
                            Min="1"
                            Max="12"
                            IsInteractive="True">
        <telerik:Marker Value="1" />
    </telerik:VerticalLinearScale>
</telerik:RadVerticalLinearGauge>
Logarithmic Scale
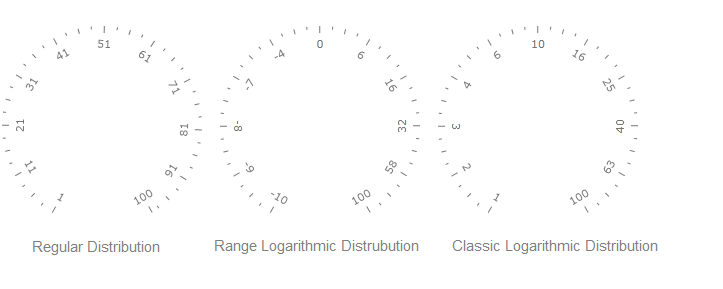
Both radial and linear scales have a Distribution property which specifies the value distribution along the scale (linear, logarithmic, exponential and etc.). This property is defined in the GraphicScale class and is of type IValueDistribution. This interface converts real scale value (given as value between Min and Max property of the scale) to the relative value (value in the [0...1] interval) which represents relative position of the value along the scale and vice versa. It is also possible to calculate the value for the tick mark using its index and the total number of ticks. Currently there are 3 basic implementations of this interface:
Regular: The default distribution which is represented by a linear function. Check Example 3.
Range logarithmic: The distribution which maps a logarithmic function on any value range (i.e. tick marks have close values at the beginning of the range and wide distance at the end of range). It corresponds to the IsLogarithmic mode in the old implementation. Check Example 4.
Classic logarithmic: The distribution which is represented by a logarithmic function. It represents the classic meaning of the logarithmic scale. In contrast to the range logarithmic distribution it can’t be used on an arbitrary value range, but on positive numbers only. Check Example 5.
The default value for the LogarithmicBase property of the logarithmic distributions is 10.
Example 3: RadialScale with RegularDistribution
<telerik:RadRadialGauge>
    <telerik:RadialScale Min="1" Max="100">
        <telerik:RadialScale.Distribution>
            <telerik:RegularDistribution />
        </telerik:RadialScale.Distribution>
    </telerik:RadialScale>
</telerik:RadRadialGauge>
Example 4: RadialScale with RangeLogarithmicDistribution
<telerik:RadRadialGauge>
    <telerik:RadialScale Min="-10" Max="100">
        <telerik:RadialScale.Distribution>
            <telerik:RangeLogarithmicDistribution />
        </telerik:RadialScale.Distribution>
    </telerik:RadialScale>
</telerik:RadRadialGauge>
Example 5: RadialScale with ClassicLogarithmicDistribution
<telerik:RadRadialGauge>
    <telerik:RadialScale Min="1" Max="100">
        <telerik:RadialScale.Distribution>
            <telerik:ClassicLogarithmicDistribution />
        </telerik:RadialScale.Distribution>
    </telerik:RadialScale>
</telerik:RadRadialGauge>
Figure 3: Results from Examples 3,4,5 respectively

Reversed Scale
The scales allow you to reverse the direction, in which it displays its values. To do it, just set the IsReversed property to True as demonstrated in Example 6.
Example 6: Create reversed scale
<telerik:RadVerticalLinearGauge x:Name="linearGauge" telerik:StyleManager.Theme="Windows8"
                        Width="102" Height="210">
    <telerik:VerticalLinearScale x:Name="linearScale"
                            Min="1"
                            Max="12"
                            IsReversed="True">
    </telerik:VerticalLinearScale>
</telerik:RadVerticalLinearGauge>
Figure 4: Result from Example 6

Show First and Last Label
You can specify the scale to either display or not its last and first labels. Their visibility is controlled by the ShowLastLabel and ShowFirstLabel properties. This can be very useful when one of these labels is overlapping the labels next to it. Example 7 demonstrates how you can utilize those properties.
The ShowLastLabel value is applied only, when the ticks of the scale are defined via the MajorTickStep property.
Example 7: Set ShowFirstLabel and ShowLastLabel
<telerik:RadVerticalLinearGauge x:Name="linearGauge" telerik:StyleManager.Theme="Windows8"
                        Width="102" Height="210">
    <telerik:VerticalLinearScale x:Name="linearScale"
                            Min="1"
                            Max="12"
                            ShowFirstLabel="True"
                            ShowLastLabel="False"
                            MajorTickStep="2">
    </telerik:VerticalLinearScale>
</telerik:RadVerticalLinearGauge>
Figure 5: Result from Example 7

Ranges
The RadGauge control allows you to define ranges for your scales. The range is used for wrapping a specific section of the scale, that meets a condition. To allow you to use ranges with the different types of scales, the RadGauge control provides you with a scale specific range objects. To learn more about working with ranges, read the Ranges section of the documentation.
Labels
The GraphicScale class allows you to modify and configure the labels displayed next to the ticks of the scales. This is done by using the set of the Label* properties (i.e. LabelLocation, LabelOffset, LabelTemplate and so on) of the scale. To learn more about configuring the labels, read the Labels section of the documentation.
Ticks
The GraphicScale class exposes three sets of properties - MajorTick*, MiddleTick*, MinorTick*. They are used to configure the displaying of the different tick types on the scale. To learn more about configuring the ticks read the Ticks section of the documentation.