CRUD operations
This topic shows how to create simple CRUD (Create, Read, Update and Delete) application with RadDomainDataSource and RadGridView. For more information on how to load data initially please read here.
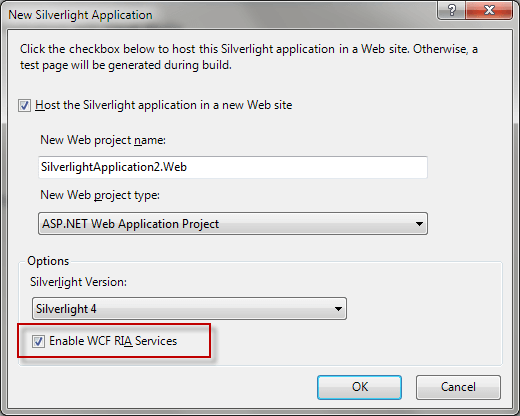
Create a default Silverlight project as following:
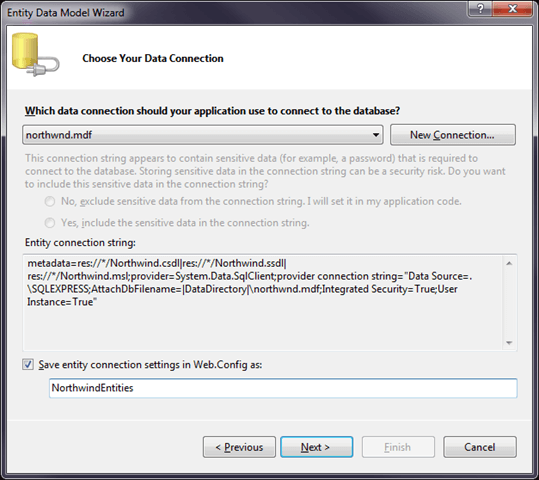
Create ADO.NET Entity data model called Northwind.edmx. For the sake of the example let's create this entity model with the Northwnd.mdf file. You will need a working (started) SQL Server EXPRESS service on your machine (or you have to change connection string accordingly).
Do not forget to rebuild web project on this stage.
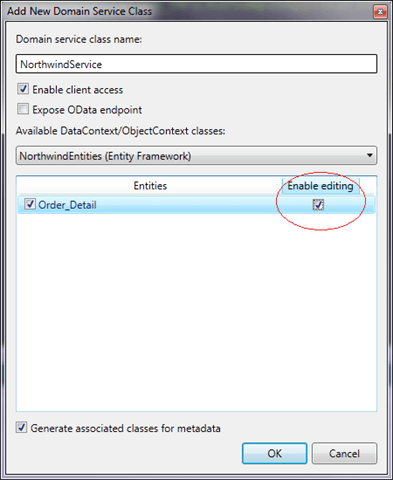
Create DomainService class with enabled editing:
Then on the client application place RadGridView control with some buttons nearby. Here is the xaml code for a reference on how to create binding to SubmitChanges and RejectChanges commands:
<Grid x:Name="LayoutRoot" Background="White">
    <Grid.RowDefinitions>
        <RowDefinition Height="Auto" />
        <RowDefinition Height="*" />
    </Grid.RowDefinitions>
    <telerik:RadDomainDataSource x:Name="radDomainDataSource" AutoLoad="True" QueryName="GetOrder_Details">
        <telerik:RadDomainDataSource.DomainContext>
            <web:NorthwindContext />
        </telerik:RadDomainDataSource.DomainContext>
    </telerik:RadDomainDataSource>
    <StackPanel Grid.Row="0">
        <telerik:RadButton x:Name="submitChangesButton" Content="Submit Changes"
                           Command="{Binding SubmitChangesCommand, ElementName=radDomainDataSource}"
                           CommandTarget="{Binding ElementName=radDomainDataSource}"/>
        <telerik:RadButton x:Name="rejectChangesButton" Content="Reject Changes"
                           Command="{Binding RejectChangesCommand, ElementName=radDomainDataSource}"
                           CommandTarget="{Binding ElementName=radDomainDataSource}"/>
    </StackPanel>
            <telerik:RadGridView x:Name="radGridView" Grid.Row="1"
                         ItemsSource="{Binding DataView, ElementName=radDomainDataSource}"
                         IsBusy="{Binding IsBusy, ElementName=radDomainDataSource}"
                         ShowInsertRow="True" />
</Grid>
How to use the example:
Create - You could add new item via Insert key or with RadGridView’s add new item UI (“Click here to add new item”).
Update - Put any cell into edit mode, change its value and commit row edit via Enter or click on another row. (note that ProductID field is read-only).
Delete - Just select an item and press Delete key.
As you will notice both buttons “Submit Changes” and “Reject Changes” will be enabled when any of these operations is finished (after Row edit is finished).
Changes will be populated on a server when Submit Changes button is clicked.
A working solution can be downloaded from here.