Getting Started with Silverlight BulletGraph
This tutorial will walk you through the creation of a RadBulletGraph.
Assembly References
In order to use RadBulletGraph in your project you have to add a reference to the following assemblies:
- Telerik.Windows.Controls
- Telerik.Windows.Controls.DataVisualization
- Telerik.Windows.Data
You can find the required assemblies for each control from the suite in the Controls Dependencies help article.
BulletGraph Types
The RadBulletGraph suite provides two controls - one horizontally arranged and one vertically.
RadHorizontalBulletGraph
RadVerticalBulletGraph
Visual Structure
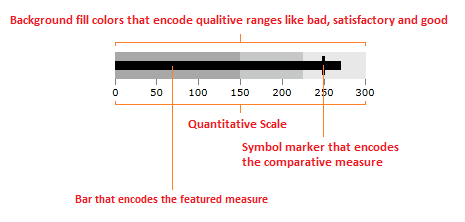
The following image describes the main elements of the RadBulletGraph control.
Figure 1: BulletGraph visual elements

Defining the RadBulletGraph
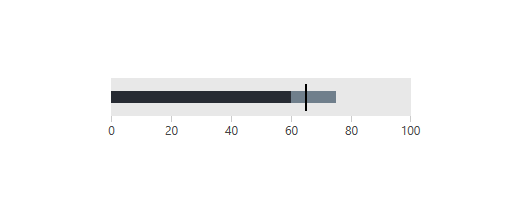
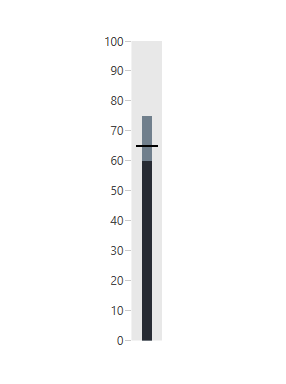
The following examples show how to define a simple horizontal and vertical bullet graphs.
Example 1: Defining horizontal bullet graph control
<telerik:RadHorizontalBulletGraph FeaturedMeasure="60"
                                  ComparativeMeasure="65"
                                  ProjectedValue="75"
                                  Maximum="100">
    <telerik:RadHorizontalBulletGraph.QualitativeRanges>
        <telerik:QualitativeRange Brush="#A8A8A8" Value="150" />
        <telerik:QualitativeRange Brush="#C6C8C8" Value="225" />
        <telerik:QualitativeRange Brush="#E8E8E8" />
    </telerik:RadHorizontalBulletGraph.QualitativeRanges>
</telerik:RadHorizontalBulletGraph>
Figure 2: RadHorizontalBulletGraph

Example 2: Defining vertical bullet graph control
<telerik:RadVerticalBulletGraph FeaturedMeasure="60"
                                ComparativeMeasure="65"
                                ProjectedValue="75"
                                Maximum="100">
    <telerik:RadVerticalBulletGraph.QualitativeRanges>
        <telerik:QualitativeRange Brush="#A8A8A8" Value="150" />
        <telerik:QualitativeRange Brush="#C6C8C8" Value="225" />
        <telerik:QualitativeRange Brush="#E8E8E8" />
    </telerik:RadVerticalBulletGraph.QualitativeRanges>
</telerik:RadVerticalBulletGraph>
Figure 3: RadVerticalBulletGraph
