Add Standard Buttons
RadEditor provides 4 different ways to configure toolbars:
Setting Tools in the RadEditor declaration
<telerik:RadEditor RenderMode="Lightweight" runat="server" ID="RadEditor1" Height="100px">
<Tools>
<telerik:EditorToolGroup>
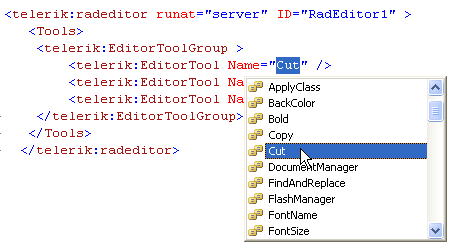
<telerik:EditorTool Name="Cut" />
<telerik:EditorTool Name="Copy" />
<telerik:EditorTool Name="Paste" />
</telerik:EditorToolGroup>
</Tools>
</telerik:RadEditor>
A useful design-time feature of the Name attribute is that it offers a list with the names of all available RadEditor tools. Press Ctrl-Space to display the drop down list.
Please, note that the selected ToolsFile or the built-in default tools file will not be loaded if you set the Tools collection in the control tag.
Setting the tools via the ToolsFile property
As in earlier versions of RadEditor, you can configure the toolbar using a ToolsFile.xml file:
<telerik:RadEditor RenderMode="Lightweight" ToolsFile="~/ToolsFile.xml" runat="server" ID="RadEditor1">
</telerik:RadEditor>
<root>
    <tools name="MainToolbar" enabled="true">
        <tool name="AjaxSpellCheck" />
        <tool name="InsertSymbol" />
        <tool name="FormatCodeBlock" />
    </tools>
</root>
Setting Tools Programmatically in the Code-Behind
Creating tools programmatically will replace the default toolsfile RadEditor loads and only the tools you added will remain. If you want to keep the original set of tools and add your own after them, call the EnsureToolsFileLoaded method first.
//uncomment this line to first load the default tools
//RadEditor3.EnsureToolsFileLoaded();

EditorToolGroup main = new EditorToolGroup();
RadEditor3.Tools.Add(main);
EditorTool bold= new EditorTool();
bold.Name = "Bold";
bold.ShortCut = "CTRL+B";
main.Tools.Add(bold);
EditorTool italic = new EditorTool();
italic.Name = "Italic";
italic.ShortCut = "CTRL+I";
main.Tools.Add(italic);
EditorTool underline = new EditorTool();
underline.Name = "Underline";underline.ShortCut = "CTRL+U";
main.Tools.Add(underline);
'uncomment this line to first load the default tools
'RadEditor3.EnsureToolsFileLoaded()

RadEditor1.Tools.Clear()
Dim main As New EditorToolGroup()
RadEditor1.Tools.Add(main)
Dim bold As New EditorTool()
bold.Name = "Bold"
bold.ShortCut = "CTRL+B"
main.Tools.Add(bold)
Dim italic As New EditorTool()
italic.Name = "Italic"
italic.ShortCut = "CTRL+I"
main.Tools.Add(italic)
Dim underline As New EditorTool()
underline.Name = "Underline"
underline.ShortCut = "CTRL+U"
main.Tools.Add(underline)
You can also use the following syntax to add a standard button to the toolbar. The example below adds a "Bold" button to the end of the first group of tools.
EditorTool tool = new EditorTool("Bold");
tool.Type = EditorToolType.Button;
RadEditor1.Tools[0].Tools.Add(tool);
Dim tool As New EditorTool("Bold")
tool.Type = EditorToolType.Button
RadEditor1.Tools(0).Tools.Add(tool)
Please, note that if a new EditorToolGroup is added then the Tools collection will be reset. You can download the default ToolsFile.xml file of RadEditor from the Default ToolsFile.xml file of RadEditor for ASP.NET AJAX KB article.
Setting the tools by using Themes
You can use a theme to conveniently set the tools for a number of RadSpell instances that use the theme. In this example the skin file is part of a Theme named "Skin1".
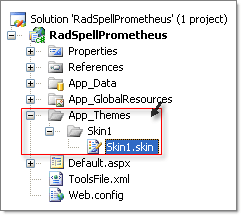
In your .skin file declare RadEditor with the tools that will be displayed in the RadEditor instances that use this theme. Set the SkinId property for the RadEditor. This will be referenced later in the RadEditor that uses the theme. In this example skin file the SkinId is "SomeTools".
<%@ register tagprefix="telerik" namespace="Telerik.Web.UI" assembly="Telerik.Web.UI" %>
<telerik:RadEditor RenderMode="Lightweight" ID="Radeditor1" runat="server" SkinID="SomeTools">
    <Tools>
        <telerik:EditorToolGroup>
            <telerik:EditorTool Name="Bold" />
            <telerik:EditorTool Name="Italic" />
        </telerik:EditorToolGroup>
    </Tools>
</telerik:RadEditor>
Once the skin is set, you need to declare the RadEditor and specify the SkinId property. You also need to set the Page Theme attribute. In the example below the Theme is named "Skin1" and the SkinId is "SomeTools".
<%@ page language="C#" autoeventwireup="true" codebehind="Default.aspx.cs" inherits="RadSpell._Default"
    theme="Skin1" %>

...
<telerik:RadEditor RenderMode="Lightweight" SkinID="SomeTools" Height="100px" runat="server" ID="RadEditor1">
</telerik:RadEditor>
Note: More information on how to use ASP.NET 2.x Themes is available in MSDN.