Overview
This help article showcases how to configure the layout of the RadCheckBoxList control via the Layout, Columns and Direction properties.
Layout
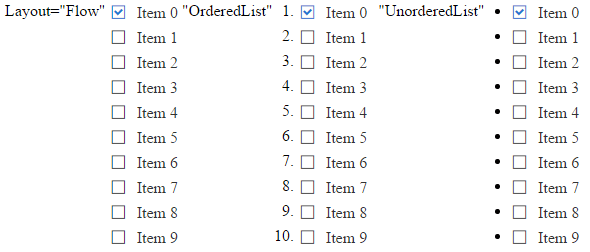
You can control whether the checkbox buttons will be rendered inside ul or li elements or without any elements. This behavior is controlled via the Layout property that takes Flow (default value), OrderedList and UnorderedList values.
You can see the output of Example 1 that shows different layouts of the control in Figure 1.
Example 1: Configure the Layout of RadCheckBoxList.
Layout="Flow"
<telerik:RadCheckBoxList ID="RadCheckBoxList1" runat="server" Layout="Flow">
</telerik:RadCheckBoxList>
"OrderedList"
<telerik:RadCheckBoxList ID="RadCheckBoxList2" runat="server" Layout="OrderedList">
</telerik:RadCheckBoxList>
"UnorderedList"
<telerik:RadCheckBoxList ID="RadCheckBoxList3" runat="server" Layout="UnorderedList">
</telerik:RadCheckBoxList>
protected void Page_Init(object sender, EventArgs e)
{
    for (int i = 0; i < 10; i++)
    {
        ButtonListItem rbli = new ButtonListItem() { Text = "Item " + i, Value = i.ToString() };
        if (i == 0) { rbli.Selected = true; }
        RadCheckBoxList1.Items.Add(rbli);
        RadCheckBoxList2.Items.Add(rbli);
        RadCheckBoxList3.Items.Add(rbli);
    }
}
Protected Sub Page_Init(sender As Object, e As EventArgs)
    For i As Integer = 0 To 9
        Dim rbli As New ButtonListItem() With { _
            Key .Text = "Item " & i, _
            Key .Value = i.ToString() _
        }
        If i = 0 Then
            rbli.Selected = True
        End If
        RadCheckBoxList1.Items.Add(rbli)
        RadCheckBoxList2.Items.Add(rbli)
        RadCheckBoxList3.Items.Add(rbli)
    Next
End Sub
Figure 1: Compare different layouts of RadCheckBoxList.
Columns
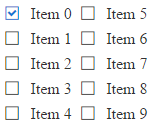
Checkbox buttons inside the RadCheckBoxList are rendered inside a single column by default. You can change this behavior using the Columns property. You can see a sample in Example 2 and the output in Figure 2.
Example 2: The code that shows how to display checkbox buttons in two columns.
<telerik:RadCheckBoxList ID="RadCheckBoxList1" runat="server" Layout="Flow" Columns="2">
</telerik:RadCheckBoxList>
protected void Page_Init(object sender, EventArgs e)
{
    for (int i = 0; i < 10; i++)
    {
        ButtonListItem rbli = new ButtonListItem() { Text = "Item " + i, Value = i.ToString() };
        if (i == 0) { rbli.Selected = true; }
        RadCheckBoxList1.Items.Add(rbli);
    }
}
Protected Sub Page_Init(sender As Object, e As EventArgs)
    For i As Integer = 0 To 9
        Dim rbli As New ButtonListItem() With { _
            Key .Text = "Item " & i, _
            Key .Value = i.ToString() _
        }
        If i = 0 Then
            rbli.Selected = True
        End If
        RadCheckBoxList1.Items.Add(rbli)
    Next
End Sub
Figure 2: Display checkbox buttons in two columns.
Direction
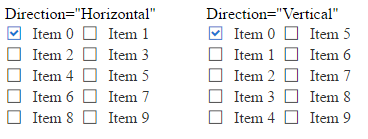
You can control the direction in which checkbox buttons are displayed within the groups via the Direction property (the output of Example 3 is shown in Figure 3).
Example 3: Configure horizontal and vertical direction for checkbox buttons.
Direction="Horizontal"
<telerik:RadCheckBoxList ID="RadCheckBoxList1" runat="server" Layout="Flow" Columns="2" Direction="Horizontal">
</telerik:RadCheckBoxList>
Direction="Vertical"
<telerik:RadCheckBoxList ID="RadCheckBoxList2" runat="server" Layout="Flow" Columns="2" Direction="Vertical">
</telerik:RadCheckBoxList>
protected void Page_Init(object sender, EventArgs e)
{
    for (int i = 0; i < 10; i++)
    {
        ButtonListItem rbli = new ButtonListItem() { Text = "Item " + i, Value = i.ToString() };
        if (i == 0) { rbli.Selected = true; }
        RadCheckBoxList1.Items.Add(rbli);
        RadCheckBoxList2.Items.Add(rbli);
    }
}
Protected Sub Page_Init(sender As Object, e As EventArgs)
    For i As Integer = 0 To 9
        Dim rbli As New ButtonListItem() With { _
            Key .Text = "Item " & i, _
            Key .Value = i.ToString() _
        }
        If i = 0 Then
            rbli.Selected = True
        End If
        RadCheckBoxList1.Items.Add(rbli)
        RadCheckBoxList2.Items.Add(rbli)
    Next
End Sub
Figure 3: Display checkbox buttons in different direction within the columns.