Tutorial Creating a Custom Skin
The following tutorial demonstrates creating a custom RadAsyncUpload skin, using the default skin as a base. This new skin will take the appearance of RadAsyncUpload and RadProgressDialog from their default look:
to something a little greener:

See Understanding the Skin CSS File for more information on specific CSS file properties.
Prepare the Project
In the Solution Explorer, double-click the Web.config file to open it for editing.
Under the <configuration> element, locate the <system.web> element. Add it if it does not exist.
Under the <system.web> element, locate the <httpModules> element. Add it if it does not exist.
In the <httpModules> element, add the following tag to register RadUploadHttpModule:
<add name="RadUploadModule" type="Telerik.Web.UI.RadUploadHttpModule" />
Under the <system.web> element, locate the <httpHandlers> element. Add it if it does not exist.
In the <httpHandlers> element, add the following tag to register RadUploadProgressHandler:
<add verb="*" path="Telerik.RadUploadProgressHandler.ashx" type="Telerik.Web.UI.RadUploadProgressHandler" />
- At this point, your web.config should look as follows:
<configuration>
    ...
    <system.web>
        <httpHandlers>
            <add verb="*" path="Telerik.RadUploadProgressHandler.ashx" type="Telerik.Web.UI.RadUploadProgressHandler" />
             ...
        </httpHandlers>
        <httpModules>
            <add name="RadUploadModule" type="Telerik.Web.UI.RadUploadHttpModule" />
            ...
        </httpModules>
            ...
    </system.web>
</configuration>
In the Solution Explorer, create a new "Green" directory in your project.
Copy the default RadAsyncUpload skin files from the installation directory to the "Green" directory; copy both the \AsyncUpload directory that contains the images for this skin and the AsyncUpload.Default.css file that defines the skin styles.
The file path will typically be similar to this example: \Program Files\Progress\UI for ASP.NET AJAX RX YYYY\Skins\Default.
In the Solution Explorer, rename "AsyncUpload.Default.css" to "AsyncUpload.Green.css".
Open Upload.Green.css and replace all instances of _Default with _Green. Then save the file.
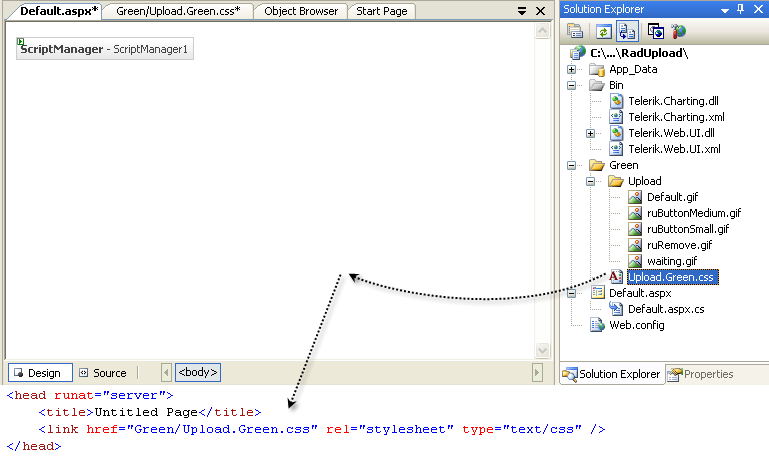
Drag the "Upload.Green.Css" file from the Solution Explorer onto your web page. This automatically adds a reference to the page "<head>" tag as a "<link>" to the new style sheet:
Drag a RadAsyncUpload control from the toolbox onto your webpage.
Set the ControlObjectsVisibility property to All.
Set the EnableEmbeddedSkins property to false.
Change the Skin property to Green.
Drag a RadProgressManager control from the toolbox onto your webpage.
Drag a RadProgressArea control from the toolbox onto your webpage.
Set the DisplayCancelButton property to true.
Set the EnableEmbeddedSkins property to false.
Change the Skin property to Green.
-
Drag a Button from the toolbox onto your webpage.
Change its Text property to Submit.
Assign the following Click event handler so that you can easily see the Progress dialog box:
protected void Button1_Click1(object sender, EventArgs e)
{
    if (RadUpload1.UploadedFiles.Count > 0)
    {
        System.Threading.Thread.Sleep(3000);
    }
}
Protected Sub Button1_Click(ByVal sender As Object, ByVal e As EventArgs) _Handles Button1.Click
    If RadUpload1.UploadedFiles.Count > 0 Then
        System.Threading.Thread.Sleep(3000)
    End If
End Sub
- Press F5 to run the application. Select a file and click the Submit button. The new "Green" skin should look just like the default skin
CSS Classes for RadAsyncUpload
- The skin CSS class that is applied to the <div> element which represents the rendered RadAsyncUpload control is RadUpload_Green. (This is also the class applied to the <div> element for RadProgressArea.) All other style definitions in the CSS files are qualified by this class. Within that top-level <div> element is an unordered list <ul> element, that handles the layout of the RadAsyncUpload control. This <ul> element has the ruInputs class applied. The default skin does not have a selector for the ruInputs class alone, which is why the default skin does not show the outlines of the entire RadAsyncUpload control. Add such a selector to your style sheet, giving it the following rules:
.RadUpload_Green .ruInputs { background:#cbecb0; padding: 5px 0 5px 5px;}
- The input area is actually a composite of a standard file input element sitting over a text box and button control that together simulate a file input element. This is done so that the skin CSS file has more control over styling the input area. The ruFakeInput class is applied to the text box.Locate the rule for this element and change the border color to "green" and the background to "#eeffee":
.RadUpload_Green .ruFakeInput
{
    height:19px;
    border:1px solid green;
    margin-right:-1px;
    padding-top:3px; color: #333;
    background: #eeffee;
}
- All of the buttons in the RadAsyncUpload control (and the RadProgressArea control, as well) have the ruButton class applied. Locate the selector for this class and add a green border, change the background from a URL to "#88ff88" and change the color to "green":
.RadUpload_Green .ruButton
{
    width:68px;
    height:25px;
    border:solid 1px green;
    margin-left:0.8em;
    padding:0;
    background : #88ff88;
    color: green;
    text-align:center;
}
Each button has an additional class applied that is specific to that type of button. These classes include ruCheck, ruBrowse, ruRemove, ruAdd, and ruDelete. The "Green" style sheet is not going to do anything special for different button types, so locate the selectors for .RadAsyncUpload_Green .ruBrowse and .RadaAsyncUpload_Green .ruRemove, and delete those class definitions.
The Add and Remove buttons appear inside a separate <li> element with the ruActions class applied. Locate the .RadUpload_Green .ruActions .ruButton selector. Remove the background rule from this class definition:
.RadUpload_Green .ruActions .ruButton { width:115px; margin:0 0.8em 0 0;}
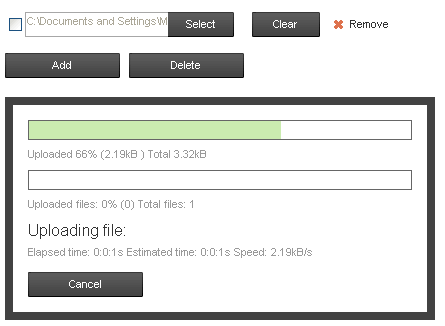
- Press F5 to run the application. The RadAsyncUpload control has its new appearance. Select a file and click the Submit button. Note that some of your changes affect the Cancel button in the progress dialog as well:
CSS Classes for RadProgressArea
- Like the RadAsyncUpload control, the RadProgressArea control is laid out using a <div> element with the RadAsyncUpload_Green class applied, and within that by a <ul> element. In the case of RadProgressArea, however, the <ul> element has the ruProgress class applied instead of the ruInputs class. Locate the rule for this class, change the background color to "#efe", change the border to green, and reduce its width to 4px:
.RadUpload_Green .ruProgress { border:4px solid Green; background:#efe; padding:15px;}
- Locate the RadAsyncUpload_Green .ruProgress li selector. This class is applied to the rows of the Progress dialog box. Change the color to "green":
.RadUpload_Green .ruProgress li { margin:0 0 0.8em; color:green;}
- Each row in the Progress dialog box has its own style class, which is assigned to the <li> element. Locate the element for the row with the current file name, which has the ruCurrentFile class (.radAsyncUpload_Green .ruProgress li.ruCurrentFile). Change the color to "#0b0" and reduce the font-size to 14px:
.RadUpload_Green .ruProgress li.ruCurrentFile { margin:0 0 0.3em; font-size:14px; color:#0b0;}
- The name of the current file is rendered using a <span> element inside the <li> element for the row. Locate the .radUpload_Green .ruProgress li.ruCurrentFile span selector. Use this rule to change the color to green and reduce the font size to 14 px:
.RadUpload_Green .ruProgress li.ruCurrentFile span { font-size:14px; color:green;}
- The progress bars are rendered using two nested <div> elements. The outer <div> has the ruBar class applied. Locate the .RadUpload_Green .ruProgress .ruBar selector. Change the border to green and add a white background:
.RadUpload_Green .ruProgress .ruBar
{
    margin-bottom:0.4em;
    border:1px solid green;
    height:18px;
    background: white;
}
- Press F5 to run the application to see the effect of your changes:
For more information about cascading style sheets (CSS), see