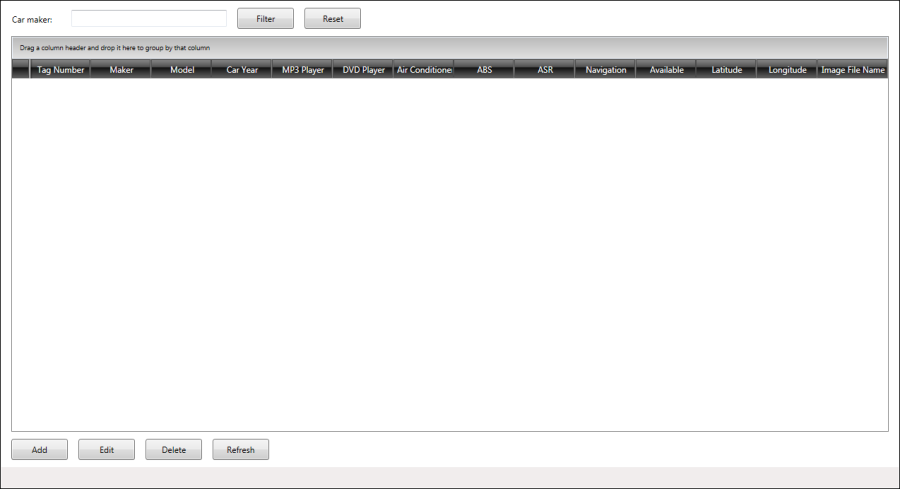
Defining the User Interface of MainWindow
In this step you will add the UI controls to MainWindow

-
In the XAML view of MainWindow, in the opening Window tag add the namespace for Telerik UI for WPF:
xmlns:telerik="http://schemas.telerik.com/2008/xaml/presentation" -
In the opening tag of the Window element__ set the Title to be Sofia Car Rental. Set the MinHeight and Height to 720. Set the MinWidth and Width to be 1280.
Title="Sofia Car Rental" Height="720" Width="1280" MinHeight="720" MinWidth="1280" -
Withing the Window element add the following Resources:
<Window.Resources> <local:NullableBooleanConverter x:Key="booleanConverter" /> <Style x:Key="checkBoxColStyle" TargetType="telerik:GridViewCell"> <Setter Property="HorizontalContentAlignment" Value="Center" /> </Style> </Window.Resources> -
In the Window element add a Grid layout element with one column and four rows:
<Grid HorizontalAlignment="Stretch" VerticalAlignment="Stretch" Width="Auto"> <Grid.ColumnDefinitions> <ColumnDefinition Width="*"/> </Grid.ColumnDefinitions> <Grid.RowDefinitions> <RowDefinition Height="50"/> <RowDefinition /> <RowDefinition Height="50"/> <RowDefinition Height="30"/> </Grid.RowDefinitions> </Grid> -
In the first row of the Grid layout add a Label with content Car maker:
<Label Grid.Row="0" Grid.Column="0" HorizontalAlignment="Left" Margin="11,13,0,10" > Car maker:</Label> -
In the first row of the Grid layout add a TextBox and bind it to property named CarMakerFilter with TwoWay mode:
<TextBox Grid.Row="0" Grid.Column="0" HorizontalAlignment="Left" Margin="100,13,0,13" Width="220" Text="{Binding Path=CarMakerFilter, Mode=TwoWay}"/> -
In the first row of the Grid layout add two Buttons with content Filter and Reset. Bind them to properties FilterCarsCommand and ResetFilterCommand respectively:
<Button Grid.Row="0" Grid.Column="0" HorizontalAlignment="Left" Margin="335,10,0,10" Width="80" Content="Filter" Command="{Binding Path=FilterCarsCommand}"/> <Button Grid.Row="0" Grid.Column="0" HorizontalAlignment="Left" Margin="430,10,0,10" Width="80" Content="Reset" Command="{Binding Path=ResetFilterCommand}"/> -
In the second row of the Grid layout add a RadGridView. Bind its ItemSource to property CarsToDisplay in OneWay mode and its SelectedItem to property SelectedCar in TwoWay mode:
<telerik:RadGridView Grid.Row="1" Grid.Column="0" HorizontalAlignment="Stretch" Margin="15,0,15,0" CanUserDeleteRows="False" CanUserInsertRows="False" IsReadOnly="True" IsFilteringAllowed="False" ScrollViewer.HorizontalScrollBarVisibility="Hidden" ColumnWidth="*" SelectionMode="Single" SelectionUnit="FullRow" AutoGenerateColumns="False" GroupRenderMode="Flat" AutoExpandGroups="True" IsSynchronizedWithCurrentItem="True" ItemsSource="{Binding Path=CarsToDisplay, Mode=OneWay}" SelectedItem="{Binding Path=SelectedCar, Mode=TwoWay}"> </telerik:RadGridView> -
In the RadGridView element, you will need to define the columns which will be displayed as well as their bindings:
<telerik:RadGridView.Columns> <telerik:GridViewDataColumn TextAlignment="Left" HeaderTextAlignment="Center" DataMemberBinding="{Binding Path=TagNumber, Mode=OneWay}" Header="Tag Number"/> <telerik:GridViewDataColumn TextAlignment="Left" HeaderTextAlignment="Center" DataMemberBinding="{Binding Path=Make, Mode=OneWay}" Header="Maker"/> <telerik:GridViewDataColumn TextAlignment="Left" HeaderTextAlignment="Center" DataMemberBinding="{Binding Path=Model, Mode=OneWay}" Header="Model"/> <telerik:GridViewDataColumn TextAlignment="Right" HeaderTextAlignment="Center" DataMemberBinding="{Binding Path=CarYear, Mode=OneWay}" Header="Car Year"/> <telerik:GridViewCheckBoxColumn TextAlignment="Center" HeaderTextAlignment="Center" DataMemberBinding="{Binding Path=Mp3Player, Mode=OneWay, Converter={StaticResource ResourceKey=booleanConverter}}" Header="MP3 Player" CellStyle="{StaticResource ResourceKey=checkBoxColStyle}"/> <telerik:GridViewCheckBoxColumn TextAlignment="Center" HeaderTextAlignment="Center" DataMemberBinding="{Binding Path=DVDPlayer, Mode=OneWay, Converter={StaticResource ResourceKey=booleanConverter}}" Header="DVD Player" CellStyle="{StaticResource ResourceKey=checkBoxColStyle}"/> <telerik:GridViewCheckBoxColumn TextAlignment="Center" HeaderTextAlignment="Center" DataMemberBinding="{Binding Path=AirConditioner, Mode=OneWay, Converter={StaticResource ResourceKey=booleanConverter}}" Header="Air Conditioner" CellStyle="{StaticResource ResourceKey=checkBoxColStyle}"/> <telerik:GridViewCheckBoxColumn TextAlignment="Center" HeaderTextAlignment="Center" DataMemberBinding="{Binding Path=ABS, Mode=OneWay, Converter={StaticResource ResourceKey=booleanConverter}}" Header="ABS" CellStyle="{StaticResource ResourceKey=checkBoxColStyle}"/> <telerik:GridViewCheckBoxColumn TextAlignment="Center" HeaderTextAlignment="Center" DataMemberBinding="{Binding Path=ASR, Mode=OneWay, Converter={StaticResource ResourceKey=booleanConverter}}" Header="ASR" CellStyle="{StaticResource ResourceKey=checkBoxColStyle}"/> <telerik:GridViewCheckBoxColumn TextAlignment="Center" HeaderTextAlignment="Center" DataMemberBinding="{Binding Path=Navigation, Mode=OneWay, Converter={StaticResource ResourceKey=booleanConverter}}" Header="Navigation" CellStyle="{StaticResource ResourceKey=checkBoxColStyle}"/> <telerik:GridViewCheckBoxColumn TextAlignment="Center" HeaderTextAlignment="Center" DataMemberBinding="{Binding Path=Available, Mode=OneWay, Converter={StaticResource ResourceKey=booleanConverter}}" Header="Available" CellStyle="{StaticResource ResourceKey=checkBoxColStyle}"/> <telerik:GridViewDataColumn TextAlignment="Right" HeaderTextAlignment="Center" DataMemberBinding="{Binding Path=Latitude, Mode=OneWay}" DataFormatString="{}{0:f6}" Header="Latitude"/> <telerik:GridViewDataColumn TextAlignment="Right" HeaderTextAlignment="Center" DataMemberBinding="{Binding Path=Longitude, Mode=OneWay}" DataFormatString="{}{0:f6}" Header="Longitude"/> <telerik:GridViewDataColumn MinWidth="100" TextAlignment="Left" HeaderTextAlignment="Center" DataMemberBinding="{Binding Path=ImageFileName, Mode=OneWay}" Header="Image File Name"/> </telerik:RadGridView.Columns> -
In the third row of the Grid layout add four Buttons with content Add, Edit, Delete and Refresh. Bind them to properties AddCarCommand, EditCarCommand, DeleteCarCommand and RefreshCommand respectively:
<Button Grid.Row="2" Grid.Column="0" HorizontalAlignment="Left" Margin="15,10,0,10" Width="80" Content="Add" Command="{Binding Path=AddCarCommand}"/> <Button Grid.Row="2" Grid.Column="0" HorizontalAlignment="Left" Margin="110,10,0,10" Width="80" Content="Edit" Command="{Binding Path=EditCarCommand}"/> <Button Grid.Row="2" Grid.Column="0" HorizontalAlignment="Left" Margin="205,10,0,10" Width="80" Content="Delete" Command="{Binding Path=DeleteCarCommand}"/> <Button Grid.Row="2" Grid.Column="0" HorizontalAlignment="Left" Margin="300,10,10,10" Width="80" Content="Refresh" Command="{Binding Path=RefreshCommand}"/> -
In the fourth row of the Grid layout add a StatusBar with a Label inside it. The label should be bound to property Status in OneWay mode:
<StatusBar Grid.Column="0" Grid.Row="3" Grid.ColumnSpan="6"
           Height="30">
    <Label Content="{Binding Path=Status, Mode=OneWay}"/>
</StatusBar>
