Preparing the Windows Forms Project
The WinForms project will have two different forms in it - one to display, filter and delete cars in the database, the other to add new cars or edit existing ones. In this step you will create and setup a new Windows Forms project and add the required RadControls controls to the forms.
Preparing the project:
- Add to your solution a new Windows Forms Application and name it SofiaCarRental.Forms.
- Integrate the Telerik.DataAccess.Core NuGet package with the SofiaCarRental.Forms project.
- Add a reference to SofiaCarRental.Model in the SofiaCarRental.Forms project.
-
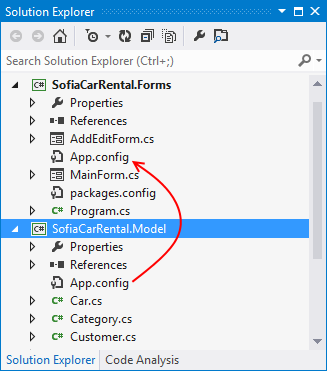
Copy the App.config file from the model SofiaCarRental.Model to the WinForms project SofiaCarRental.Forms.

Remove the default form Form1 from the project.
- Add a new RadForm named MainForm to the project.
- Add a new RadForm named AddEditForm to the project.
-
Set MainForm to be the startup form for the project:
-
For C#, go to Program.cs, in the Main() method, initialize MainForm in the call to Application.Run():
[STAThread]
static void Main()
{
    Application.EnableVisualStyles();
    Application.SetCompatibleTextRenderingDefault(false);
    Application.Run(new MainForm());
}
For VB.NET, open the properties window of the project, in the Application select MainForm from the Startup form dropdown list.
-
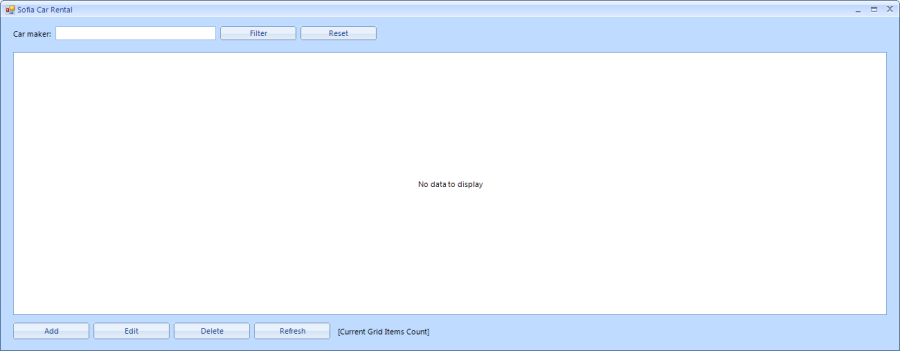
Defining the user interface of MainForm

- Add two RadLabels to the form. From the properties window, Change the Text of one of the labels to Car maker:. For the other label change the Name property to lblResultCount.
- Add a RadTextBoxControl to the form. In the Properties window name it rtbCarMaker.
- Add a RadButton to the form. Change its Name property to rbtnFilterByMaker and its Text property to Filter.
- Add a RadButton to the form. Change its Name property to rbtnResetFilter and its Text property to Reset.
- Add a RadButton to the form. Change its Name property to rbtnAddCar and its Text property to Add.
- Add a RadButton to the form. Change its Name property to rbtnEditCar and its Text property to Edit.
- Add a RadButton to the form. Change its Name property to rbtnDeleteCar and its Text property to Delete.
- Add a RadButton to the form. Change its Name property to rbtnRefresh and its Text property to Refresh.
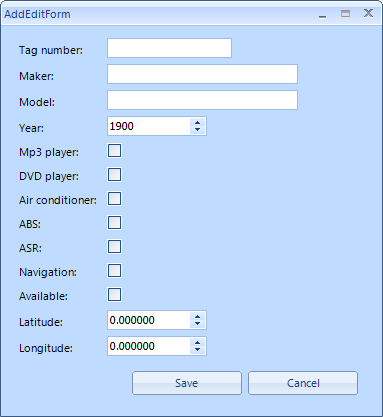
Defining the user interface of AddEditForm:

- Add a RadLabel to the form. Change its Text property to Tag number:. Next to the label, add a RadTextBoxControl. Change its Name property to rtbTagNumber.
- Add a RadLabel to the form. Change its Text property to Maker:. Next to the label, add a RadTextBoxControl. Change its Name property to rtbMaker.
- Add a RadLabel to the form. Change its Text property to Model:. Next to the label, add a RadTextBoxControl. Change its Name property to rtbModel.
- Add a RadLabel to the form. Change its Text property to Year:. Next to the label, add a RadSpinEditor. Change its Name property to rseCarYear. Set its DecimalPlaces property to 0 and its Increment property to 1. Set the Maximum and Minimum properties to 1900 and 2100 respectively.
- Add a RadLabel to the form. Change its Text property to Mp3 player:. Next to the label, add a RadCheckBox. Change its Name property to rcbMp3 and clear its Text property.
- Add a RadLabel to the form. Change its Text property to DVD player:. Next to the label, add a RadCheckBox. Change its Name property to rcbDvd and clear its Text property.
- Add a RadLabel to the form. Change its Text property to Air conditioner:. Next to the label, add a RadCheckBox. Change its Name property to rcbAirCond and clear its Text property.
- Add a RadLabel to the form. Change its Text property to ABS:. Next to the label, add a RadCheckBox. Change its Name property to rcbAbs and clear its Text property.
- Add a RadLabel to the form. Change its Text property to ASR:. Next to the label, add a RadCheckBox. Change its Name property to rcbAsr and clear its Text property.
- Add a RadLabel to the form. Change its Text property to Navigation:. Next to the label, add a RadCheckBox. Change its Name property to rcbNavigation and clear its Text property.
- Add a RadLabel to the form. Change its Text property to Available:. Next to the label, add a RadCheckBox. Change its Name property to rcbAvailable and clear its Text property.
- Add a RadLabel to the form. Change its Text property to Latitude:. Next to the label , add a RadSpinEditor. Change its Name property to rseLatitude, set its DecimalPlaces property to 6, set its Increment property to 0.000001 and finally, set the Maximum and Minimum properties to 100 and -100 respectively.
- Add a RadLabel to the form. Change its Text property to Longitude:. Next to the label , add a RadSpinEditor. Change its Name property to rseLongitude, set its DecimalPlaces property to 6, set its Increment property to 0.000001 and finally, set the Maximum and Minimum properties to 100 and -100 respectively.
- Add a RadButton to the form. Set its Name property to rbtnSave and its Text property to Save. Set the DialogResult property to OK.
- Add a RadButton to the form. Set its Name property to rbtnCancel and its Text property to Cancel. Set the DialogResult property to Cancel.
