Creating a New Web Application
In this tutorial, you will create a new ASP.NET Web Application that you can use as a starting point for your application.
- Start Visual Studio, on the File menu select New, and then select Project.
- In the New Project dialog box, select Visual Basic or Visual C# as the programming language.
-
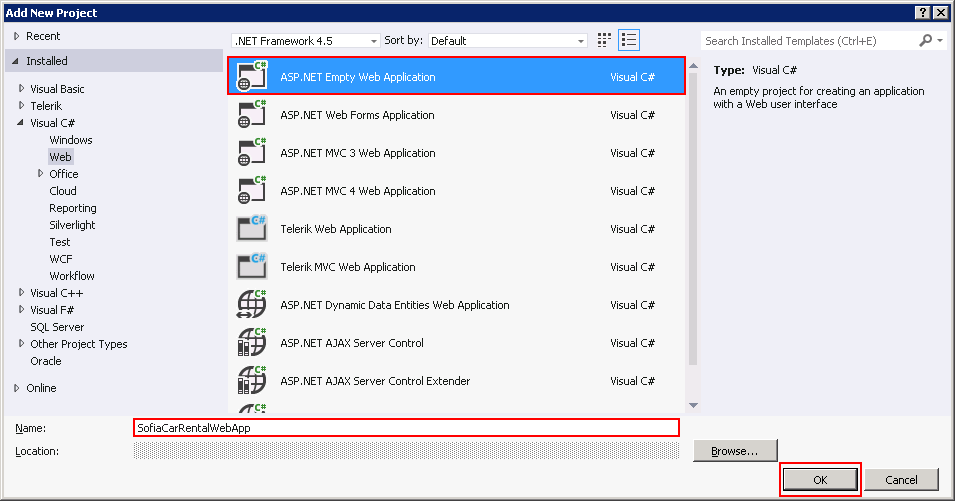
In the Templates pane, select ASP.NET Empty Web Application, and name the project SofiaCarRentalWebApp.

Click OK to create the solution and the project.
- Add a Global Application Class file (Global.asax) to the project.
- Add a new web form called Default to the project.
- Integrate the Telerik.DataAccess.Core NuGet package with the SofiaCarRentalWebApp project.
- Following the steps in the Creating The SofiaCarRental Model tutorial, create the SofiaCarRental.Model project, which holds the fluent model.
- In the SofiaCarRentalWebApp project, add a reference to the SofiaCarRental.Model project.
-
Copy the SofiaCarRentalConnection connection string from the App.config file of the SofiaCarRental.Model project to the Web.config file of the SofiaCarRentalWebApp project.
<connectionStrings>
   <add name="SofiaCarRentalConnection"
        connectionString="data source=.\sqlexpress;
                          initial catalog=SofiaCarRental_v2.2;
                          integrated security=True"
        providerName="System.Data.SqlClient" />
</connectionStrings>
Select the Telerik.OpenAccess.dll reference in the SofiaCarRentalWebApp and press F4 to open the Properties pane. Set the Copy Local property to True.
- Build the Solution.
In this task, you created a new ASP.NET Web Application and the SofiaCarRental fluent model. Next, you will start implementing the user interface.
