IIS Deployment
This topic describes the steps you must perform to deploy your ASP.NET application to a Web server.
Confirm that the .NET Framework Platform is Installed on the Web Server
The .NET Framework must be installed on the Web Server for an ASP.NET application to work. Note that you have to install the same version (or later) as the version used by your application. In this example, .NET Framework version 4.5 is used.
Deploying ASP.NET Web Applications with Telerik Data Access
You are not required to install Telerik Data Access on your web server. You can just deploy the runtime assemblies in the \bin folder of your web application. For example, in order to deploy the SofiaCarRentalWebApp application to a web server (e.g. IIS), you need to ensure that the following Telerik Data Access assemblies are copied in the \bin folder:
- Telerik.OpenAccess.dll
- Telerik.OpenAccess.35.Extensions.dll
- Telerik.OpenAccess.40.Extensions.dll
- Telerik.OpenAccess.Config.dll
- Telerik.OpenAccess.Web.40.dll
- Telerik.OpenAccess.Runtime.dll
If any of the assemblies are not copied in the \bin folder, you have to deploy them manually, e.g. copy+paste from the Telerik Data Access installation folder. If you use any additional third party libraries, you need to ensure that they are also deployed in the \bin folder. In this example, RadControls for ASP.NET AJAX are used. That's why, the Telerik.Web.UI.dll assembly should be deployed in the \bin folder (it is deployed by default).
To deploy the SofiaCarRentalWebApp to IIS you can perform the following procedure:
- Open the IIS Manager.
- In the Connections pane, expand the Sites node.
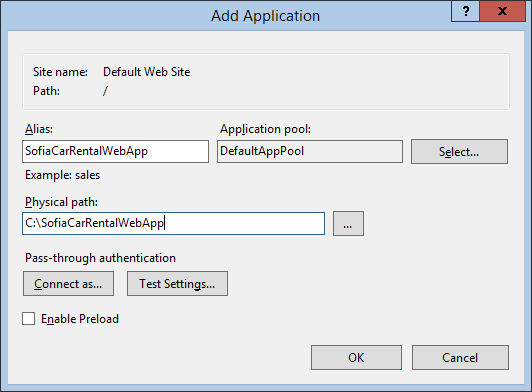
- Right-click the site (e.g., Default Web Site) for which you want to create the application, and click Add Application.
- In the Alias text field, type a value for the application URL, e.g. SofiaCarRentalWebApp. This value is used to access the application in a URL.
- If you want to select a different application pool than the one listed in the Application pool box, click the Select button. In case of this example, the Default application pool is used.
-
In the Physical path text box, type the physical path of the application's folder, or click the browse button to navigate the file system to find the folder.

Click OK.
To test the application:
- In the Connections pane, select your application.
- Right-click it, point Manage Application and then Browse.
- Go to http://localhost/SofiaCarRentalWebApp/Default.aspx.
Ensure that the Database is Deployed on the Web Server
The next step is to ensure that the database (e.g. SofiaCarRental) is deployed on the web server. Also you may need to adjust the connection string in the configuration file.
Fixing Error "Cannot read configuration file due to insufficient permissions"
By default, the worker process identity (your application pool user) and/or the IIS_IUSRS group requires at least Read access to the application directory as well as the web.config file. You need to add rights for this user to the application directory:
- In Windows Explorer, locate the application directory.
- Right-click it and select Properties.
- Navigate to the Security tab, and then click Edit. In the Permissions for SofiaCarRentalWebApp dialog, click Add.
- In the Enter the object names to select box, type ComputerName\IIS_IUSRS, click Check Names, and then click OK. Note "ComputerName" is a placeholder for the computer name.
- Ensure that the Read check box is selected, and then click OK.
- In the "Application Folder" Properties dialog box, click OK.
Test your application again. If you still experience the same "access denied" error, perform the procedure for the web.config file and try again. If the problem persists, you can run the Process Monitor Tool to trace the "Access Denied" error and see when and who is trying to access config file.
Fixing Error "Unrecognized attribute 'targetFramework'. Note that attribute names are case-sensitive."
This error typically occurs when you have an attribute of targetFramework="4.0" (or 4.5), but the Application Pool for your site is configured for .NET Framework Version = v2.0.XXXXX. To fix this error, you need to switch your Application Pool to .NET 4.0. Note that there is no 4.5 application pool. You can use any .NET 4.5 application in the 4.0 app pool, just ensure that .NET Framework 4.5 is installed on the server machine. If you use the default Application Pool like in this example:
- Open the IIS Manager.
- In the Connections pane, select Application Pools.
- Right-click DefaultAppPool and select Basic Settings....
- In the Edit Application Pool dialog, select .NET Framework v4.0.XXXXX.
- Click OK and test your application again.
Fixing Error "Cannot open database "DabaseName" requested by the login. The login failed. Login failed for user 'IIS APPPOOL\DefaultAppPool'."
If you are using "Integrated Security=True" in your connection string for your "LocalSqlServer" connection (the connection to the database that your authentication service is using), then it is possible to have security issues when deploying your ASP.NET application. When you are running the ASP.NET application under Visual Studio 2010/2012, the personated user is you, i.e. the current windows login user. But when you deploy the ASP.NET application to IIS, unless you set a valid windows user as the user that your Application connects as, the personated user is the Network Service. In this situation there are two possible solutions:
- Add login for the "IIS APPPOOL\DefaultAppPool" to your server. After that give read/write permissions for "IIS APPPOOL\DefaultAppPool" to the target database. Note that "DefaultAppPool" is the Application Pool for your web application. In this example, this is the Default Application Pool.
- Change the connection string to use SQL authentication instead of Windows authentication.
Fixing Problem with CSS/Script Redirection with HTTP 302
If the deployed ASP.NET Application cannot load css and script files, you need to exclude them from getting authenticated as follow:
- In the IIS Manager, click on your application, then double-click the Authentication button.
- Click on Anonymous Authentication, then click the Edit... link on the right side.
- Make sure the Application pool identity option is selected.
