Inserting Data
In this task, you will modify CRUDPage.html to support insert operations.
- Open CRUDPage.html.
-
Configure the DataSource for remote Create operations. Note that the resource you will use is the same - /api/categories. However, the type of the operation is set to POST.
var categoriesDataSource = new kendo.data.DataSource( { transport: { read: { url: "/api/categories", dataType: "json" }, create: { url: "/api/categories", dataType: "json", type: "POST" } }, // schema configuration.... }); -
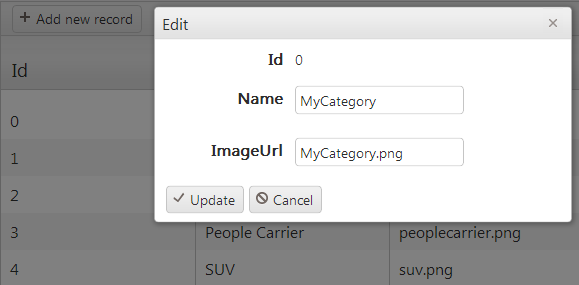
Set the Kendo UI grid editable configuration option to popup. Additionally, to enable new records insertion the grid toolbar should be configured.
$("#grid").kendoGrid({ dataSource: categoriesDataSource, columns: [ { field: "CategoryID", title: "Id" }, { field: "CategoryName", title: "Name" }, { field: "ImageFileName", title: "ImageUrl" }], toolbar: ["create"], editable: "popup" }); -
To test the HTML page, right-click CRUDPage.html in Solution Explorer and select View in Browser.

The complete Javascript for the ready() event is listed below:
$(document).ready(function () {
   var categoriesDataSource = new kendo.data.DataSource(
       {
           transport: {
               read: {
                   url: "/api/categories",
                   dataType: "json"
               },
               create: {
                   url: "/api/categories",
                   dataType: "json",
                   type: "POST"
               }
           },
           // schema configuration....
           schema: {
               model: {
                   id: "CategoryID",
                   fields: {
                       CategoryID: {
                           editable: false,
                           nullable: false,
                           type: "number"
                       },
                       CategoryName: {
                           type: "string",
                           validation: { required: true }
                       },
                       ImageFileName: {
                           type: "string",
                           validation: { required: true }
                       },
                   }
               }
           }
       });
   $("#grid").kendoGrid({
       dataSource: categoriesDataSource,
       columns: [
           {
               field: "CategoryID",
               title: "Id"
           },
           {
               field: "CategoryName",
               title: "Name"
           },
           {
               field: "ImageFileName",
               title: "ImageUrl"
           }],
       toolbar: ["create"],
       editable: "popup"
   });
})
In the next tutorial, you will modify the CRUDPage.html so it supports update operations.
