How to: Work with 2nd Level Cache in Distributed Environments
The purpose of this topic is to discuss how to work with the second level cache in distributed environment.
Working with 2nd Level Cache in Distributed Environment
When deployment scenarios exist with more than one application using the L2 cache for the same database (e.g. application server farm), then the various caches for the same database must be synchronized. Every modifying transaction sends its eviction requests to all participants in the L2 cache cluster. This communication is done in an asynchronous way. There is a time window, in which one L2 cache (process A) is already evicted but another L2 cache (process B) is not yet evicted. The size of the time window depends on the cache cluster implementation that is chosen.
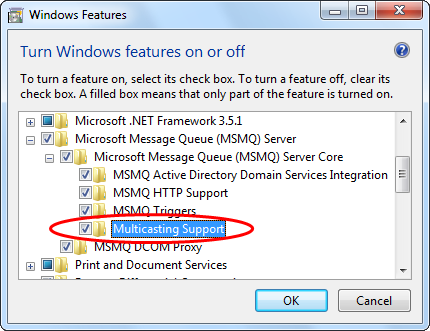
The L2 cache cluster implementation uses MSMQ for transporting eviction messages. This implementation was chosen as MSMQ supports multicast addressing, which is perfect for a cluster of unknown size. This implementation therefore, requires that MSMQ is available on all participating machines. MSMQ is an optional component of Windows. On Windows 7 and Windows Vista, this component can be installed by using Control Panel -> Programs and Features -> Turn Windows features on or off. You need to ensure that the Multicast Support is installed.
How to Enable 2nd Level Cache Cluster
To enable to cluster you need to override the OnDatabaseOpen method of OpenAccessContext in your implementation of the context class. You can use the following code:
- C#
- VB
protected override void OnDatabaseOpen( Telerik.OpenAccess.BackendConfiguration backendConfiguration,
   Telerik.OpenAccess.Metadata.MetadataContainer metadataContainer )
{
   backendConfiguration.SecondLevelCache.Enabled = true;
   backendConfiguration.SecondLevelCache.Synchronization.Enabled = true;
   backendConfiguration.SecondLevelCache.Synchronization.MulticastAddress =
        "224.1.1.1:666";
   backendConfiguration.SecondLevelCache.Synchronization.Name = "MSMQ";
   base.OnDatabaseOpen( backendConfiguration, metadataContainer );
}
Protected Overrides Sub OnDatabaseOpen(ByVal backendConfiguration As  _
    Telerik.OpenAccess.BackendConfiguration, _
    ByVal metadataContainer As  _
    Telerik.OpenAccess.Metadata.MetadataContainer)
    backendConfiguration.SecondLevelCache.Enabled = True
    backendConfiguration.SecondLevelCache.Synchronization.Enabled = True
    backendConfiguration.SecondLevelCache.Synchronization.MulticastAddress =
        "224.1.1.1:666"
    backendConfiguration.SecondLevelCache.Synchronization.Name = "MSMQ"
    MyBase.OnDatabaseOpen(backendConfiguration, metadataContainer)
End Sub
Having More Than One Network Interface Card
If you have more than one network interface card on the machine you are running the MSMQ, you might get into the problem that the MSMQ doesn't know which card to use. The MSMQ will start using a random card. A message like this will appear in your event log:
Message Queueing found multiple IP addresses for the local computer. Message Queueing will use the default IP address determined by the PGM driver for multicast messages. To use a different IP address, set the \HKLM\Software\Microsoft\MSMQ\Parameters\MulticastBindIP registry value to one of the following valid IP addresses: xxx.xxx.xxx.xxx.
You could solve this problem by setting the MulticastBindIP property in the registry. You could solve this problem by setting the MulticastBindIP property in the registry. Details can be found here.
Having No Connected Network Interface Cards
In case you don’t have a network connection, you usually cannot work with the MSMQ. To solve this, you could install a new "Microsoft Loopback Adapter" and the MSMQ will be able to work again. To do this perform the following steps:
- Run hdwwiz.exe from the command line.
- Select Install the hardware that I manually select from a list (Advanced). Click Next.
- Select Network Adapters. Click Next.
- From the Manufacturer list, select Microsoft. Then, from the Network Adapter list, select Microsoft Loopback Adapter. Click Finish.